<?xml version="1.0" encoding="utf-8"?>
<feed xmlns="http://www.w3.org/2005/Atom">
  <author>
    <name>Wei.G</name>
  </author>
  <generator uri="https://hexo.io/">Hexo</generator>
  <id>https://www.weigshare.com/</id>
  <link href="https://www.weigshare.com/" rel="alternate"/>
  <link href="https://www.weigshare.com/atom.xml" rel="self"/>
  <rights>All rights reserved 2026, Wei.G</rights>
  <subtitle>Cloud · AI · Python · DevOps</subtitle>
  <title>Wei.G Share Blog</title>
  <updated>2026-10-21T08:39:31.056Z</updated>
  <entry>
    <author>
      <name>Wei.G</name>
    </author>
    <category term="qBittorrent" scheme="https://www.weigshare.com/categories/qBittorrent/"/>
    <category term="qBittorrent" scheme="https://www.weigshare.com/tags/qBittorrent/"/>
    <category term="WebUI" scheme="https://www.weigshare.com/tags/WebUI/"/>
    <category term="NAS" scheme="https://www.weigshare.com/tags/NAS/"/>
    <category term="Docker" scheme="https://www.weigshare.com/tags/Docker/"/>
    <content>
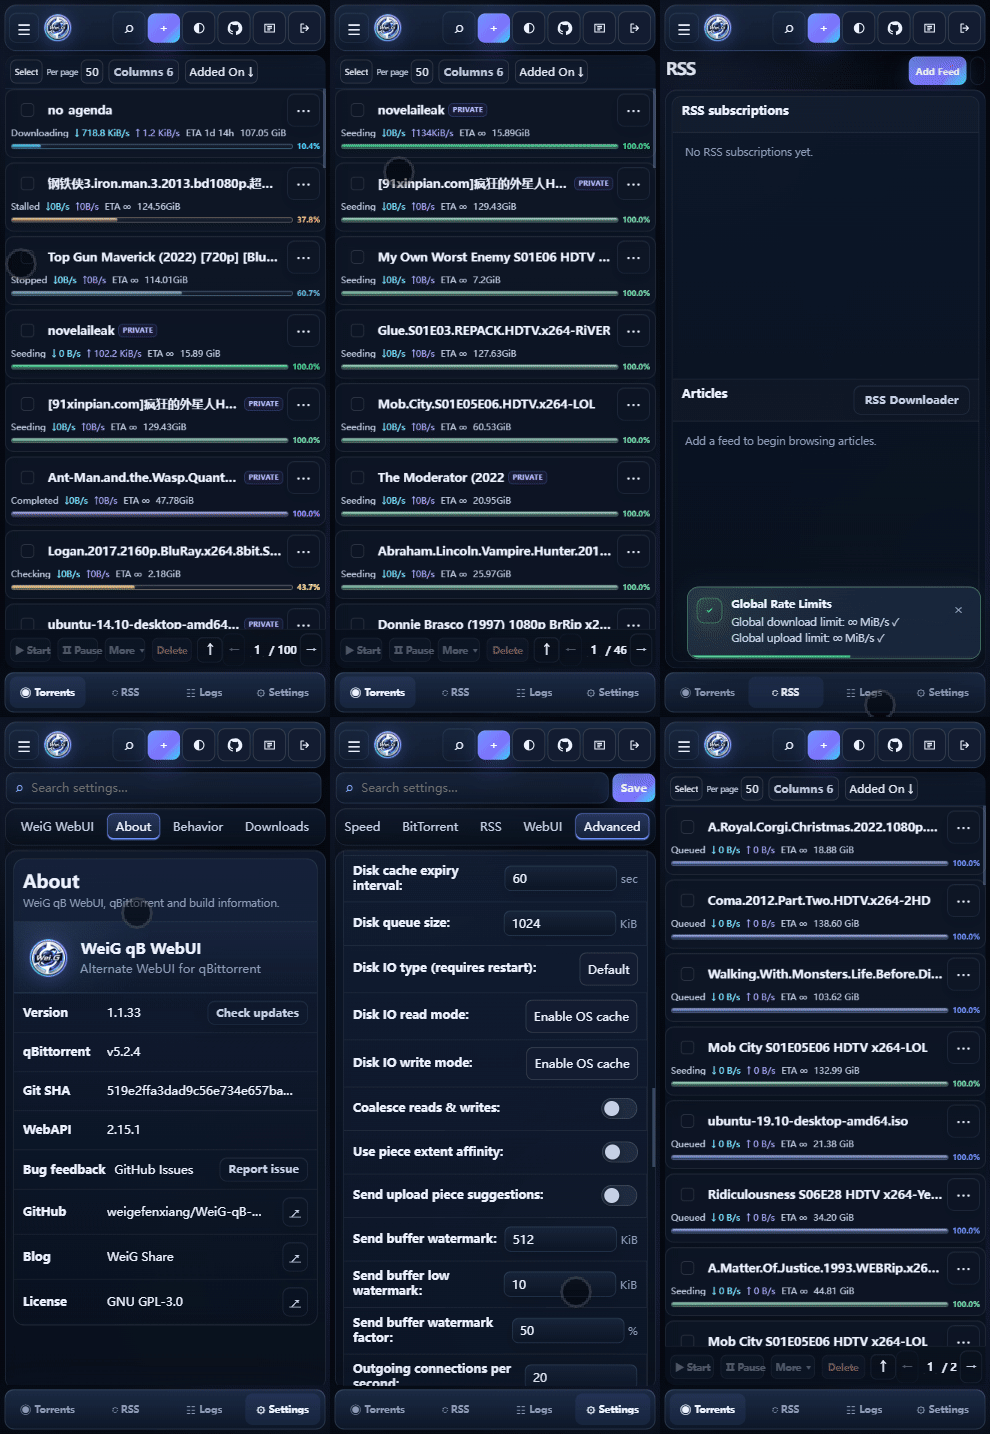
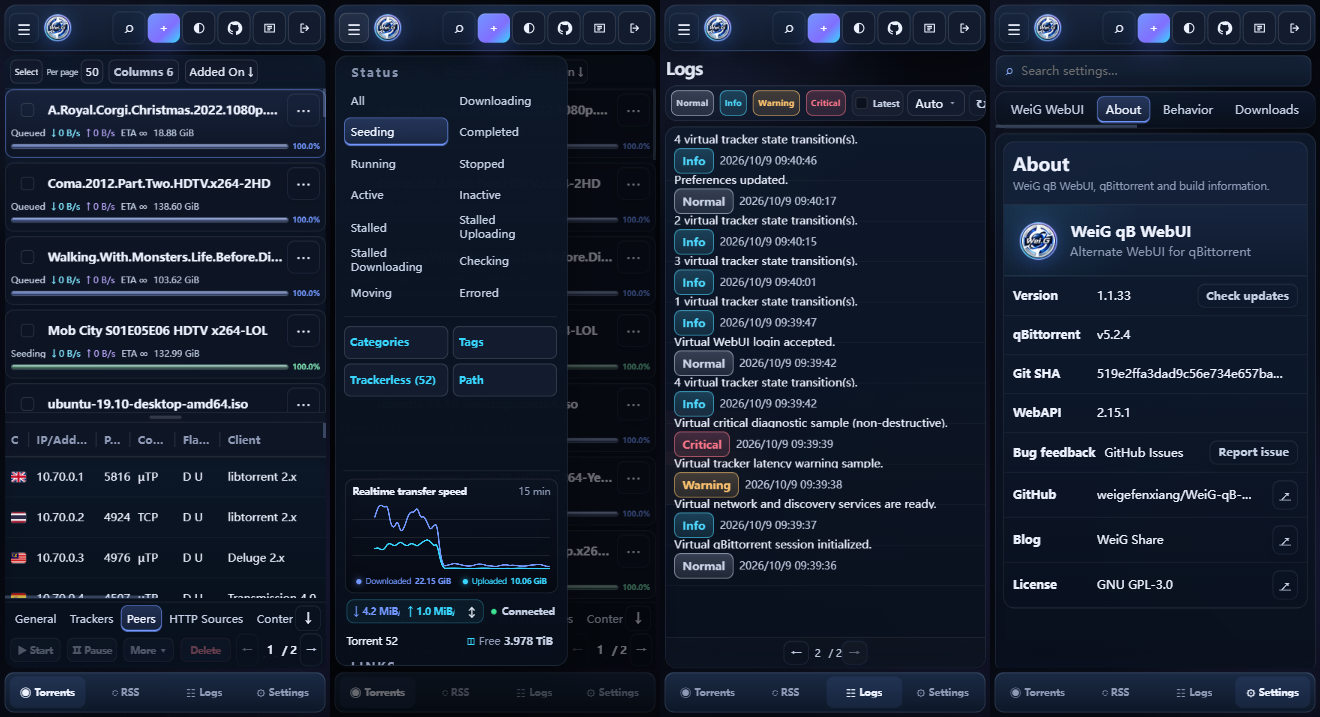
      <![CDATA[<p>如果你平常都是透過瀏覽器管理 qBittorrent，尤其是在 <strong>NAS、Docker 或手機</strong> 上使用，WeiG qB WebUI 可以讓日常操作舒服很多。<strong><a href="https://weigefenxiang.github.io/WeiG-qB-WebUI/">線上預覽</a></strong></p><p>大約七年前，我加入了幾個 PT 站。當時 NAS 上裝的是最新版 qBittorrent 4.1.9，沒想到一用就用到現在。</p><p>我也曾試過跨大版本升級（印象中是 4.2.5），結果用戶端裡的種子任務全都不見了，沒辦法正常做種。累積的種子太多，光是恢復就很麻煩。從那之後，只要系統運作穩定，我就不太敢隨便升級了。</p><p>畢業開始工作以後，坐在電腦前的時間愈來愈少，NAS 也大多直接用手機管理。可是 qBittorrent 原本的 WebUI 在手機上不太順手；我還試過幾款替代 WebUI，很多卻對舊版本支援得不理想。</p><p>於是就有了 WeiG qB WebUI。目前涵蓋 qBittorrent 4.1.x 到 5.2.x 的多個穩定版本。如果遇到相容性問題，或有改善建議，都歡迎留言交流。</p><p><strong>WeiG qB WebUI</strong> 是給 qBittorrent 使用的 <strong>替補 WebUI</strong>，同時照顧桌面與手機操作：</p><ul><li>📱 手機版自適應</li><li>🌙 暗夜模式</li><li>🧱 相容較舊的 qBittorrent 版本</li><li>✅ 支援 <strong>qBittorrent 4.1.x → 5.2.x</strong></li><li>🐳 適用於 Windows、Linux、Docker、NAS</li></ul><p><a href="https://github.com/weigefenxiang/WeiG-qB-WebUI">專案地址</a></p><div align="left" style="display:flex;gap:10px;flex-wrap:wrap;justify-content:left;">  <img src="https://img.shields.io/badge/-JavaScript-F7DF1E?logo=javascript&logoColor=black" alt="JavaScript">  <img src="https://img.shields.io/badge/-HTML5-E34F26?logo=html5&logoColor=white" alt="HTML5">  <img src="https://img.shields.io/badge/-CSS3-1572B6?logo=css3&logoColor=white" alt="CSS3">  <img src="https://img.shields.io/badge/-Node.js-339933?logo=nodedotjs&logoColor=white" alt="Node.js">  <img src="https://img.shields.io/badge/-Shell-8A2BE2?logo=gnubash&logoColor=white" alt="Shell"></div><h2 id="介面預覽"><a href="#介面預覽" class="headerlink" title="介面預覽"></a>介面預覽</h2><h3 id="桌面端"><a href="#桌面端" class="headerlink" title="桌面端"></a>桌面端</h3><p align="center">  <img src="https://img.weigshare.com/img/004.001.weig-qb-webui-desktop-overview.gif" alt="WeiG qB WebUI 桌面端介面" style="display:block;width:100%;max-width:900px;height:auto;margin:0 auto;"></p><h3 id="手機端"><a href="#手機端" class="headerlink" title="手機端"></a>手機端</h3><style>/* Scoped to the mobile preview in this article */.weig-qb-mobile-preview {  width: 100%;  container-type: inline-size;}.weig-qb-mobile-preview-images {  display: flex;  justify-content: center;  align-items: center;  flex-wrap: nowrap;  gap: 10px;  width: 100%;}.weig-qb-mobile-preview-images img {  display: block;  flex: 0 1 auto;  min-width: 0;  width: auto;  height: min(341px, 38cqw);  max-width: 100%;  object-fit: contain;}/* Stack when the article column is narrow */@container (max-width: 640px) {  .weig-qb-mobile-preview-images {    flex-direction: column;  }  .weig-qb-mobile-preview-images img {    flex: none;    width: auto;    height: auto;    max-width: 100%;    max-height: 341px;  }}</style><div class="weig-qb-mobile-preview">  <div class="weig-qb-mobile-preview-images">    <img src="https://img.weigshare.com/img/004.002.weig-qb-webui-mobile-overview.gif" alt="WeiG qB WebUI 手機操作動態示範">    <img src="https://img.weigshare.com/img/004.003.weig-qb-webui-mobile-overview.png" alt="WeiG qB WebUI 手機多畫面預覽">  </div></div><h2 id="新手安裝"><a href="#新手安裝" class="headerlink" title="新手安裝"></a>新手安裝</h2><details><summary><b>第一次安裝？點擊展開 1 分鐘教學</b></summary><h3 id="1-解壓縮"><a href="#1-解壓縮" class="headerlink" title="1. 解壓縮"></a>1. 解壓縮</h3><p>下載最新正式版 <a href="https://github.com/weigefenxiang/WeiG-qB-WebUI/releases/latest/download/weig-qb-webui.zip"><strong>weig-qb-webui.zip</strong></a>，解壓縮後就會直接得到以下資料夾結構，無須重新命名：</p><pre class="line-numbers language-text" data-language="text"><code class="language-text">weig-qb-webui/├── public/├── private/├── VERSION└── GIT_SHA<span aria-hidden="true" class="line-numbers-rows"><span></span><span></span><span></span><span></span><span></span></span></code></pre><p>整個 <strong><code>weig-qb-webui</code> 資料夾</strong>就是 WebUI 根目錄，不要只複製 <code>public</code> 或 <code>private</code>。</p><h3 id="2-放到固定位置"><a href="#2-放到固定位置" class="headerlink" title="2. 放到固定位置"></a>2. 放到固定位置</h3><p>把整個 <code>weig-qb-webui</code> 資料夾移到之後不會隨便刪除的位置，例如：</p><pre class="line-numbers language-text" data-language="text"><code class="language-text">Windows：D:\weig-qb-webuiLinux：  /opt/weig-qb-webui<span aria-hidden="true" class="line-numbers-rows"><span></span><span></span></span></code></pre><p>之後 qBittorrent 要填寫的就是這個目錄。</p><h3 id="3-在-qBittorrent-中啟用"><a href="#3-在-qBittorrent-中啟用" class="headerlink" title="3. 在 qBittorrent 中啟用"></a>3. 在 qBittorrent 中啟用</h3><p>開啟 qBittorrent：</p><p><strong>工具 → 選項… → WebUI</strong></p><p>這是 qBittorrent 目前繁體中文官方用語。接著：</p><ol><li>勾選 <strong>使用替補 WebUI</strong>。</li><li>找到 <strong>檔案位置：</strong>。</li><li>填入剛才儲存的 <code>weig-qb-webui</code> 資料夾路徑。</li></ol><p>Windows 範例：</p><pre class="line-numbers language-text" data-language="text"><code class="language-text">D:\weig-qb-webui<span aria-hidden="true" class="line-numbers-rows"><span></span></span></code></pre><p>一般 Linux 範例：</p><pre class="line-numbers language-text" data-language="text"><code class="language-text">/opt/weig-qb-webui<span aria-hidden="true" class="line-numbers-rows"><span></span></span></code></pre><ol start="4"><li>按一下 <strong>確定</strong> 儲存設定。</li><li>重新整理 qBittorrent WebUI 頁面。如果瀏覽器仍顯示舊頁面，可再按一次 <code>Ctrl + F5</code> 強制重新整理。</li></ol><blockquote><p><strong>怎麼判斷路徑填對了？</strong> 你填寫的目錄裡應該能直接看到 <code>public</code>、<code>private</code>、<code>VERSION</code> 等檔案&#x2F;目錄。如果還要再進入一層 <code>weig-qb-webui</code> 才能看到這些內容，表示路徑多填或少填了一層。</p></blockquote><blockquote><p><strong>Docker 使用者注意：</strong> qBittorrent 執行在容器裡，因此這裡通常不能直接填宿主機上的真實路徑。Docker 的「宿主機 &#x2F; 容器」差異與正確路徑寫法請看下面 <strong>Docker</strong> 折疊教學。</p></blockquote></details><h2 id="一鍵安裝"><a href="#一鍵安裝" class="headerlink" title="一鍵安裝"></a>一鍵安裝</h2><p>Linux &#x2F; NAS 安裝腳本固定從下方 Dev Pages 取得。<strong>腳本網址不決定安裝通道：</strong>不加 <code>-dev</code> 會安裝 <code>main</code> 最新且經過驗證的 GitHub Release；加上 <code>-dev</code> 才會安裝目前 <code>dev</code> 的 exact-SHA 開發版。腳本會留在目前目錄，方便日後更新或回滾。</p><h3 id="Linux-NAS"><a href="#Linux-NAS" class="headerlink" title="Linux &#x2F; NAS"></a>Linux &#x2F; NAS</h3><pre class="line-numbers language-bash" data-language="bash"><code class="language-bash"><span class="token function">curl</span> <span class="token parameter variable">-fsSL</span> https://weigefenxiang.github.io/WeiG-qB-WebUI/downloads/dev/install.sh <span class="token parameter variable">-o</span> install.sh <span class="token operator">&amp;&amp;</span> <span class="token function">sh</span> install.sh <span class="token parameter variable">-configure</span><span aria-hidden="true" class="line-numbers-rows"><span></span></span></code></pre><details><summary><b>查看腳本位置與 WebUI 預設安裝目錄</b></summary><pre class="line-numbers language-text" data-language="text"><code class="language-text">./install.sh<span aria-hidden="true" class="line-numbers-rows"><span></span></span></code></pre><p>WebUI 本體預設安裝到：</p><pre class="line-numbers language-text" data-language="text"><code class="language-text">~/.local/share/weig-qb-webui<span aria-hidden="true" class="line-numbers-rows"><span></span></span></code></pre><p>例如使用 <code>root</code> 使用者執行時，通常就是：</p><pre class="line-numbers language-text" data-language="text"><code class="language-text">/root/.local/share/weig-qb-webui<span aria-hidden="true" class="line-numbers-rows"><span></span></span></code></pre></details><h3 id="Docker"><a href="#Docker" class="headerlink" title="Docker"></a>Docker</h3><details><summary><b>Docker 一鍵安裝 / 多容器 / 路徑說明（新手建議展開）</b></summary><h4 id="先理解「宿主機」和「容器」"><a href="#先理解「宿主機」和「容器」" class="headerlink" title="先理解「宿主機」和「容器」"></a>先理解「宿主機」和「容器」</h4><p>如果你是在 VPS、Linux 伺服器、Synology、QNAP 等裝置上執行 Docker：</p><ul><li><strong>宿主機</strong>：真正執行 Docker 的那台 Linux &#x2F; NAS，也就是你 SSH 登入後看到的系統。</li><li><strong>容器</strong>：Docker 為 qBittorrent 建立的獨立執行環境。qBittorrent 可以直接看到容器內路徑，但不能任意看到宿主機路徑。</li></ul><p>例如 Docker 建立 qBittorrent 時有這樣的目錄映射：</p><pre class="line-numbers language-text" data-language="text"><code class="language-text">宿主機：/root/qbittorrent/config   ↓ 映射到容器內：/config<span aria-hidden="true" class="line-numbers-rows"><span></span><span></span><span></span></span></code></pre><p>Docker Compose 常見寫法類似：</p><pre class="line-numbers language-yaml" data-language="yaml"><code class="language-yaml"><span class="token key atrule">volumes</span><span class="token punctuation">:</span>  <span class="token punctuation">-</span> /root/qbittorrent/config<span class="token punctuation">:</span>/config<span aria-hidden="true" class="line-numbers-rows"><span></span><span></span></span></code></pre><p>冒號左邊 <code>/root/qbittorrent/config</code> 是<strong>宿主機路徑</strong>，右邊 <code>/config</code> 是<strong>容器內路徑</strong>。</p><p>如果 WeiG qB WebUI 實際安裝到了：</p><pre class="line-numbers language-text" data-language="text"><code class="language-text">宿主機：/root/qbittorrent/config/weig-qb-webui<span aria-hidden="true" class="line-numbers-rows"><span></span></span></code></pre><p>那麼 qBittorrent 的 <strong>檔案位置：</strong> 應填寫：</p><pre class="line-numbers language-text" data-language="text"><code class="language-text">/config/weig-qb-webui<span aria-hidden="true" class="line-numbers-rows"><span></span></span></code></pre><p>**不要填 <code>/root/qbittorrent/config/weig-qb-webui</code>**，因為 qBittorrent 容器通常看不到這個宿主機路徑。</p><h4 id="情況-1：只有一個正在執行的-qBittorrent-Docker-容器"><a href="#情況-1：只有一個正在執行的-qBittorrent-Docker-容器" class="headerlink" title="情況 1：只有一個正在執行的 qBittorrent Docker 容器"></a>情況 1：只有一個正在執行的 qBittorrent Docker 容器</h4><p>最簡單，直接執行：</p><pre class="line-numbers language-bash" data-language="bash"><code class="language-bash"><span class="token function">curl</span> <span class="token parameter variable">-fsSL</span> https://weigefenxiang.github.io/WeiG-qB-WebUI/downloads/dev/install.sh <span class="token parameter variable">-o</span> install.sh <span class="token operator">&amp;&amp;</span> <span class="token function">sh</span> install.sh <span class="token parameter variable">-configure</span><span aria-hidden="true" class="line-numbers-rows"><span></span></span></code></pre><p>安裝器會嘗試自動找到正在執行的 qBittorrent 容器、辨識它的 <code>/config</code> 映射，把 WebUI 安裝到對應的宿主機位置，並自動設定 qBittorrent。</p><h4 id="情況-2：先查看機器上有哪些-qBittorrent-容器"><a href="#情況-2：先查看機器上有哪些-qBittorrent-容器" class="headerlink" title="情況 2：先查看機器上有哪些 qBittorrent 容器"></a>情況 2：先查看機器上有哪些 qBittorrent 容器</h4><p>如果不確定容器叫什麼：</p><pre class="line-numbers language-bash" data-language="bash"><code class="language-bash"><span class="token function">sh</span> install.sh --list-containers<span aria-hidden="true" class="line-numbers-rows"><span></span></span></code></pre><p>也可以直接用 Docker 查看目前執行中的容器：</p><pre class="line-numbers language-bash" data-language="bash"><code class="language-bash"><span class="token function">docker</span> <span class="token function">ps</span><span aria-hidden="true" class="line-numbers-rows"><span></span></span></code></pre><p>例如你看到 qBittorrent 容器名稱是：</p><pre class="line-numbers language-text" data-language="text"><code class="language-text">qbittorrent<span aria-hidden="true" class="line-numbers-rows"><span></span></span></code></pre><p>就可以明確指定：</p><pre class="line-numbers language-bash" data-language="bash"><code class="language-bash"><span class="token function">sh</span> install.sh <span class="token parameter variable">--container</span><span class="token operator">=</span>qbittorrent <span class="token parameter variable">-configure</span><span aria-hidden="true" class="line-numbers-rows"><span></span></span></code></pre><h4 id="情況-3：機器上有多個-qBittorrent-容器"><a href="#情況-3：機器上有多個-qBittorrent-容器" class="headerlink" title="情況 3：機器上有多個 qBittorrent 容器"></a>情況 3：機器上有多個 qBittorrent 容器</h4><p>例如同時有：</p><pre class="line-numbers language-text" data-language="text"><code class="language-text">qbittorrentqbittorrent-test<span aria-hidden="true" class="line-numbers-rows"><span></span><span></span></span></code></pre><p>先執行：</p><pre class="line-numbers language-bash" data-language="bash"><code class="language-bash"><span class="token function">sh</span> install.sh --list-containers<span aria-hidden="true" class="line-numbers-rows"><span></span></span></code></pre><p>安裝正式使用的 <code>qbittorrent</code>：</p><pre class="line-numbers language-bash" data-language="bash"><code class="language-bash"><span class="token function">sh</span> install.sh <span class="token parameter variable">--container</span><span class="token operator">=</span>qbittorrent <span class="token parameter variable">-configure</span><span aria-hidden="true" class="line-numbers-rows"><span></span></span></code></pre><p>安裝測試容器 <code>qbittorrent-test</code>：</p><pre class="line-numbers language-bash" data-language="bash"><code class="language-bash"><span class="token function">sh</span> install.sh <span class="token parameter variable">--container</span><span class="token operator">=</span>qbittorrent-test <span class="token parameter variable">-configure</span><span aria-hidden="true" class="line-numbers-rows"><span></span></span></code></pre><p>安裝器不會在多個 qBittorrent 容器之間隨便猜一個。</p><h4 id="情況-4：你知道-qBittorrent-config-對應的宿主機目錄"><a href="#情況-4：你知道-qBittorrent-config-對應的宿主機目錄" class="headerlink" title="情況 4：你知道 qBittorrent /config 對應的宿主機目錄"></a>情況 4：你知道 qBittorrent <code>/config</code> 對應的宿主機目錄</h4><p>例如 Docker 設定目錄是：</p><pre class="line-numbers language-text" data-language="text"><code class="language-text">/root/qbittorrent/config<span aria-hidden="true" class="line-numbers-rows"><span></span></span></code></pre><p>可以直接指定：</p><pre class="line-numbers language-bash" data-language="bash"><code class="language-bash"><span class="token function">sh</span> install.sh --config-root<span class="token operator">=</span>/root/qbittorrent/config <span class="token parameter variable">-configure</span><span aria-hidden="true" class="line-numbers-rows"><span></span></span></code></pre><p>Synology 上可能類似：</p><pre class="line-numbers language-bash" data-language="bash"><code class="language-bash"><span class="token function">sh</span> install.sh --config-root<span class="token operator">=</span>/volume1/docker/qbittorrent <span class="token parameter variable">-configure</span><span aria-hidden="true" class="line-numbers-rows"><span></span></span></code></pre><p>其他 NAS 可能類似：</p><pre class="line-numbers language-bash" data-language="bash"><code class="language-bash"><span class="token function">sh</span> install.sh --config-root<span class="token operator">=</span>/share/Container/qbittorrent <span class="token parameter variable">-configure</span><span aria-hidden="true" class="line-numbers-rows"><span></span></span></code></pre><p>這些只是範例，<strong>請換成你自己的 qBittorrent <code>/config</code> 真實宿主機目錄</strong>。</p><h4 id="情況-5：指定-WebUI-安裝目錄"><a href="#情況-5：指定-WebUI-安裝目錄" class="headerlink" title="情況 5：指定 WebUI 安裝目錄"></a>情況 5：指定 WebUI 安裝目錄</h4><p>已經指定容器時，也可以指定容器內希望使用的 WebUI 路徑：</p><pre class="line-numbers language-bash" data-language="bash"><code class="language-bash"><span class="token function">sh</span> install.sh <span class="token parameter variable">--container</span><span class="token operator">=</span>qbittorrent <span class="token parameter variable">-o</span> /config/weig-qb-webui <span class="token parameter variable">-configure</span><span aria-hidden="true" class="line-numbers-rows"><span></span></span></code></pre><p>安裝器會依照 Docker <code>/config</code> 映射換算成宿主機上的實際安裝目錄。</p><h4 id="情況-6：一次更新多個現有-WebUI-目錄"><a href="#情況-6：一次更新多個現有-WebUI-目錄" class="headerlink" title="情況 6：一次更新多個現有 WebUI 目錄"></a>情況 6：一次更新多個現有 WebUI 目錄</h4><p>如果有多個 qBittorrent 實例，可以重複指定 <code>-o</code>。安裝器只下載並驗證一次套件，等所有目標準備好才進行切換。每個目標都會在 <code>~/.config/weig-qb-webui/backups/</code> 獨立保留最近 3 份備份。</p><pre class="line-numbers language-bash" data-language="bash"><code class="language-bash"><span class="token function">sh</span> install.sh <span class="token parameter variable">-dev</span> <span class="token punctuation">\</span>  <span class="token parameter variable">-o</span> /root/qbittorrent/config/weig-qb-webui <span class="token punctuation">\</span>  <span class="token parameter variable">-o</span> /root/qbittorrent3/config/weig-qb-webui<span aria-hidden="true" class="line-numbers-rows"><span></span><span></span><span></span></span></code></pre><p>多目標模式不要加 <code>-configure</code>；各個實例仍沿用原本設定的 WebUI 路徑。參數請見 <code>sh install.sh -help</code>。</p><h4 id="安裝後應該看到什麼"><a href="#安裝後應該看到什麼" class="headerlink" title="安裝後應該看到什麼"></a>安裝後應該看到什麼</h4><p>安裝成功時腳本會輸出類似：</p><pre class="line-numbers language-text" data-language="text"><code class="language-text">Host install path: /root/qbittorrent/config/weig-qb-webuiqBittorrent Root Folder: /config/weig-qb-webui<span aria-hidden="true" class="line-numbers-rows"><span></span><span></span></span></code></pre><p>意思是：</p><ul><li><code>Host install path</code>：檔案實際儲存在宿主機哪裡；</li><li><code>qBittorrent Root Folder</code>：<strong>你在 qBittorrent「檔案位置：」中應填寫的容器內路徑</strong>。</li></ul><p>如果使用 <code>-configure</code> 並成功找到 qBittorrent 設定，安裝器會自動啟用 <strong>使用替補 WebUI</strong> 並設定路徑；否則請依照上面的「新手安裝 → 在 qBittorrent 中啟用」手動填寫。</p></details><h3 id="Windows-PowerShell"><a href="#Windows-PowerShell" class="headerlink" title="Windows PowerShell"></a>Windows PowerShell</h3><pre class="line-numbers language-powershell" data-language="powershell"><code class="language-powershell"><span class="token function">Invoke-WebRequest</span> https:<span class="token operator">/</span><span class="token operator">/</span>weigefenxiang<span class="token punctuation">.</span>github<span class="token punctuation">.</span>io/WeiG-qB-WebUI/downloads/dev/install<span class="token punctuation">.</span>ps1 <span class="token operator">-</span>OutFile <span class="token punctuation">.</span>\install<span class="token punctuation">.</span>ps1<span class="token punctuation">;</span> powershell <span class="token operator">-</span>ExecutionPolicy Bypass <span class="token operator">-</span>File <span class="token punctuation">.</span>\install<span class="token punctuation">.</span>ps1 <span class="token operator">-</span>configure<span aria-hidden="true" class="line-numbers-rows"><span></span></span></code></pre><details><summary><b>查看安裝目錄</b></summary><pre class="line-numbers language-text" data-language="text"><code class="language-text">C:\Users\&lt;你的使用者名稱>\AppData\Local\weig-qb-webui<span aria-hidden="true" class="line-numbers-rows"><span></span></span></code></pre></details><h2 id="常用參數"><a href="#常用參數" class="headerlink" title="常用參數"></a>常用參數</h2><details><summary><b>Linux 和 Windows 使用相同的參數名稱；PowerShell 不分大小寫（點擊展開）</b></summary><p>Linux 與 Windows 盡量使用相同的公開參數名稱；文件統一使用小寫。PowerShell 參數名稱本身不區分大小寫。</p><table><thead><tr><th>用途</th><th>Linux &#x2F; Docker &#x2F; NAS</th><th>Windows PowerShell</th></tr></thead><tbody><tr><td>最新穩定版</td><td>預設，不需參數</td><td>預設，不需參數</td></tr><tr><td>指定正式版本</td><td><code>-version 1.2.0</code></td><td><code>-version 1.2.0</code></td></tr><tr><td>開發版</td><td><code>-dev</code></td><td><code>-dev</code></td></tr><tr><td>指定安裝目錄</td><td><code>-o /path</code> （Linux 可重複指定）</td><td><code>-o D:\path</code> 或 <code>-output D:\path</code></td></tr><tr><td>指定 qBittorrent 設定檔</td><td>—</td><td><code>-qbconfig D:\path\qBittorrent.ini</code></td></tr><tr><td>自動設定 qBittorrent</td><td><code>-configure</code></td><td><code>-configure</code></td></tr><tr><td>回滾上一次安裝</td><td><code>-rollback</code></td><td><code>-rollback</code></td></tr><tr><td>完整解除安裝（不保留安裝器備份）</td><td><code>-uninstall -purge</code></td><td><code>-uninstall -purge</code></td></tr><tr><td>查看完整說明</td><td><code>-help</code></td><td><code>-help</code></td></tr><tr><td>指定 Docker 容器</td><td><code>--container=NAME</code></td><td>—</td></tr><tr><td>列出 Docker 容器</td><td><code>--list-containers</code></td><td>—</td></tr><tr><td>指定 Docker <code>/config</code> 宿主機目錄</td><td><code>--config-root=/path</code></td><td>—</td></tr></tbody></table></details><details><summary><b>說明：</b> <b>（點擊展開）</b></summary><ul><li>不加 <code>-dev</code> 使用 <code>main</code> 最新且經過驗證的 GitHub Release；加 <code>-dev</code> 才安裝目前 <code>dev</code> 的 exact-SHA 開發版。</li><li><code>-o</code> 是 <strong>output</strong>，Linux 可重複指定多個現有安裝目錄，下載與驗證套件只需一次。</li><li>備份放在 <code>~/.config/weig-qb-webui/backups/</code>，每個安裝目標獨立保留最近 3 份。</li><li><code>-configure</code> 會啟用 <strong>使用備選 WebUI &#x2F; Use alternative WebUI</strong> 並設定 <strong>檔案位置 &#x2F; Files location</strong>，僅能用於單一目標。</li><li><code>-rollback</code> 可還原所選目標最近的安裝器備份；重複 <code>-o</code> 也能一次回滾多個指定目標。</li><li><code>-uninstall -purge</code> 只清理該目標的 WebUI、安裝器備份和回滾狀態，不會影響其他目標；共享狀態目錄為空時也會清除。</li><li>若要保留備份日後使用 <code>-rollback</code>，解除安裝時請去掉 <code>-purge</code>。</li><li><code>-version 1.2.0</code> 可指定 GitHub Release；版本不存在會報錯，<strong>不會自動切換到 latest 或 dev</strong>。</li><li><code>-help</code> 顯示目前安裝器支援的參數。</li><li>多個 Docker 容器請先用 <code>--list-containers</code> 查看，再用 <code>--container=NAME</code> 指定；或使用 <code>--config-root=/path</code> 指定宿主機上的設定目錄。</li></ul><h3 id="指定版本與安裝目錄"><a href="#指定版本與安裝目錄" class="headerlink" title="指定版本與安裝目錄"></a>指定版本與安裝目錄</h3><p>Linux：</p><pre class="line-numbers language-bash" data-language="bash"><code class="language-bash"><span class="token function">sh</span> install.sh <span class="token parameter variable">-version</span> <span class="token number">1.2</span>.0 <span class="token parameter variable">-o</span> /opt/weig-qb-webui <span class="token parameter variable">-configure</span><span aria-hidden="true" class="line-numbers-rows"><span></span></span></code></pre><p>Windows：</p><pre class="line-numbers language-powershell" data-language="powershell"><code class="language-powershell">powershell <span class="token operator">-</span>ExecutionPolicy Bypass <span class="token operator">-</span>File <span class="token punctuation">.</span>\install<span class="token punctuation">.</span>ps1 <span class="token operator">-</span>version 1<span class="token punctuation">.</span>2<span class="token punctuation">.</span>0 <span class="token operator">-</span>o D:\weig-qb-webui <span class="token operator">-</span>configure<span aria-hidden="true" class="line-numbers-rows"><span></span></span></code></pre><h3 id="回滾"><a href="#回滾" class="headerlink" title="回滾"></a>回滾</h3><p>Linux：</p><pre class="line-numbers language-bash" data-language="bash"><code class="language-bash"><span class="token function">sh</span> install.sh <span class="token parameter variable">-rollback</span><span aria-hidden="true" class="line-numbers-rows"><span></span></span></code></pre><p>Windows：</p><pre class="line-numbers language-powershell" data-language="powershell"><code class="language-powershell">powershell <span class="token operator">-</span>ExecutionPolicy Bypass <span class="token operator">-</span>File <span class="token punctuation">.</span>\install<span class="token punctuation">.</span>ps1 <span class="token operator">-</span>rollback<span aria-hidden="true" class="line-numbers-rows"><span></span></span></code></pre></details><h2 id="一鍵解除安裝"><a href="#一鍵解除安裝" class="headerlink" title="一鍵解除安裝"></a>一鍵解除安裝</h2><details><summary><b>Linux / NAS、Docker、Windows PowerShell 一鍵完整解除安裝</b></summary><p>預設建議<strong>不保留安裝器備份</strong>：解除安裝 WebUI、關閉目前目標的備選 WebUI、清理該目標的 installer-owned backups &#x2F; rollback 狀態，並刪除目前目錄中下載的安裝腳本。</p><h3 id="Linux-NAS-1"><a href="#Linux-NAS-1" class="headerlink" title="Linux &#x2F; NAS"></a>Linux &#x2F; NAS</h3><pre class="line-numbers language-bash" data-language="bash"><code class="language-bash"><span class="token function">sh</span> install.sh <span class="token parameter variable">-uninstall</span> <span class="token parameter variable">-configure</span> <span class="token parameter variable">-purge</span> <span class="token operator">&amp;&amp;</span> <span class="token function">rm</span> <span class="token parameter variable">-f</span> -- ./install.sh<span aria-hidden="true" class="line-numbers-rows"><span></span></span></code></pre><p>自訂安裝目錄請再加上 <code>-o /你的/weig-qb-webui</code>。</p><h3 id="Docker-1"><a href="#Docker-1" class="headerlink" title="Docker"></a>Docker</h3><p>單一容器自動辨識：</p><pre class="line-numbers language-bash" data-language="bash"><code class="language-bash"><span class="token function">sh</span> install.sh <span class="token parameter variable">-uninstall</span> <span class="token parameter variable">-configure</span> <span class="token parameter variable">-purge</span> <span class="token operator">&amp;&amp;</span> <span class="token function">rm</span> <span class="token parameter variable">-f</span> -- ./install.sh<span aria-hidden="true" class="line-numbers-rows"><span></span></span></code></pre><p>多個容器：</p><pre class="line-numbers language-bash" data-language="bash"><code class="language-bash"><span class="token function">sh</span> install.sh <span class="token parameter variable">-uninstall</span> <span class="token parameter variable">-configure</span> <span class="token parameter variable">-purge</span> <span class="token parameter variable">--container</span><span class="token operator">=</span>qbittorrent <span class="token operator">&amp;&amp;</span> <span class="token function">rm</span> <span class="token parameter variable">-f</span> -- ./install.sh<span aria-hidden="true" class="line-numbers-rows"><span></span></span></code></pre><p>使用 <code>--config-root</code> 時：</p><pre class="line-numbers language-bash" data-language="bash"><code class="language-bash"><span class="token function">sh</span> install.sh <span class="token parameter variable">-uninstall</span> <span class="token parameter variable">-configure</span> <span class="token parameter variable">-purge</span> --config-root<span class="token operator">=</span>/path/to/qbittorrent/config <span class="token operator">&amp;&amp;</span> <span class="token function">rm</span> <span class="token parameter variable">-f</span> -- ./install.sh<span aria-hidden="true" class="line-numbers-rows"><span></span></span></code></pre><h3 id="Windows-PowerShell-1"><a href="#Windows-PowerShell-1" class="headerlink" title="Windows PowerShell"></a>Windows PowerShell</h3><pre class="line-numbers language-powershell" data-language="powershell"><code class="language-powershell">powershell <span class="token operator">-</span>ExecutionPolicy Bypass <span class="token operator">-</span>File <span class="token punctuation">.</span>\install<span class="token punctuation">.</span>ps1 <span class="token operator">-</span>uninstall <span class="token operator">-</span>configure <span class="token operator">-</span>purge<span class="token punctuation">;</span> <span class="token keyword">if</span> <span class="token punctuation">(</span><span class="token variable">$LASTEXITCODE</span> <span class="token operator">-eq</span> 0<span class="token punctuation">)</span> <span class="token punctuation">&#123;</span> <span class="token function">Remove-Item</span> <span class="token punctuation">.</span>\install<span class="token punctuation">.</span>ps1 <span class="token operator">-</span>Force <span class="token punctuation">&#125;</span><span aria-hidden="true" class="line-numbers-rows"><span></span></span></code></pre><p>自訂安裝目錄請再加上 <code>-o D:\weig-qb-webui</code>。</p><p><code>-purge</code> 只會清理目前解除安裝目標的備份，不會刪除其他安裝實例。共享狀態目錄沒有其他內容時，Linux 的 <code>~/.config/weig-qb-webui</code>（root 為 <code>/root/.config/weig-qb-webui</code>）或 Windows 的 <code>%APPDATA%\weig-qb-webui</code> 也會一併清除。</p><p>若要保留備份以便之後使用 <code>-rollback</code>，只需移除 <code>-purge</code>。</p></details><h2 id="更多說明"><a href="#更多說明" class="headerlink" title="更多說明"></a>更多說明</h2><p>Docker 多容器、NAS、自訂路徑、更新及進階部署說明請參閱：<a href="https://github.com/weigefenxiang/WeiG-qB-WebUI/blob/main/translations/installation-guide/deployment-guide.zh-TW.md">安裝、升級與手動部署</a>。</p><h2 id="授權條款"><a href="#授權條款" class="headerlink" title="授權條款"></a>授權條款</h2><p>本專案使用 <a href="https://github.com/weigefenxiang/WeiG-qB-WebUI/blob/main/LICENSE">GNU General Public License v3</a>。</p><p>Copyright © 2026 Wei.G &#x2F; WeiG Share。</p>]]>
    </content>
    <id>https://www.weigshare.com/posts/WeiG-qB-WebUI-Guide/</id>
    <link href="https://www.weigshare.com/posts/WeiG-qB-WebUI-Guide/"/>
    <published>2026-09-28T09:15:00.000Z</published>
    <summary>從下載到啟用 qBittorrent 的「替補 WebUI」，帶新手一步一步安裝 WeiG qB WebUI，並說明 Windows、Linux、NAS 與 Docker 的路徑差異。</summary>
    <title>WeiG qB WebUI：qBittorrent「替補 WebUI」新手安裝教學</title>
    <updated>2026-10-21T08:39:31.056Z</updated>
  </entry>
  <entry>
    <author>
      <name>Wei.G</name>
    </author>
    <category term="OpenWrt" scheme="https://www.weigshare.com/categories/OpenWrt/"/>
    <category term="OpenWrt" scheme="https://www.weigshare.com/tags/OpenWrt/"/>
    <category term="ImmortalWrt" scheme="https://www.weigshare.com/tags/ImmortalWrt/"/>
    <category term="GitHub Actions" scheme="https://www.weigshare.com/tags/GitHub-Actions/"/>
    <category term="韌體編譯" scheme="https://www.weigshare.com/tags/%E9%9F%8C%E9%AB%94%E7%B7%A8%E8%AD%AF/"/>
    <content>
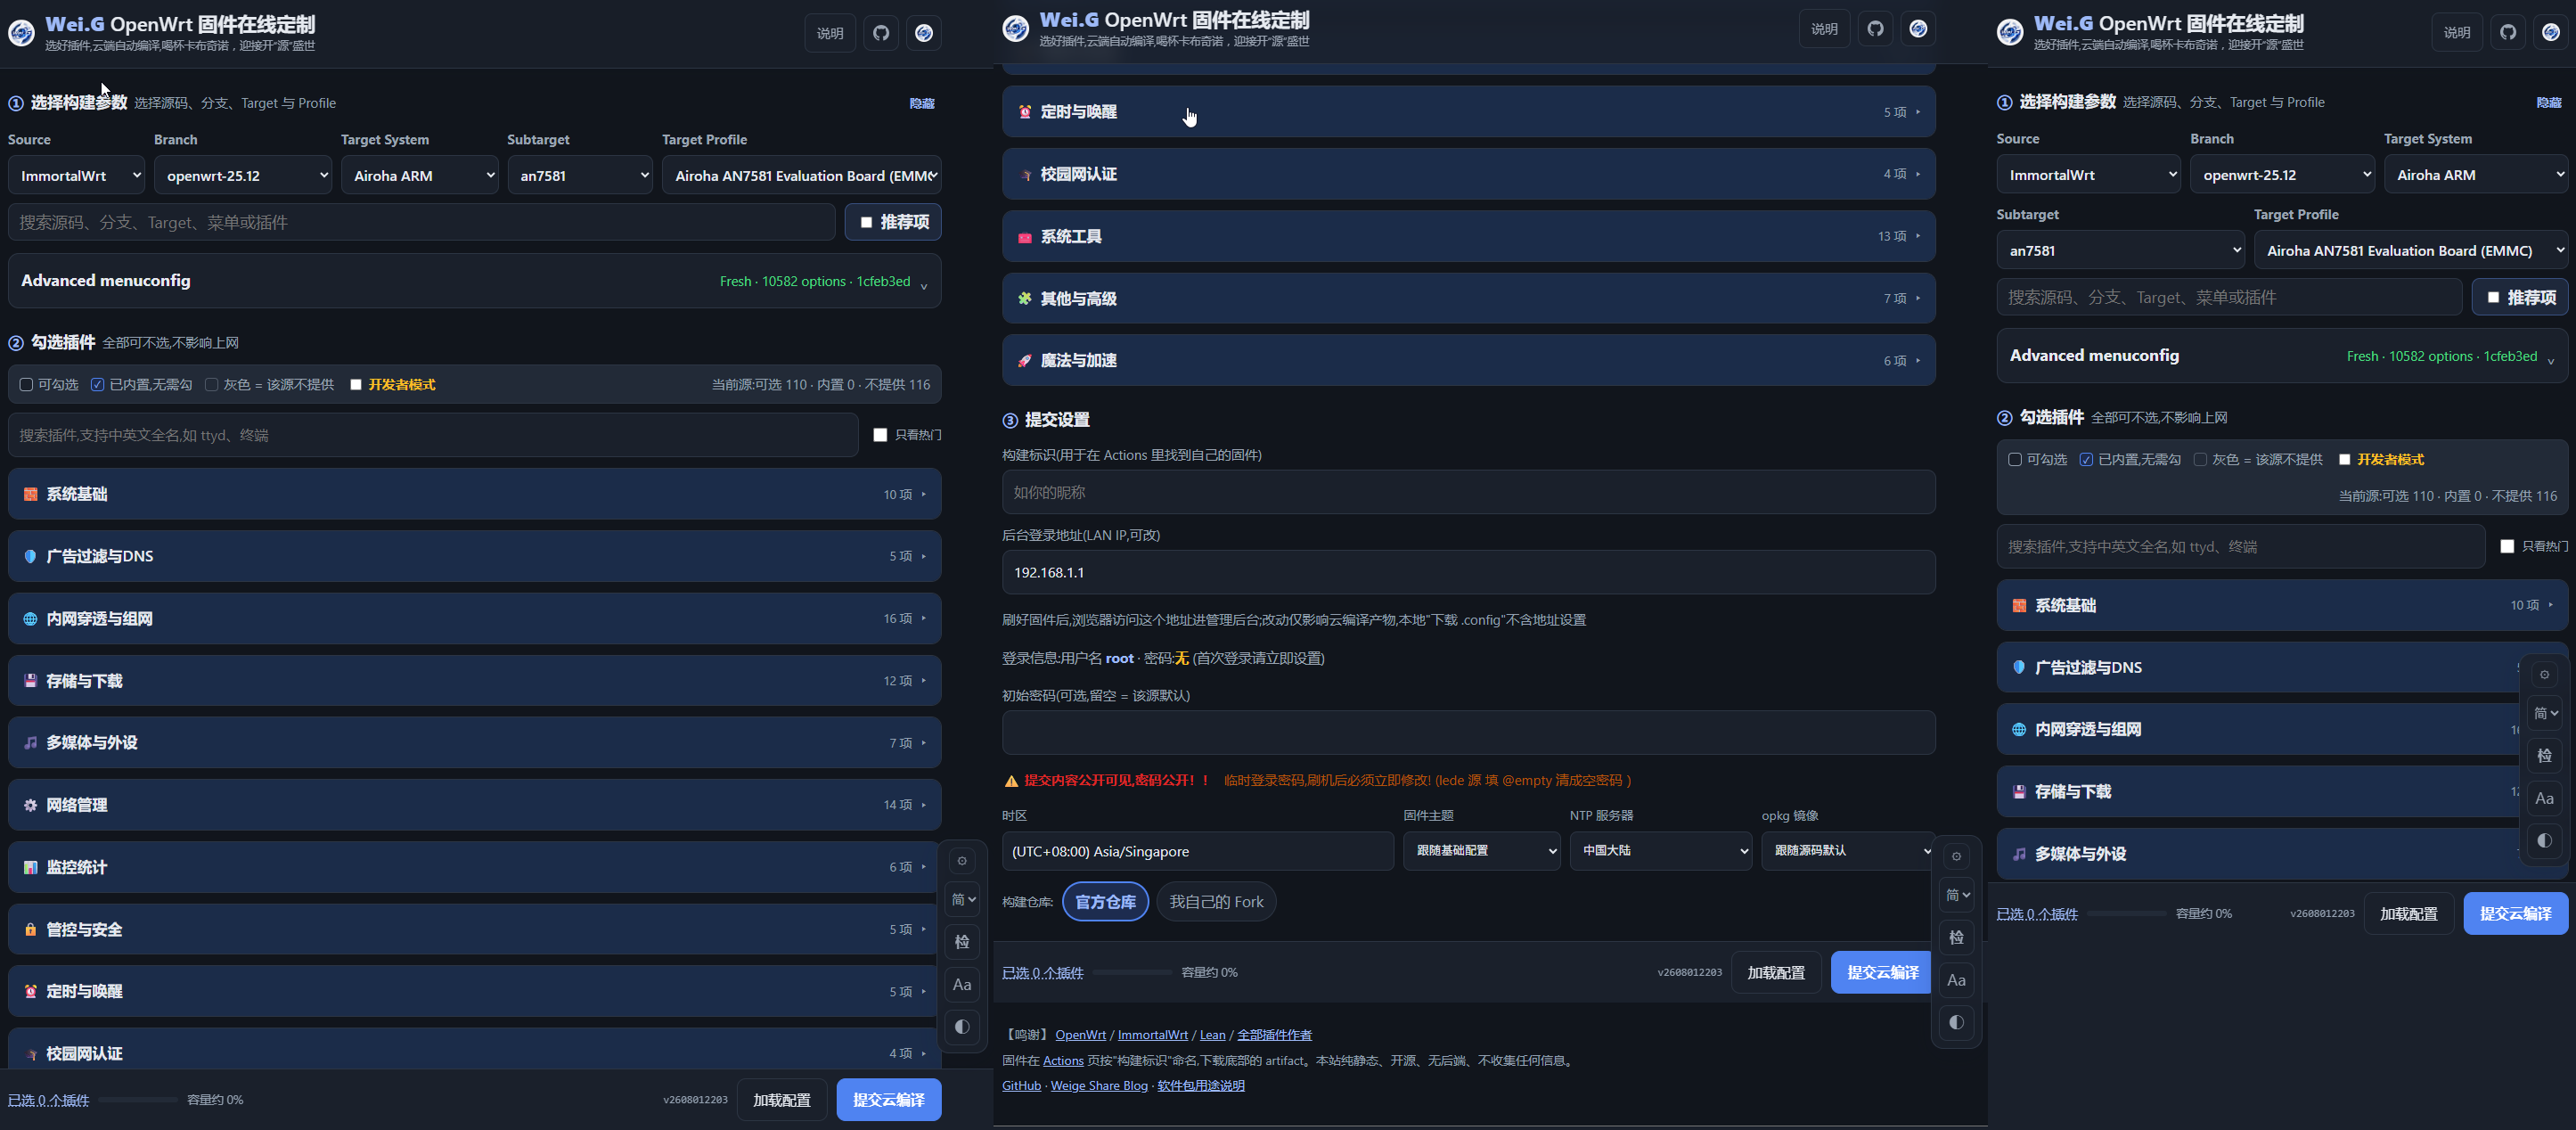
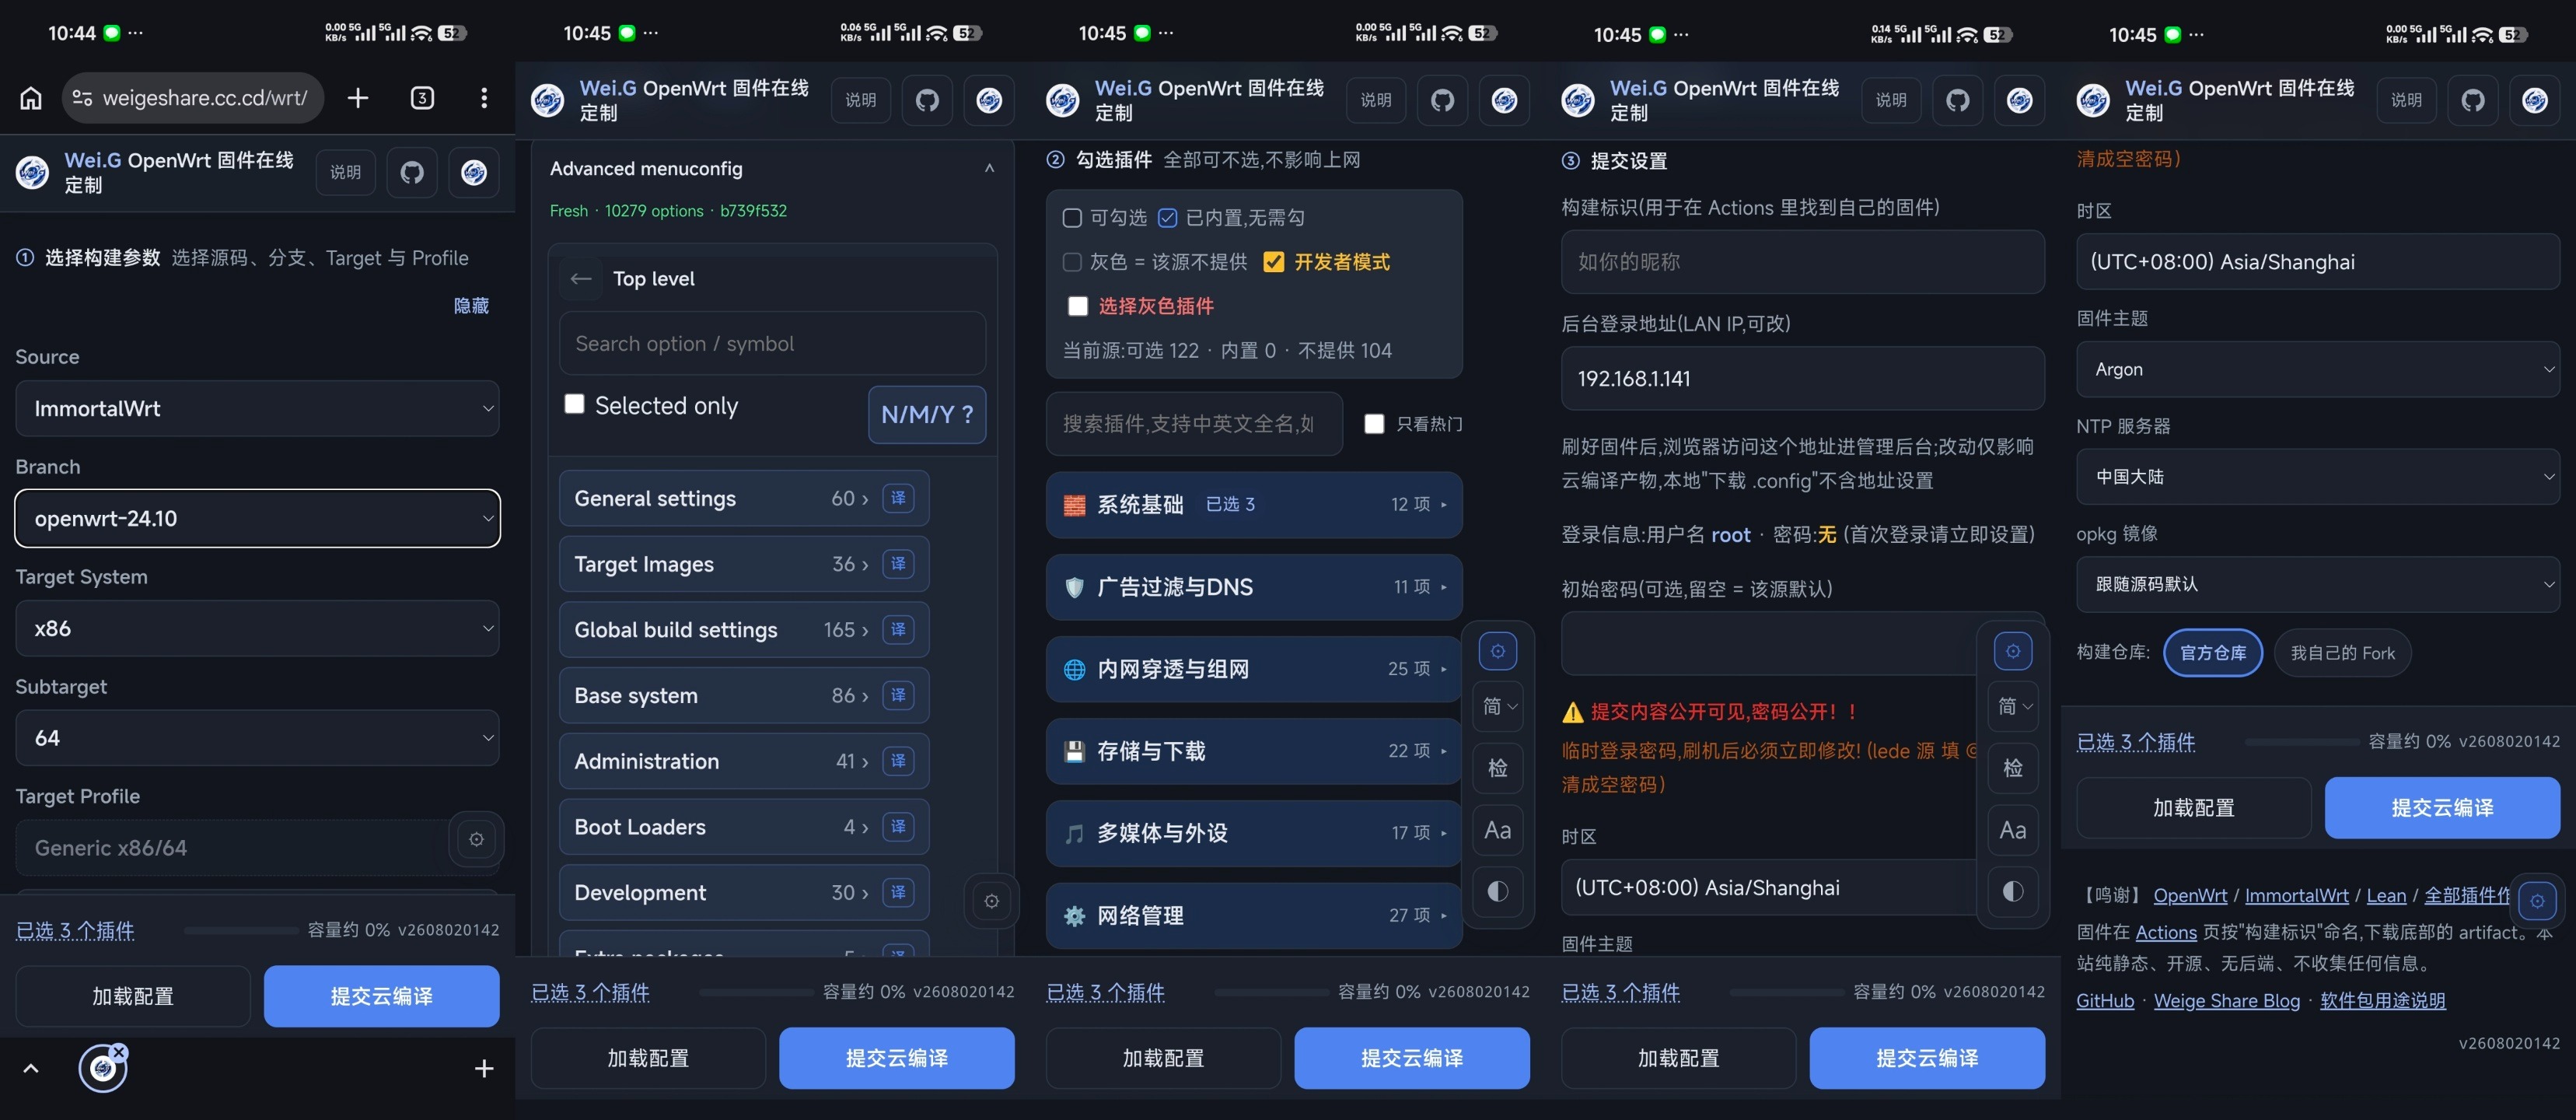
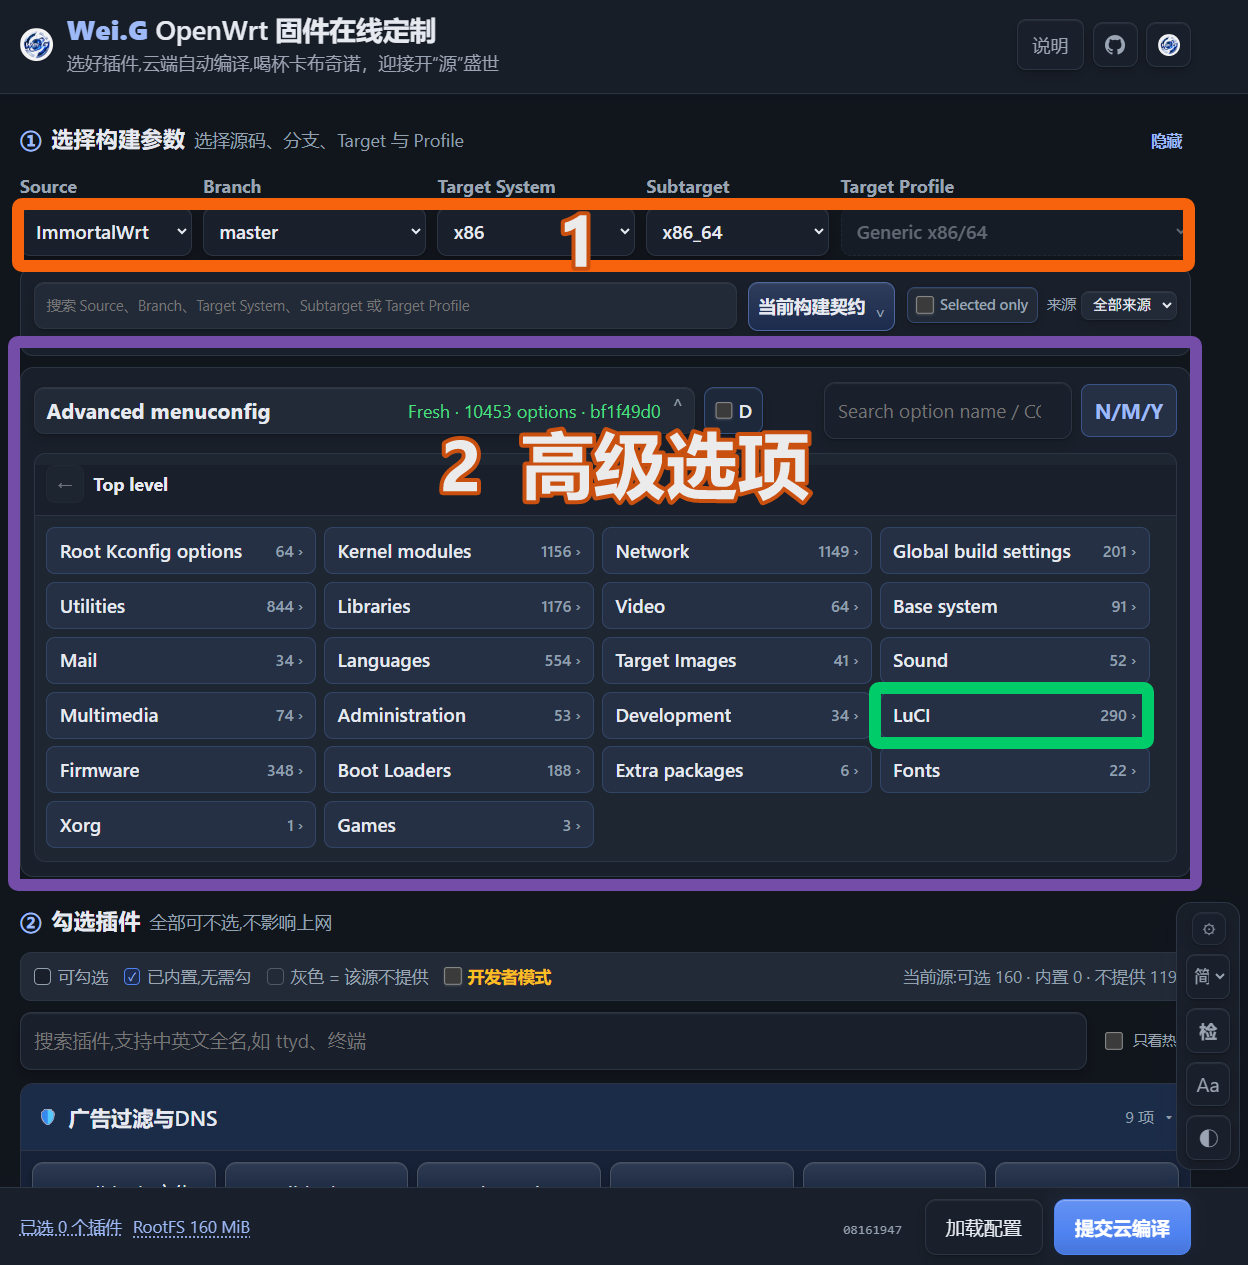
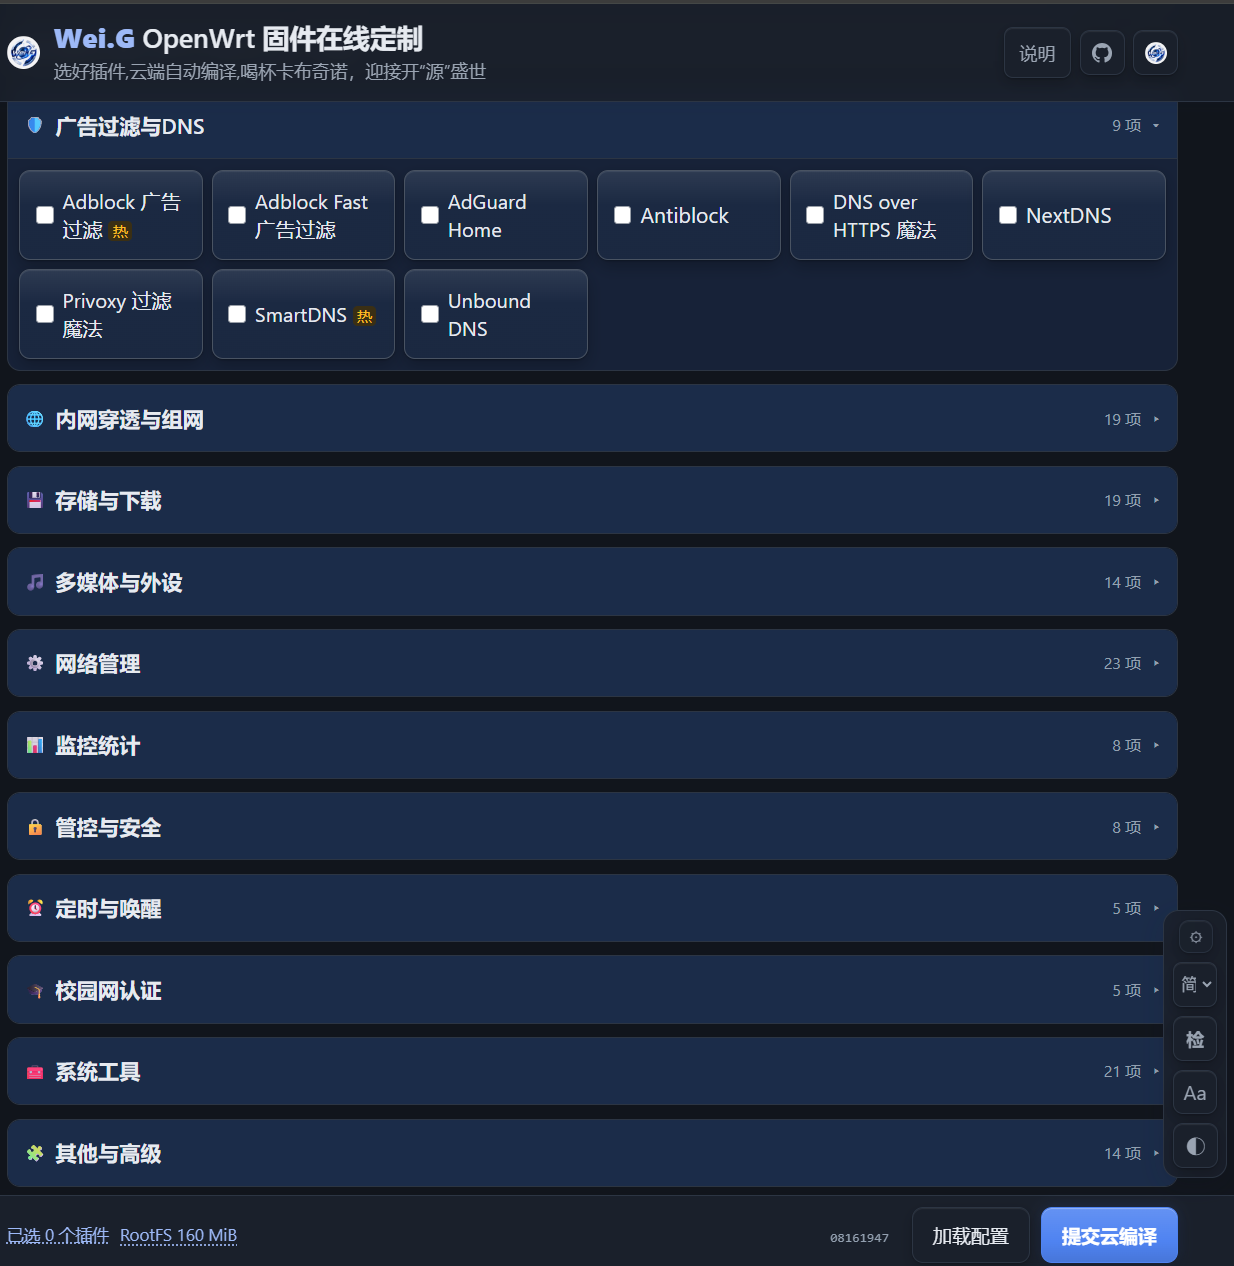
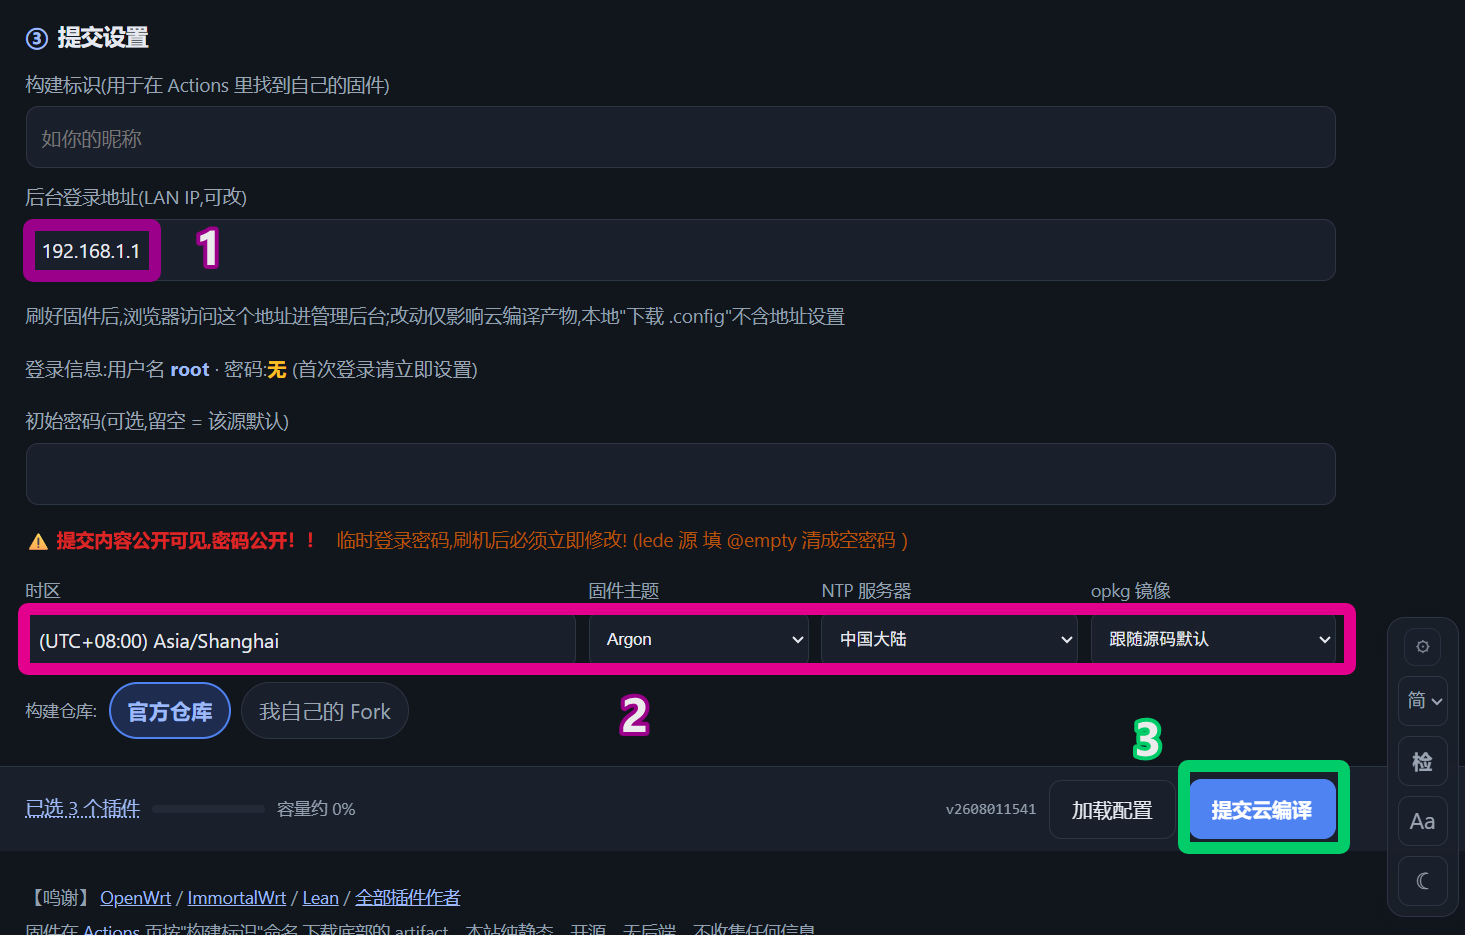
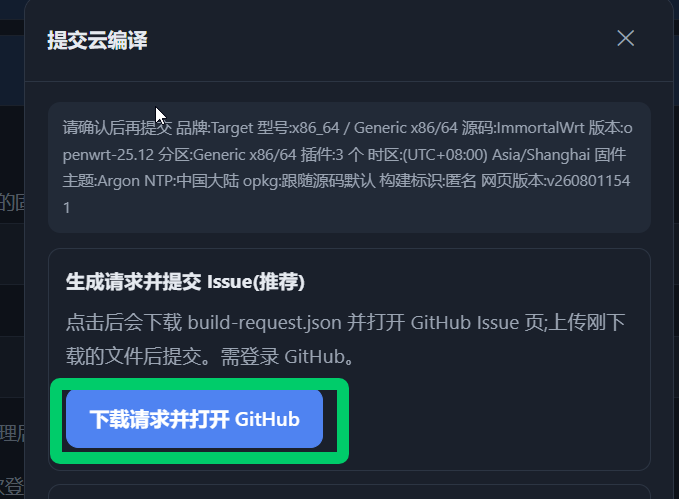
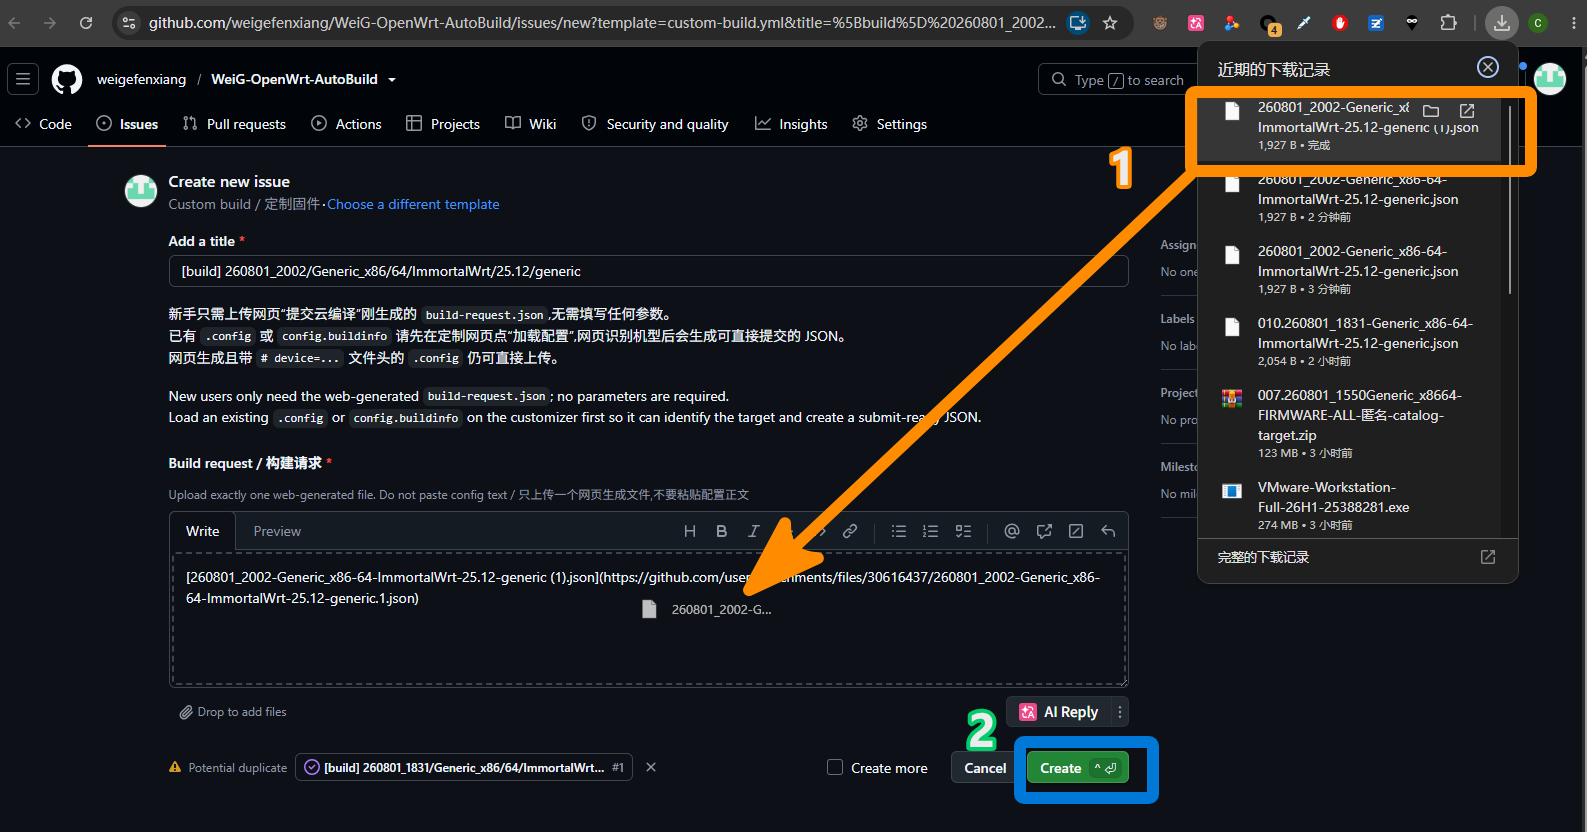
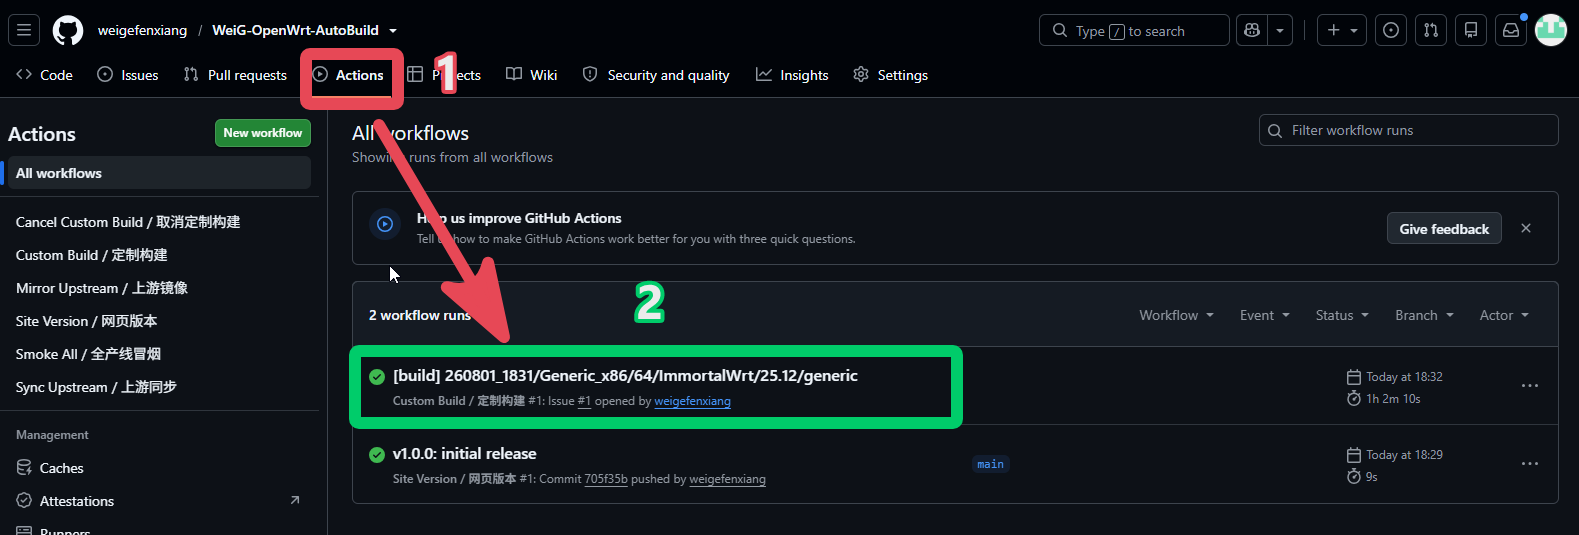
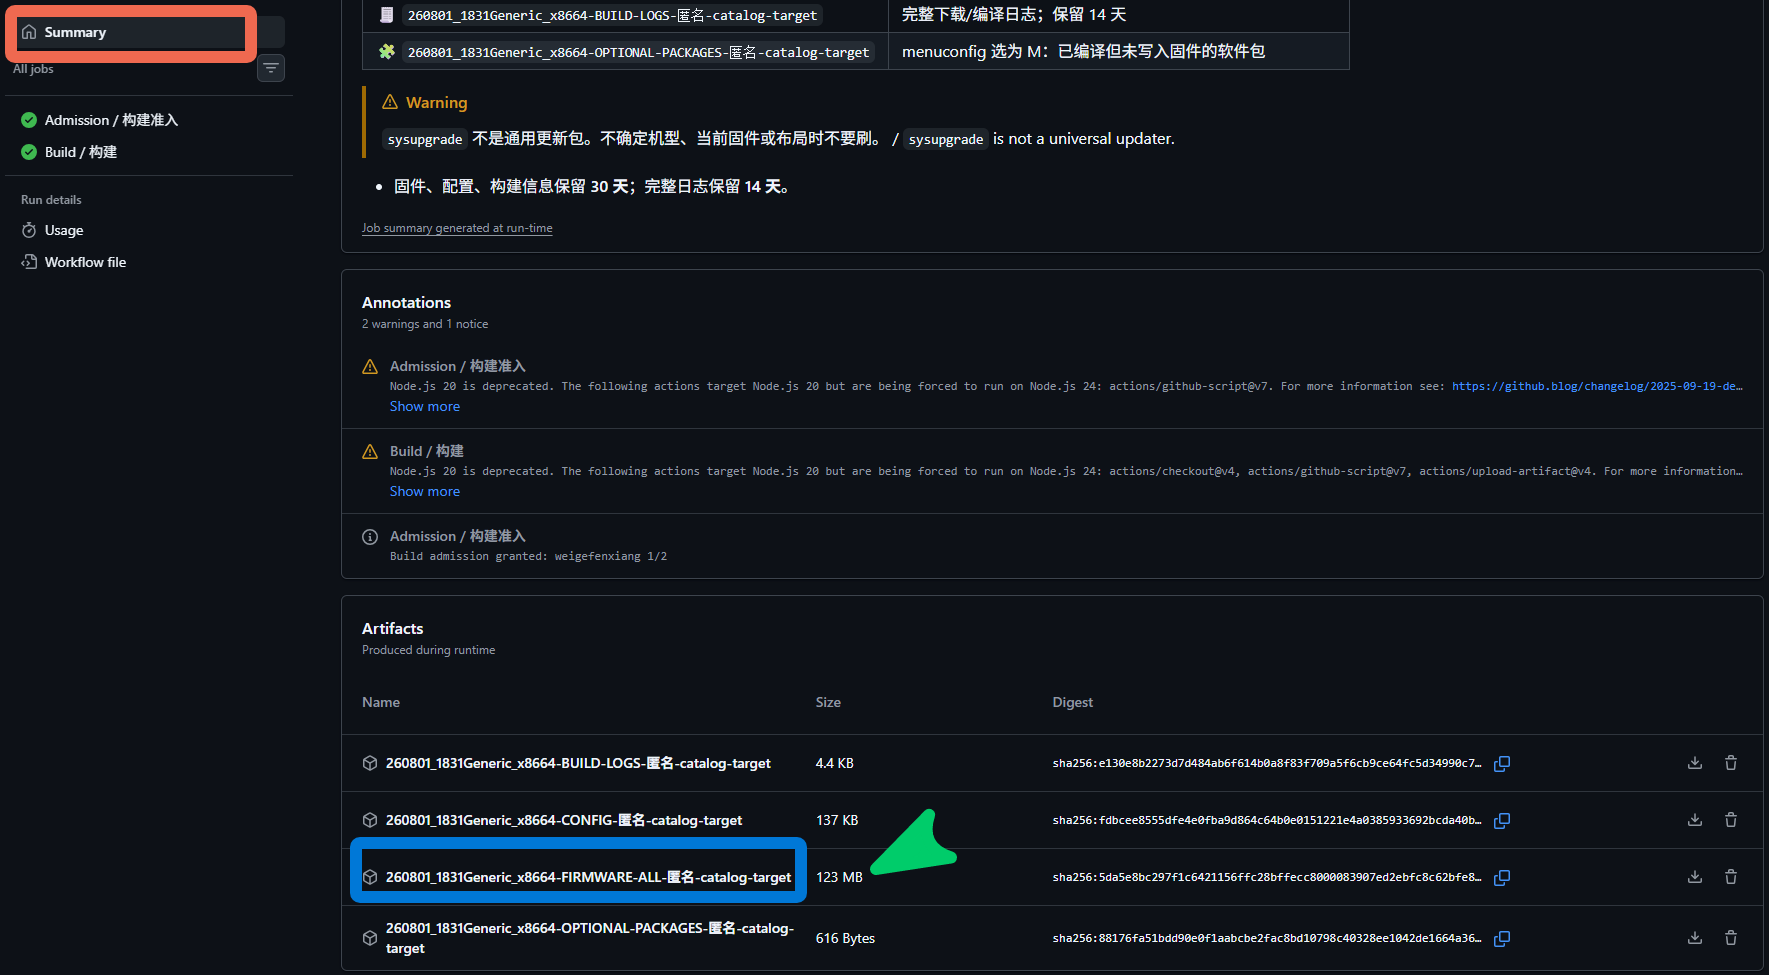
      <![CDATA[<p>想要一份真正符合自己需求的 OpenWrt 韌體，不一定要先在電腦上架好完整的編譯環境。打開 <a href="https://www.weigshare.com/wrt">Wei.G 線上定製</a>，選好原始碼、機型、套件與韌體設定，提交到 GitHub Actions 後，讓雲端完成後續編譯即可。</p><div align="left" style="display:flex;gap:10px;flex-wrap:wrap;justify-content:left;">  <img src="https://img.shields.io/badge/JavaScript-ES2020-f7df1e?logo=javascript&logoColor=black" alt="JavaScript">  <img src="https://img.shields.io/badge/HTML-5-e34f26?logo=html5&logoColor=white" alt="HTML">  <img src="https://img.shields.io/badge/CSS-3-1572b6?logo=css3&logoColor=white" alt="CSS">  <img src="https://img.shields.io/badge/Node.js-22-339933?logo=nodedotjs&logoColor=white" alt="Node.js">  <img src="https://img.shields.io/badge/Bash-5-4eaa25?logo=gnubash&logoColor=white" alt="Bash">  <img src="https://img.shields.io/badge/YAML-1.2-cb171e?logo=yaml&logoColor=white" alt="YAML"></div><h2 id="快速開始"><a href="#快速開始" class="headerlink" title="快速開始"></a>快速開始</h2><p><span style="color:#ffc107;">⚠️ </span> <span style="color:#ff7b72;">刷機有風險。請先確認路由器型號、分割區與刷寫方式；不確定時不要刷寫。</span></p><ul><li>登入 <strong><a href="https://github.com/">GitHub</a></strong></li><li>開啟 <strong><a href="https://www.weigshare.com/wrt">Wei.G 線上定製</a></strong></li><li>新手請看下方教學👇</li></ul><h2 id="背景"><a href="#背景" class="headerlink" title="背景"></a>背景</h2><ul><li><strong>【比較容易上手的起點】</strong> 想自己動手編譯韌體、了解「手搓韌體」的過程，但又不想先折騰完整本機環境，這個專案就是一個較輕鬆的入口。</li><li><strong>【套件與依賴】</strong> 有些外掛或依賴必須在編譯階段直接放進韌體，安裝完成後才可以使用。</li><li><strong>【設定成本】</strong> OpenWrt 的編譯選項很多，中國大陸的網路環境也可能讓依賴下載變得更麻煩。</li><li><strong>【耗時】</strong> 一次完整編譯可能要等數小時，即使如此仍有失敗的可能，自己排查也很花時間。</li><li><strong>【未來方向】</strong> 希望之後每個人都能直接 Fork 專案，用 GitHub <strong>Pages + Actions</strong> 建立屬於自己的 OpenWrt 線上編譯站。</li><li><strong>【目前階段】</strong> 專案仍在測試，出現 bug 很正常；共用工作流如果被大量使用，也可能碰到 GitHub 的政策或配額限制。</li></ul><div style="display:flex; gap:10px;"><img src=https://img.weigshare.com/img/003.009.WeiG-OpenWrt-AutoBuild-Guide.png height="150"></div><div style="display:flex; gap:10px;"><img src=https://img.weigshare.com/img/003.010.WeiG-OpenWrt-AutoBuild-Guide.png height="150"></div><h2 id="適用"><a href="#適用" class="headerlink" title="適用"></a>適用</h2><p>目前僅適用以下機型，其他機型尚未驗證；如果沒有救磚工具，請勿使用。</p><ul><li><strong>來源：<a href="https://github.com/openwrt/openwrt">OpenWrt</a> · <a href="https://github.com/immortalwrt/immortalwrt">ImmortalWrt</a> · <a href="https://github.com/coolsnowwolf/lede">LEDE</a> · <a href="https://github.com/hanwckf/immortalwrt-mt798x">hanwckf</a></strong></li><li><strong>x86 &#x2F; 64</strong></li><li>支援電腦、手機端存取</li></ul><h2 id="準備"><a href="#準備" class="headerlink" title="準備"></a>準備</h2><p><span style="color:#ffc107;">⚠️ </span> <span style="color:#ff7b72;">刷機有風險。請先確認路由器型號、分割區與刷寫方式；不確定時不要刷寫。</span></p><ul><li>登入 <strong><a href="https://github.com/">GitHub</a></strong> 帳號（沒有帳號則無法建置）</li><li>開啟 <strong><a href="https://www.weigshare.com/wrt">Wei.G 線上定製</a></strong><ul><li>**<a href="https://dev.weig-wrt.pages.dev/">Cloudflare dev 頁</a>**（實驗功能，可體驗最新功能，但可能有 bug）</li></ul></li></ul><!-- 截圖 1：網頁首頁，展示 Source、Branch、Target 與外掛區域 --><h2 id="1-選擇參數"><a href="#1-選擇參數" class="headerlink" title="1. 選擇參數"></a>1. 選擇參數</h2><ul><li><p>選擇來源後，在搜尋框搜尋對應機型或環境，也可以載入 config。</p></li><li><p><strong>Source → Branch → Target System → Subtarget → Target Profile</strong>。</p><ul><li>例如 X86&#x2F;64：<strong>ImmortalWrt → openwrt-24.10 → x86 → 64 → Generic x86&#x2F;64</strong></li></ul></li><li><p>在 <strong>Advanced menuconfig › LuCI › 3. Applications</strong> 勾選你想要的應用程式。</p></li><li><p><strong>Advanced menuconfig</strong> 其他進階設定可自行探索。</p></li></ul><p>然後依需求設定 <strong>時區</strong>、<strong>韌體主題</strong>、<strong>NTP 伺服器</strong>和<strong>軟體來源鏡像</strong>。</p><div style="display:flex; gap:10px;"><img src=https://img.weigshare.com/img/003.002.WeiG-OpenWrt-AutoBuild-Guide.png height="150"><img src=https://img.weigshare.com/img/003.003.WeiG-OpenWrt-AutoBuild-Guide.png height="150"><img src=https://img.weigshare.com/img/003.004.WeiG-OpenWrt-AutoBuild-Guide.png height="150"></div><h3 id="已有設定"><a href="#已有設定" class="headerlink" title="已有設定"></a>已有設定</h3><p>已有 <code>.config</code>、<code>config.buildinfo</code> 或以前下載的請求檔案，可點底部「載入設定」，在確認框核對來源、分支、Target Profile、外掛和韌體設定。</p><h2 id="2-提交建置"><a href="#2-提交建置" class="headerlink" title="2. 提交建置"></a>2. 提交建置</h2><p>點擊右下角 <strong>提交雲端編譯</strong>。</p><p>選擇 <strong>下載請求並開啟 GitHub</strong>：瀏覽器會下載一個 JSON 檔案，並自動開啟 GitHub 的新 Issue 頁面。</p><p>將檔案移入 Issue 對話框，直接點擊 <strong>Create</strong>。</p><p>機器人會在 Issue 中回覆本次建置的 Actions 連結。</p><div style="display:flex; gap:10px;"><img src=https://img.weigshare.com/img/003.005.WeiG-OpenWrt-AutoBuild-Guide.png height="150"><img src=https://img.weigshare.com/img/003.006.WeiG-OpenWrt-AutoBuild-Guide.png height="150"></div><h2 id="3-下載韌體"><a href="#3-下載韌體" class="headerlink" title="3. 下載韌體"></a>3. 下載韌體</h2><p>編譯通常需要 2～4 小時。完成後進入 Actions 頁面，在底部 <strong>Artifacts</strong> 下載：</p><ul><li><code>FIRMWARE-ALL-XXX</code>：全部韌體與校驗資料；首次刷機通常找 <code>factory</code> 等檔案。</li><li><code>CONFIG-XXX</code>：本次提交設定、最終設定和差異，建議保存。</li><li><code>BUILD-LOGS-XXX</code>：完整建置日誌，用於排查原因。</li></ul><div style="display:flex; gap:10px;"><img src=https://img.weigshare.com/img/003.007.WeiG-OpenWrt-AutoBuild-Guide.png height="150"><img src=https://img.weigshare.com/img/003.008.WeiG-OpenWrt-AutoBuild-Guide.png height="150"></div><h2 id="常見問題"><a href="#常見問題" class="headerlink" title="常見問題"></a>常見問題</h2><ul><li><strong>建置失敗怎麼辦？</strong> 下載 <code>BUILD-LOGS-…</code>，查看最後出現的 <code>Error</code>；也可在 Issue 回報。</li><li><strong>如何取消？</strong> 在自己的建置 Issue 回覆 <code>/cancel</code>。</li><li><strong>同時建置數量？</strong> 一個帳號只允許同時 2 個建置任務，超出的需要排隊。</li><li><strong>為什麼沒有下載按鈕？</strong> GitHub 的 Artifacts 通常需要先登入帳號才能下載。</li><li><strong>公共倉庫排隊較久？</strong> 未來會支援 <a href="https://github.com/weigefenxiang/WeiG-OpenWrt-AutoBuild">Fork 本專案</a>，按照頁面提示提交到自己的倉庫執行，就不會受到公共佇列限制。</li></ul><p>專案地址：<a href="https://github.com/weigefenxiang/WeiG-OpenWrt-AutoBuild">WeiG-OpenWrt-AutoBuild</a></p><h2 id="鳴謝"><a href="#鳴謝" class="headerlink" title="鳴謝"></a>鳴謝</h2><ul><li><p><strong>原始碼：</strong> <a href="https://github.com/openwrt/openwrt">OpenWrt</a> · <a href="https://github.com/immortalwrt/immortalwrt">ImmortalWrt</a> · <a href="https://github.com/coolsnowwolf/lede">LEDE</a> · <a href="https://github.com/hanwckf/immortalwrt-mt798x">hanwckf</a></p></li><li><p><strong>參考：</strong> <a href="https://github.com/P3TERX/Actions-OpenWrt">P3TERX</a></p></li><li><p><strong>LuCI 外掛的作者們</strong></p></li><li><p><strong>每一位</strong>參與的小夥伴</p></li></ul>]]>
    </content>
    <id>https://www.weigshare.com/posts/WeiG-OpenWrt-AutoBuild-Guide/</id>
    <link href="https://www.weigshare.com/posts/WeiG-OpenWrt-AutoBuild-Guide/"/>
    <published>2026-08-01T12:11:00.000Z</published>
    <summary>不用在本機安裝編譯環境，透過 Wei.G OpenWrt 線上定製器與 GitHub Actions 在雲端產生自己的 OpenWrt 韌體。</summary>
    <title>從零開始：用雲端編譯自己的 OpenWrt 韌體</title>
    <updated>2026-10-21T08:39:31.056Z</updated>
  </entry>
  <entry>
    <author>
      <name>Wei.G</name>
    </author>
    <category term="網站搭建" scheme="https://www.weigshare.com/categories/%E7%B6%B2%E7%AB%99%E6%90%AD%E5%BB%BA/"/>
    <category term="Hexo" scheme="https://www.weigshare.com/tags/Hexo/"/>
    <category term="PicList" scheme="https://www.weigshare.com/tags/PicList/"/>
    <category term="Cloudflare" scheme="https://www.weigshare.com/tags/Cloudflare/"/>
    <category term="R2" scheme="https://www.weigshare.com/tags/R2/"/>
    <category term="圖床" scheme="https://www.weigshare.com/tags/%E5%9C%96%E5%BA%8A/"/>
    <content>
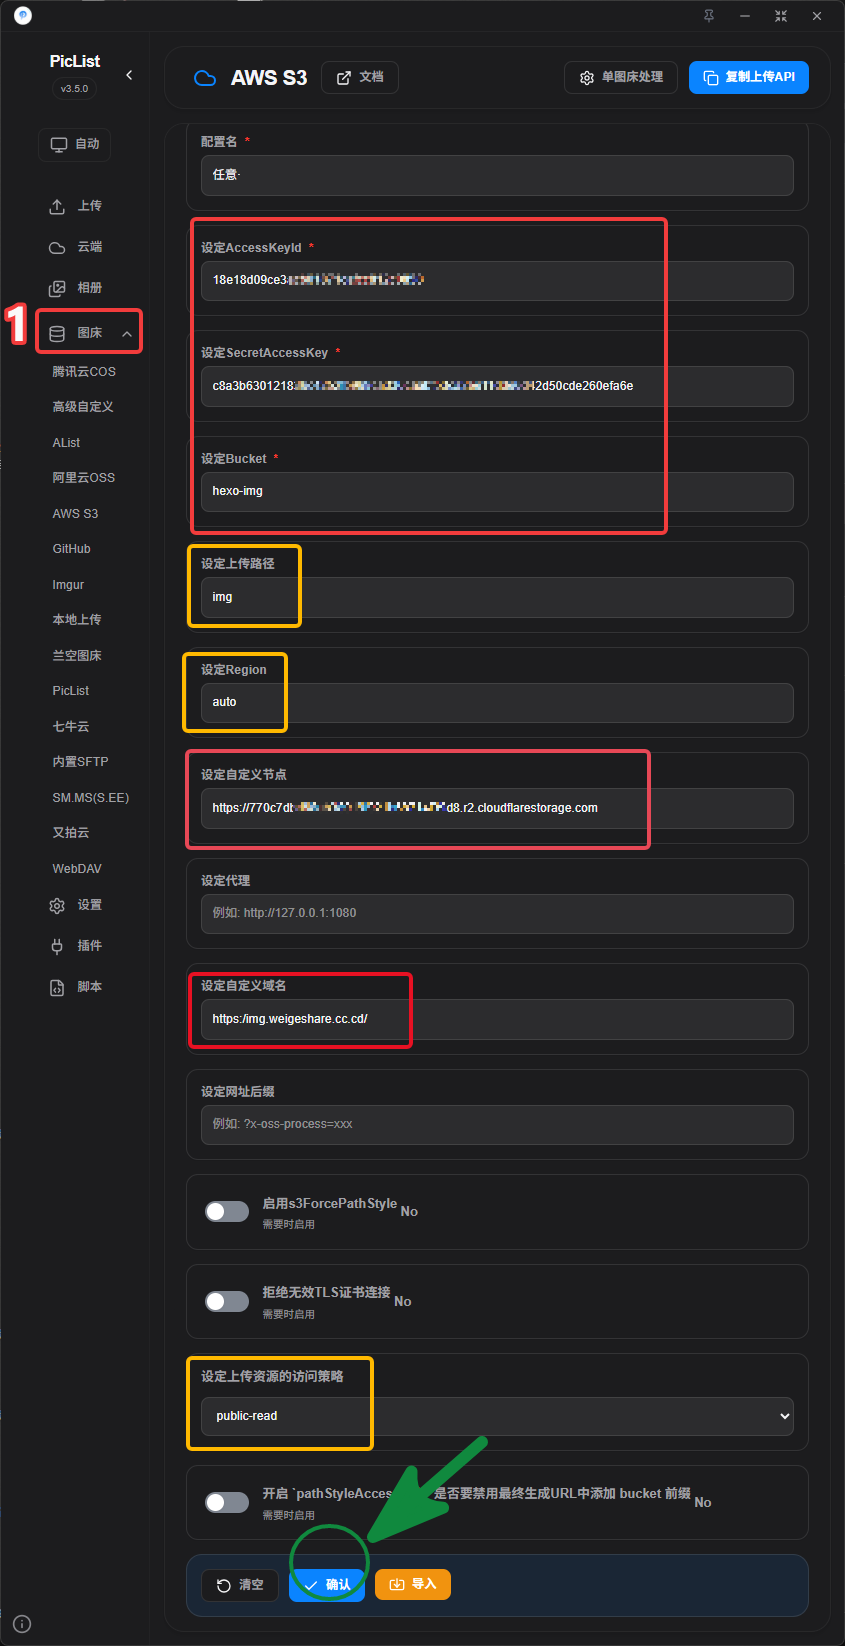
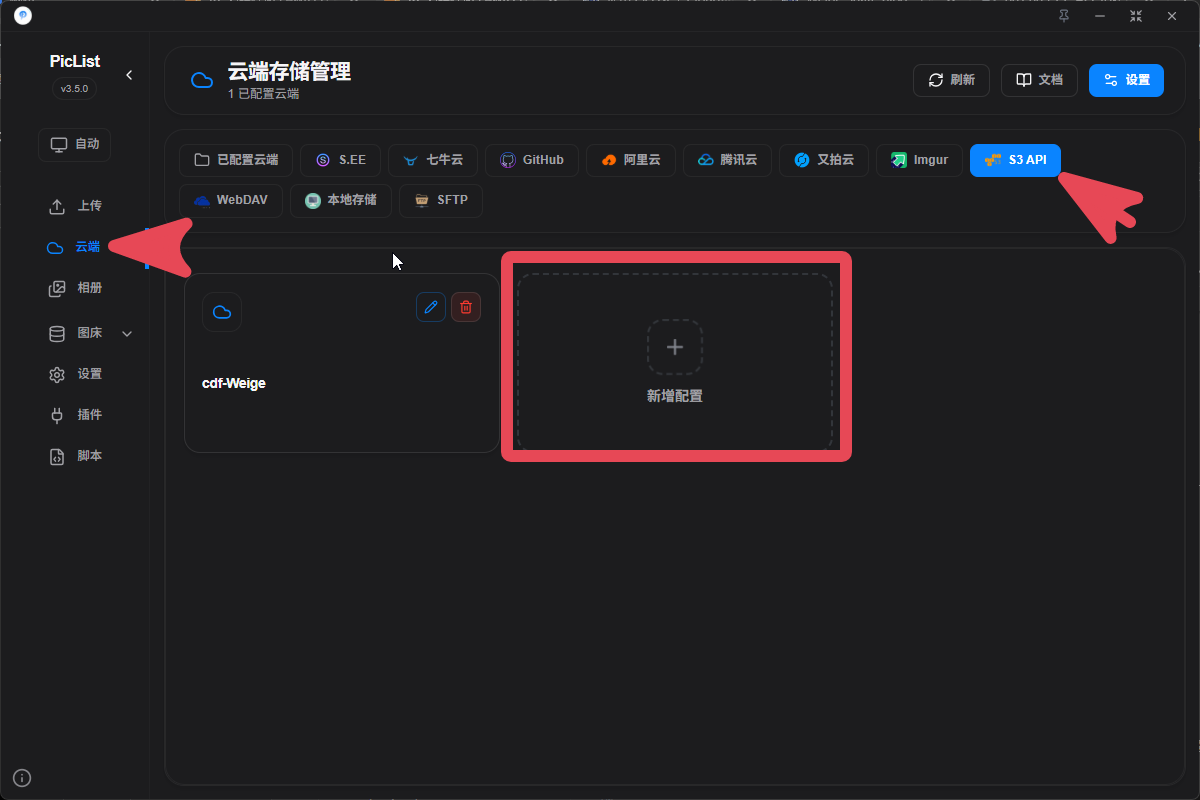
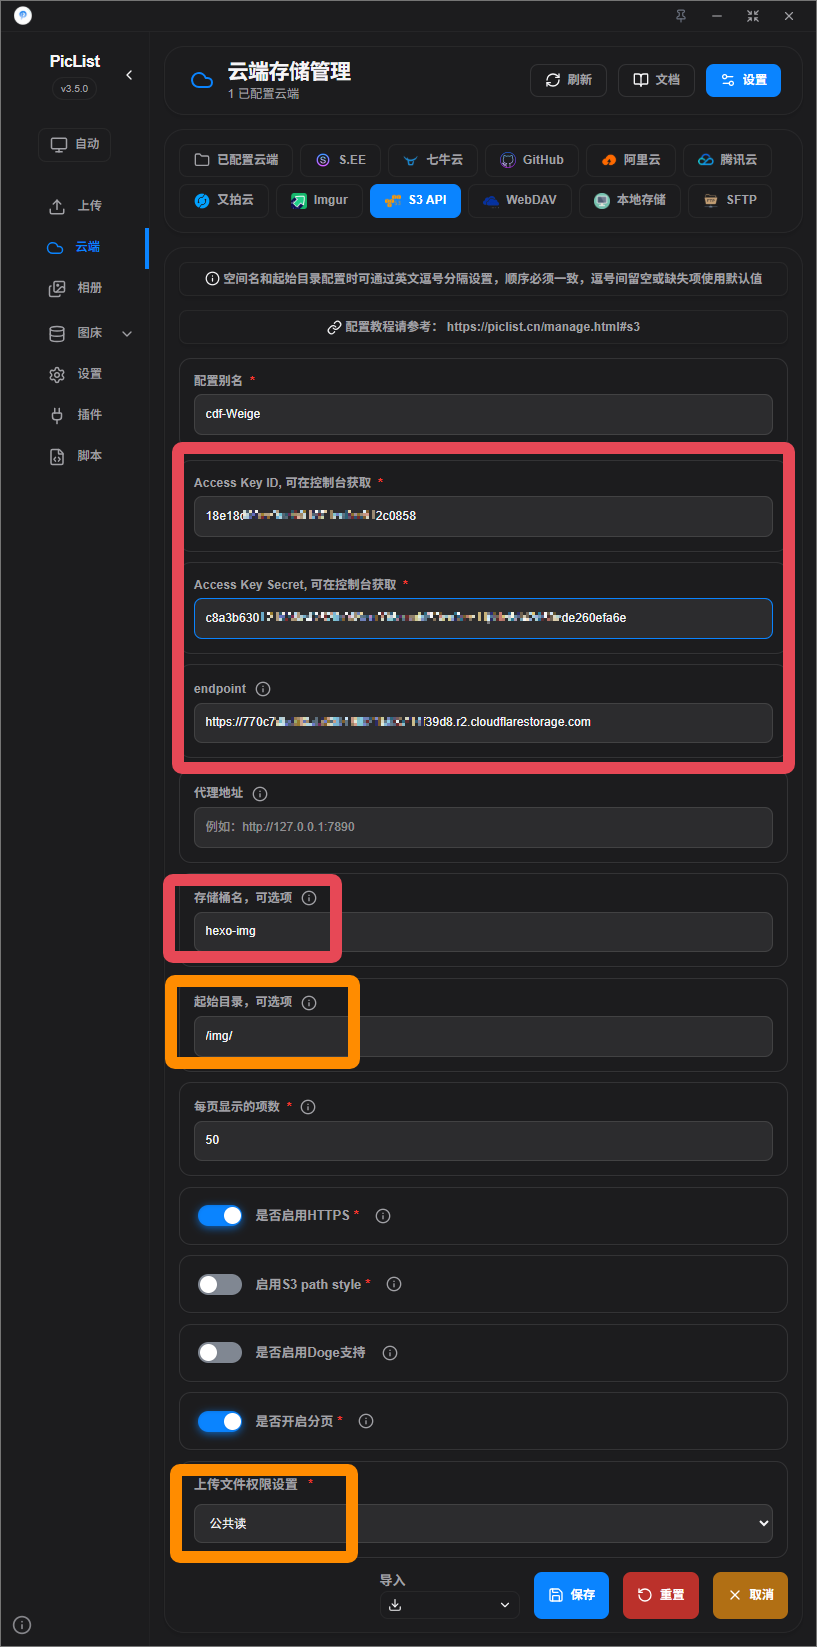
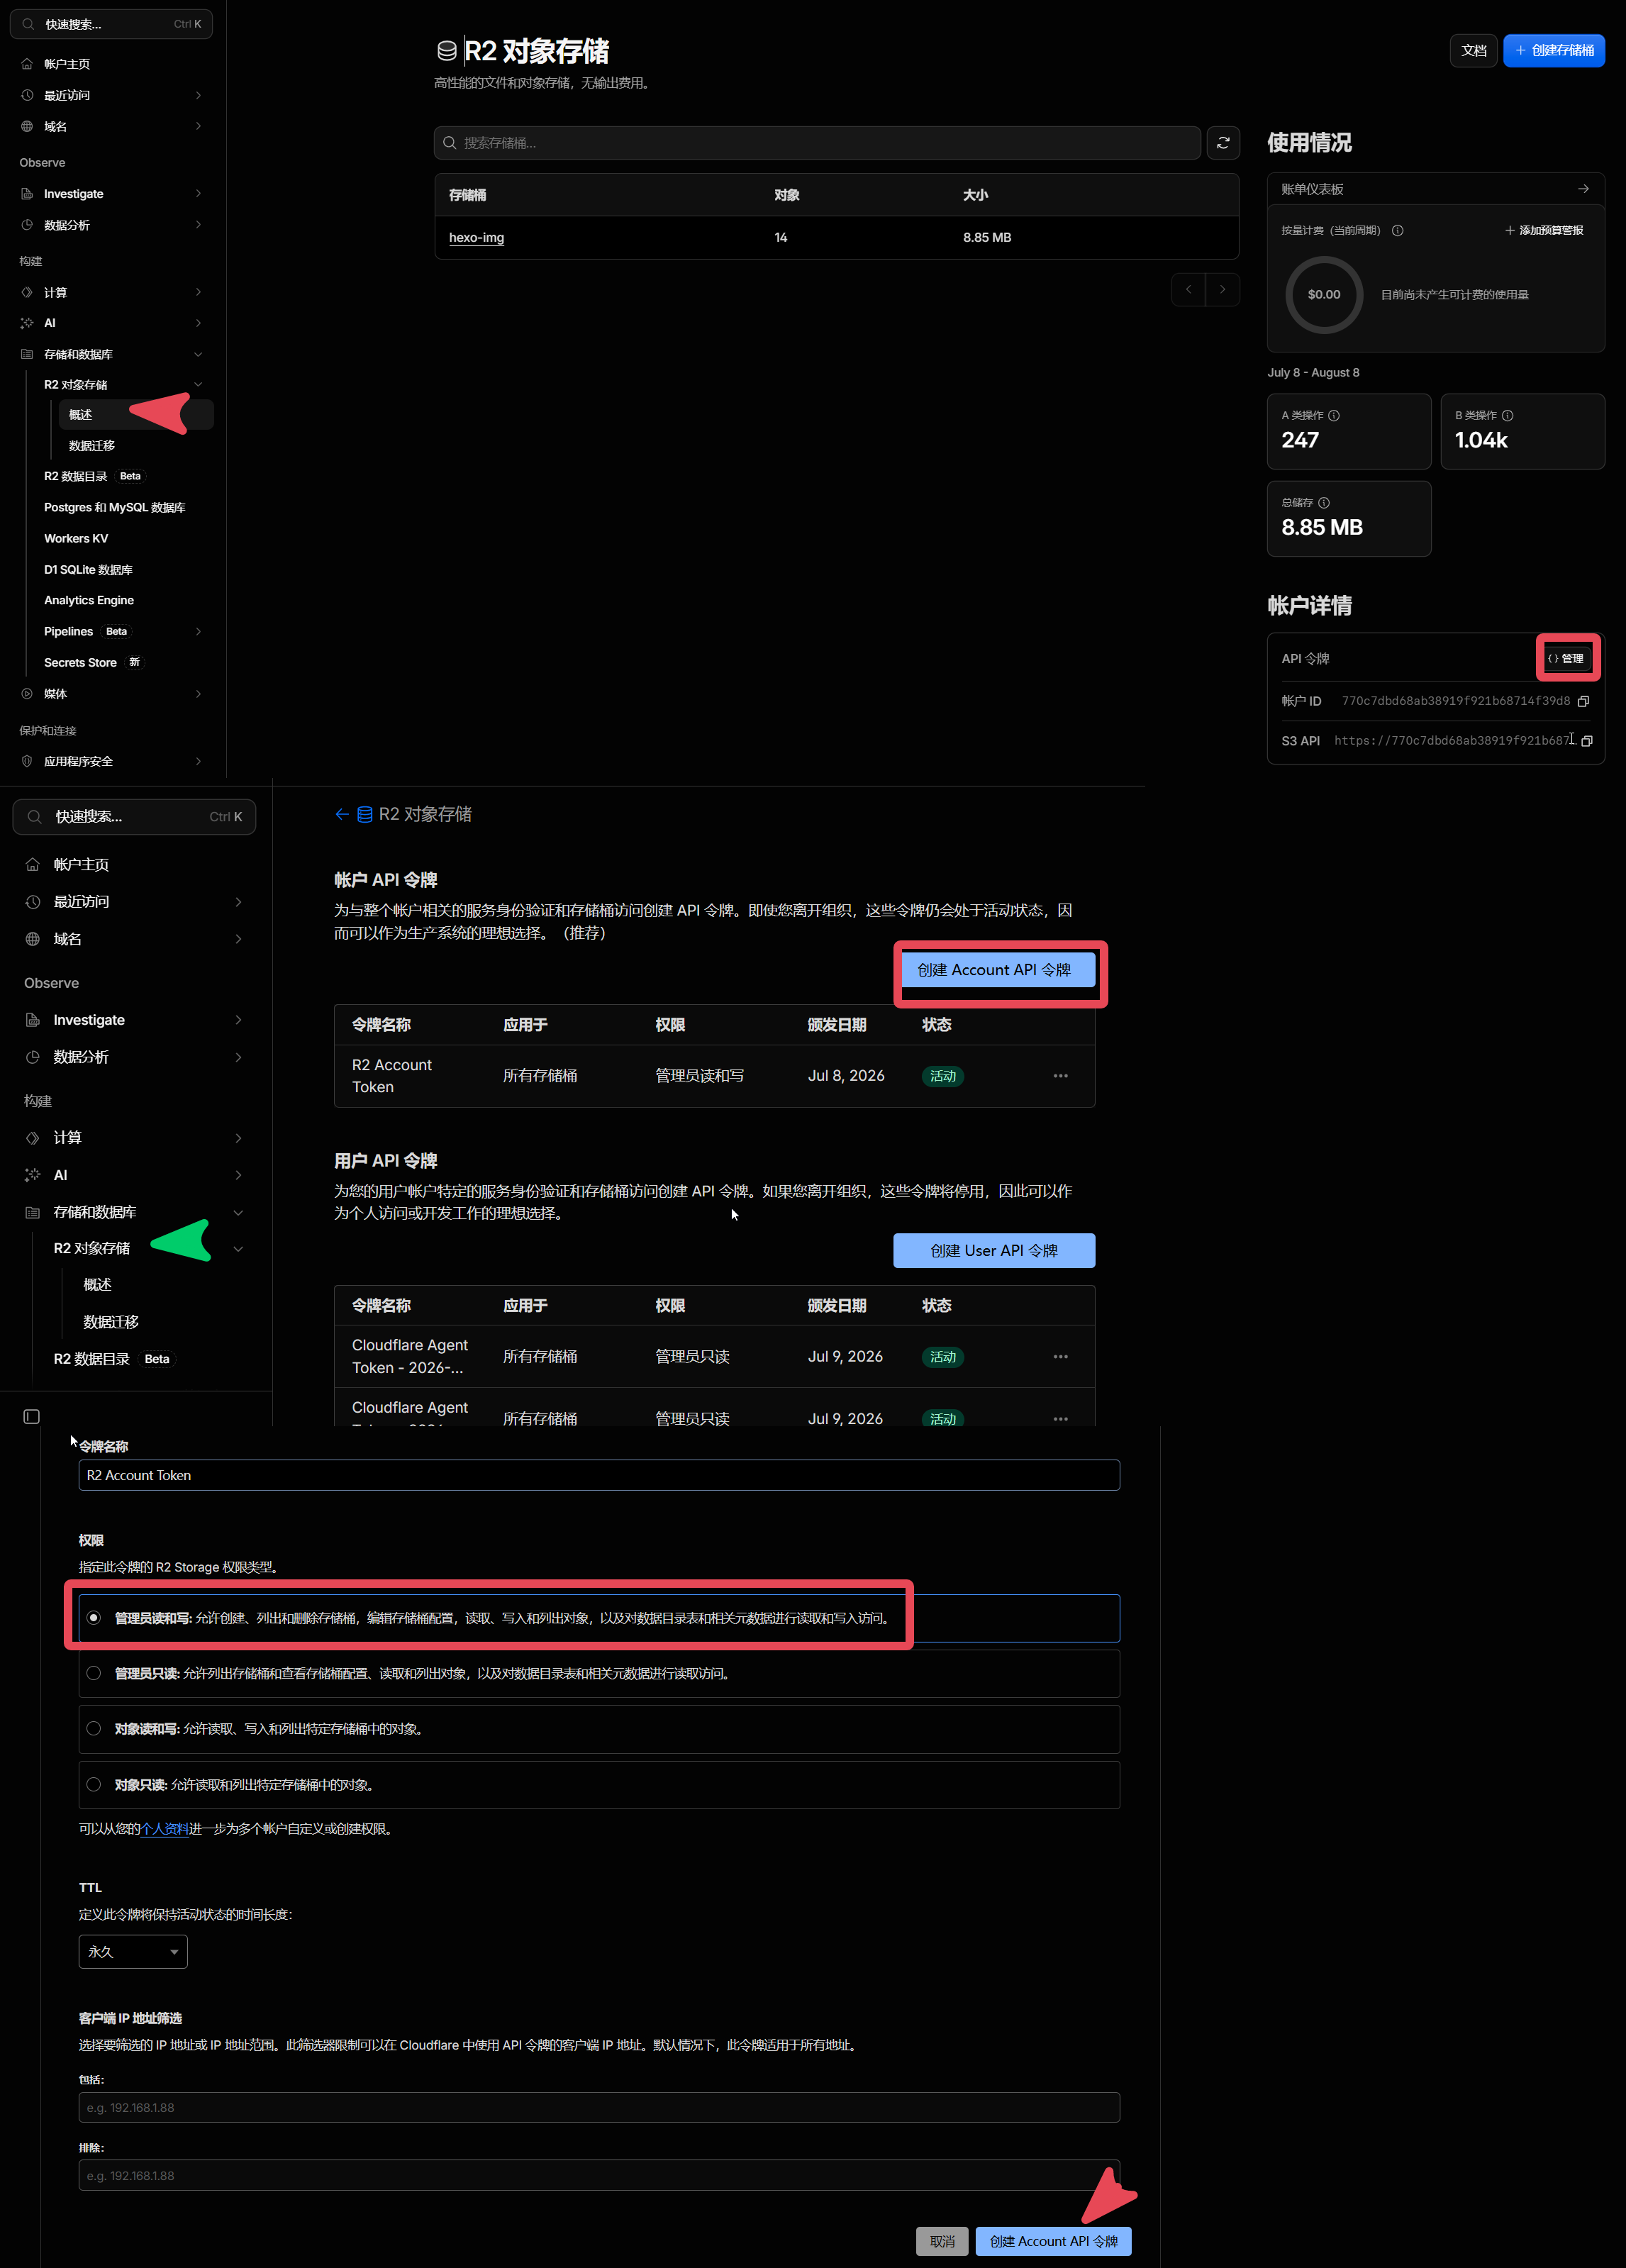
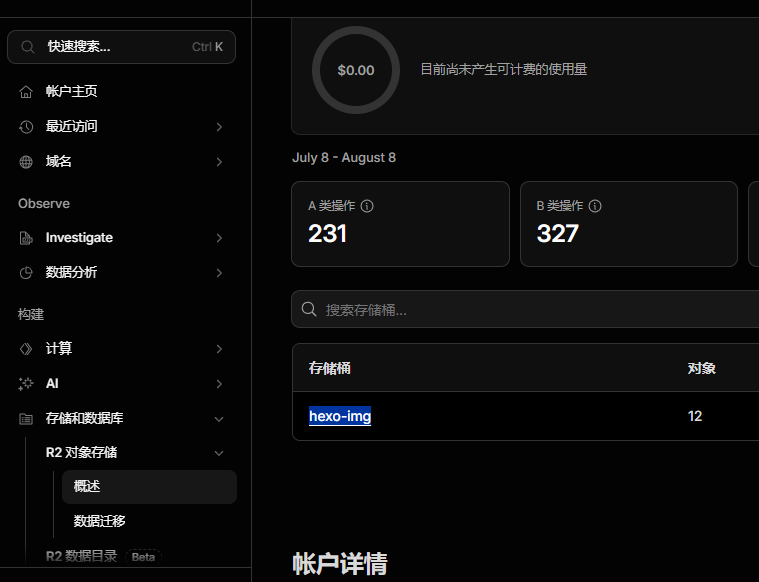
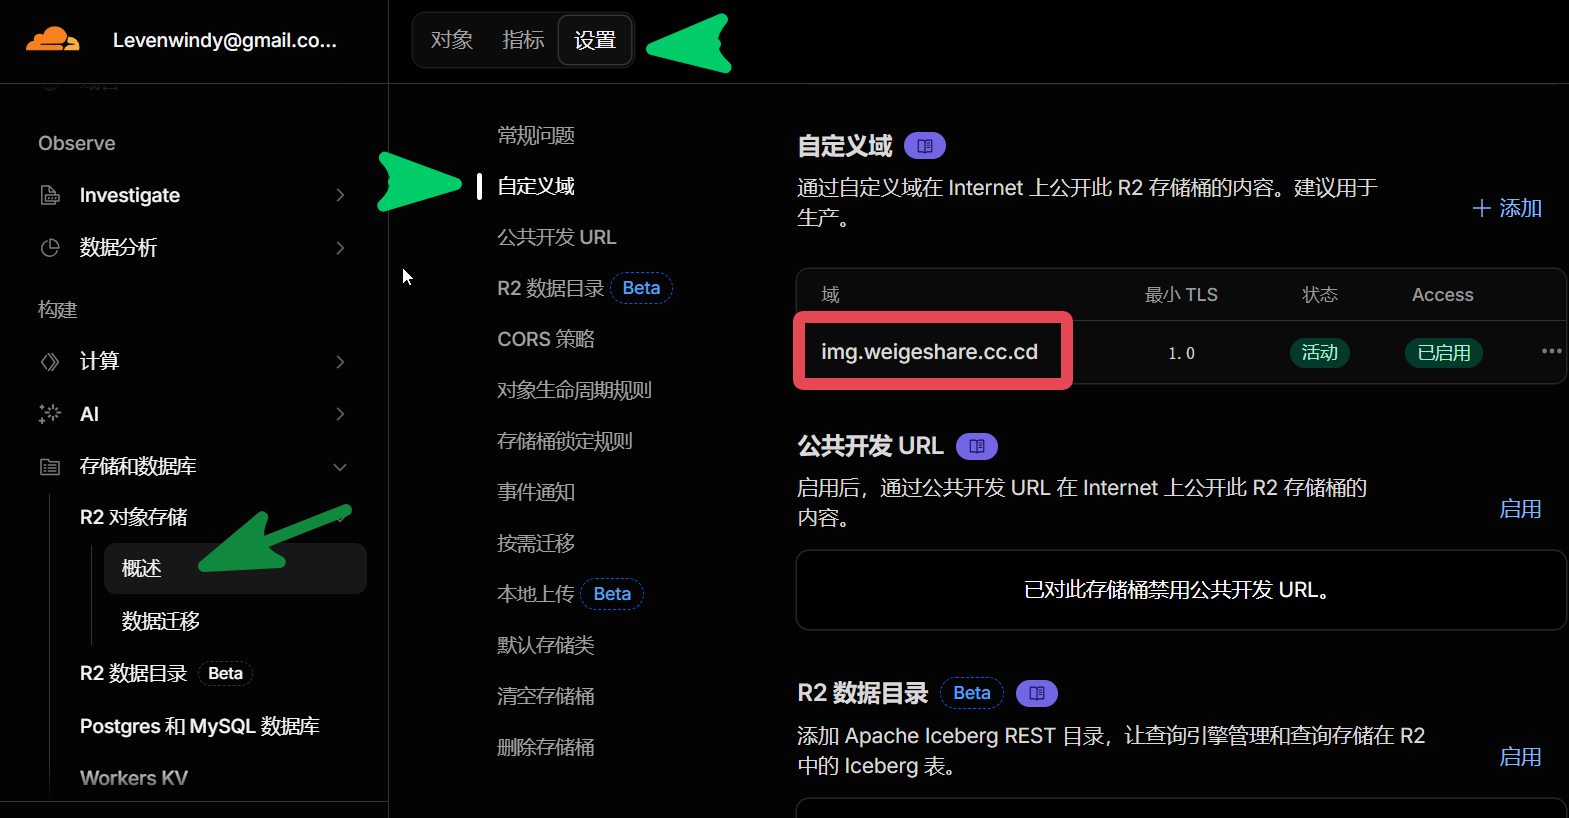
      <![CDATA[<h1 id="前言"><a href="#前言" class="headerlink" title="前言"></a>前言</h1><p>PicList 現在對 Cloudflare R2 的支援已經相當完整，不過第一次設定時還是有幾個地方容易踩雷：</p><ul><li>設定欄位不少，新手很容易把參數填錯位置。</li><li>目前沒有專門的連線測試按鈕。<ul><li>最直接的驗證方式，就是實際上傳一張圖片。</li></ul></li></ul><p>這篇文章會一步一步說明如何把 <strong>PicList</strong> 接到 <strong>Cloudflare R2</strong>，作為速度快、可搭配自訂網域與 CDN 的圖床。</p><p>如果 R2 儲存桶還沒建立，可以先參考：</p><ul><li><strong><a href="https://www.fecify.com/doc/cn-1.0/fecify-shop-helper-cloudflare-r2.html">Cloudflare R2 教學</a></strong></li></ul><p>本文使用的 PicList 版本為 <strong>v3.5.0（2026 年 7 月）</strong>。</p><hr><p>最近將部落格圖片遷移到了 <strong>Cloudflare R2</strong>，搭配 <strong>PicList</strong> 使用，效果非常不錯：</p><p>優點：</p><p>✅ 免費  ✅ 穩定  ✅ 高速  ✅ 自訂網域  ✅ 全球 CDN 加速  ✅ VPS 零壓力</p><hr><h1 id="設定-PicList"><a href="#設定-PicList" class="headerlink" title="設定 PicList"></a>設定 PicList</h1><ul><li>圖床：用於圖片上傳</li><li>雲端：用於 PicList 存取 Cloudflare 的圖床</li></ul><h2 id="圖床設定"><a href="#圖床設定" class="headerlink" title="圖床設定"></a>圖床設定</h2><p>在左側導覽視窗【<strong>圖床</strong>】-【<strong>AWS S3</strong>】-【<strong>新增設定</strong>】：</p><img src="https://img.weigshare.com/img/001.002_PicList_orign.png" width="120"/><h3 id="必填項"><a href="#必填項" class="headerlink" title="必填項"></a>必填項</h3><pre><code>● 設定名稱：任意● AccessKeyId：18e1************************c0858● secretAccessKey：c8a3********************************************************fa6e● 自訂節點：https://770*************************39d8.r2.cloudflarestorage.com</code></pre><p>以上均可在此取得：<a href="https://img.weigshare.com/img/001.005_CF_API_token.png">API 圖示</a>。</p><ul><li>權限：<strong>管理員讀和寫</strong>（否則 <strong>PicList</strong> 雲端存取會失敗）</li><li>金鑰只顯示一次，記得保存，否則需要重新建立。</li></ul><p>● Bucket（儲存桶）：我的名稱是 <strong>hexo-img</strong>。<a href="https://img.weigshare.com/img/001.003_CDF_bucket.png">圖示</a></p><hr><h3 id="非必需項"><a href="#非必需項" class="headerlink" title="非必需項"></a>非必需項</h3><p>■ 上傳路徑：**&#x2F;**（根目錄）</p><p>我想放在 <strong>img</strong> 目錄下，因此設定為 **&#x2F;img&#x2F;**。<a href="https://img.weigshare.com/img/001.004_Directory.png">圖示</a></p><p>● 自訂網域：<a href="https://img.weigshare.com/">https://img.weigshare.com/</a><br>（綁定網域後才能設定，上傳後即可取得對應網域的連結。）<a href="https://img.weigshare.com/img/001.004_Directory.png">圖示</a></p><pre class="line-numbers language-bash" data-language="bash"><code class="language-bash">https://img.weigeshare.com/img/x.png<span aria-hidden="true" class="line-numbers-rows"><span></span></span></code></pre><p>☐ 若不設定，可能取得以下連結，而且可能無法直接開啟：</p><pre class="line-numbers language-text" data-language="text"><code class="language-text">https://770*************************39d8.r2.cloudflarestorage.com/img/0.%E5%B1%8F%E5%B9%95%E6%88%AA%E5%9B%BE%202026-07-08%20181820.png<span aria-hidden="true" class="line-numbers-rows"><span></span></span></code></pre><p>☐ Region：<strong>auto</strong>（或 us-east-1）</p><ul><li>上傳資源的存取策略：<span style="color:#ff69b4;font-weight:bold;">public-read</span>（官方建議）</li></ul><hr><h2 id="雲端設定"><a href="#雲端設定" class="headerlink" title="雲端設定"></a>雲端設定</h2><p>在左側導覽視窗【<strong>雲端</strong>】-【<strong>S3 API</strong>】-【<strong>新增設定</strong>】-【<strong>保存</strong>】：</p><p><img src="https://img.weigshare.com/img/001.005_piclist_cloud_configuration1.png" height="280"/> <img src="https://img.weigshare.com/img/001.005_piclist_cloud_configuration2.png" height="280"/></p><h3 id="必填項-1"><a href="#必填項-1" class="headerlink" title="必填項"></a>必填項</h3><pre><code>● 設定名稱：任意● Access Key Id：18e1************************c0858● Access Key Secret：c8a3********************************************************fa6e● endpoint 自訂節點：https://770*************************39d8.r2.cloudflarestorage.com</code></pre><p>API Token 可在此取得：<a href="https://img.weigshare.com/img/001.005_CF_API_token.png">API</a>。</p><ul><li>權限：<strong>管理員讀和寫</strong>（否則 <strong>PicList</strong> 雲端存取會失敗）</li></ul><p>● 儲存桶名稱（Bucket）：<strong>hexo-img</strong>。<a href="https://img.weigshare.com/img/001.003_CDF_bucket.png">圖示</a></p><p>■ 起始目錄：**&#x2F;**</p><ul><li>我想儲存在 <strong>&#x2F;img&#x2F;</strong> 目錄下：<a href="https://img.weigshare.com/img/001.004_Directory.png">圖示</a></li></ul><h3 id="非必需項-1"><a href="#非必需項-1" class="headerlink" title="非必需項"></a>非必需項</h3><p>■ 上傳檔案權限：public-read（公開讀取，官方建議）</p><hr><h1 id="常見問題"><a href="#常見問題" class="headerlink" title="常見問題"></a>常見問題</h1><h2 id="上傳成功但圖片打不開"><a href="#上傳成功但圖片打不開" class="headerlink" title="上傳成功但圖片打不開"></a>上傳成功但圖片打不開</h2><p>檢查：</p><ul><li>Bucket 是否允許公開存取</li><li>自訂網域是否已綁定</li><li>DNS 解析是否已生效</li></ul><h2 id="出現-AccessDenied"><a href="#出現-AccessDenied" class="headerlink" title="出現 AccessDenied"></a>出現 AccessDenied</h2><p>檢查：</p><ul><li>Access Key ID 是否正確</li><li>Secret Access Key 是否正確</li><li>API Token 是否具有讀寫權限</li></ul><h2 id="出現-SignatureDoesNotMatch"><a href="#出現-SignatureDoesNotMatch" class="headerlink" title="出現 SignatureDoesNotMatch"></a>出現 SignatureDoesNotMatch</h2><p>檢查：</p><ul><li>Endpoint 是否填寫正確</li></ul><h1 id="總結"><a href="#總結" class="headerlink" title="總結"></a>總結</h1><p>目前我的部落格方案：</p><pre class="line-numbers language-text" data-language="text"><code class="language-text">Hexo + Butterfly + Github + Cloudflare R2 + Cloudflare CDN<span aria-hidden="true" class="line-numbers-rows"><span></span></span></code></pre><p>如果你正在尋找一個長期穩定的部落格圖床方案，PicList + Cloudflare R2 非常值得嘗試。</p>]]>
    </content>
    <id>https://www.weigshare.com/posts/PicList-Cloudflare-R2-Guide/</id>
    <link href="https://www.weigshare.com/posts/PicList-Cloudflare-R2-Guide/"/>
    <published>2026-07-08T13:10:08.000Z</published>
    <summary>新手也能照著完成的 PicList + Cloudflare R2 圖床設定教學，支援自訂網域與全球 CDN 加速。</summary>
    <title>用 PicList + Cloudflare R2 搭建免費高速圖床</title>
    <updated>2026-10-21T08:39:31.056Z</updated>
  </entry>
  <entry>
    <author>
      <name>Wei.G</name>
    </author>
    <category term="Python" scheme="https://www.weigshare.com/categories/Python/"/>
    <category term="Python" scheme="https://www.weigshare.com/tags/Python/"/>
    <category term="PyQt6" scheme="https://www.weigshare.com/tags/PyQt6/"/>
    <category term="實驗室" scheme="https://www.weigshare.com/tags/%E5%AF%A6%E9%A9%97%E5%AE%A4/"/>
    <category term="化學分析" scheme="https://www.weigshare.com/tags/%E5%8C%96%E5%AD%B8%E5%88%86%E6%9E%90/"/>
    <category term="國標" scheme="https://www.weigshare.com/tags/%E5%9C%8B%E6%A8%99/"/>
    <category term="標準滴定液" scheme="https://www.weigshare.com/tags/%E6%A8%99%E6%BA%96%E6%BB%B4%E5%AE%9A%E6%B6%B2/"/>
    <category term="標準溶液" scheme="https://www.weigshare.com/tags/%E6%A8%99%E6%BA%96%E6%BA%B6%E6%B6%B2/"/>
    <content>
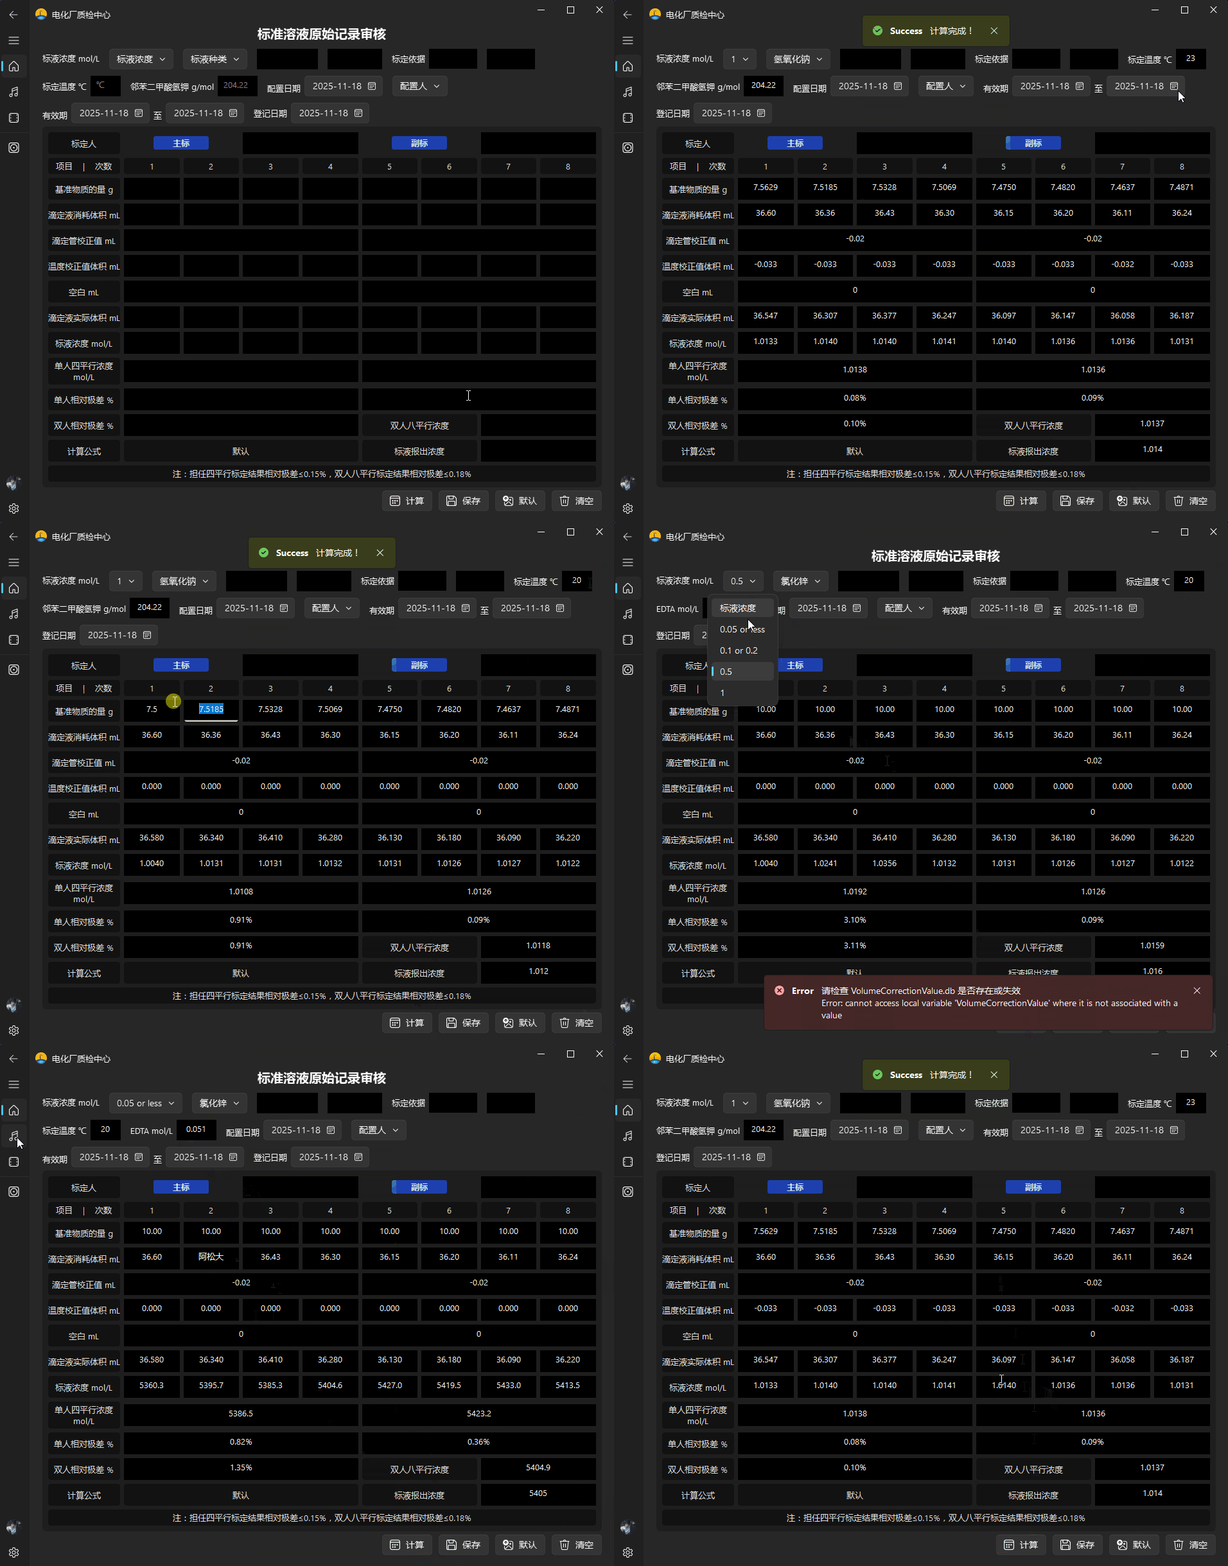
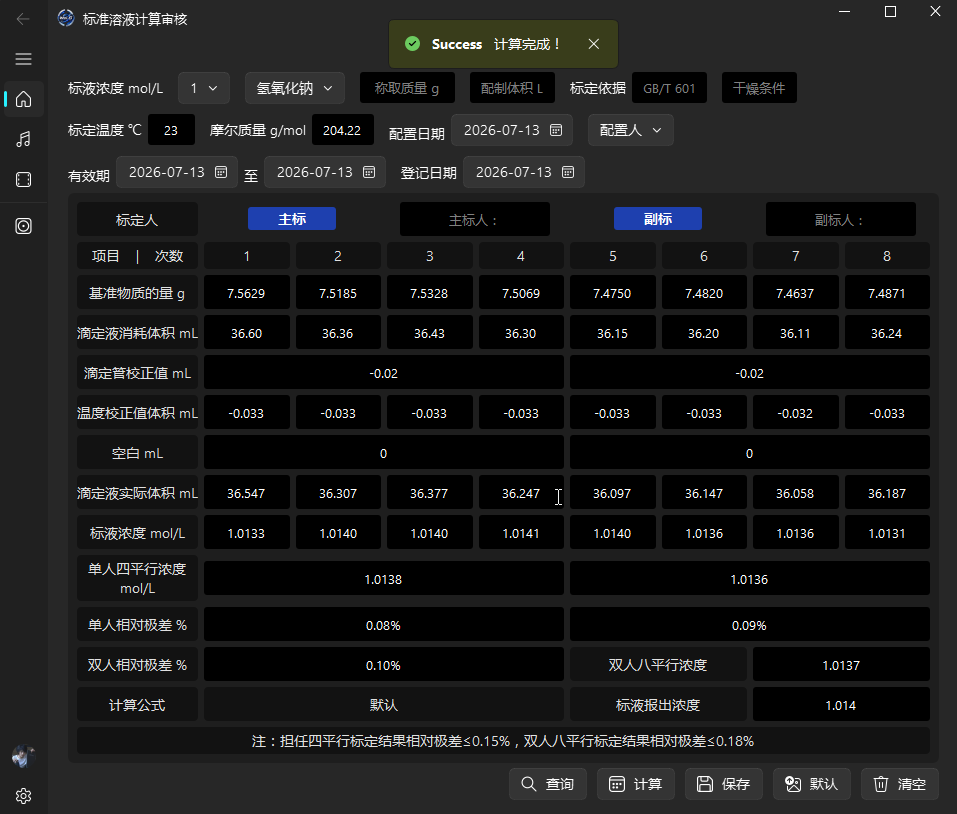
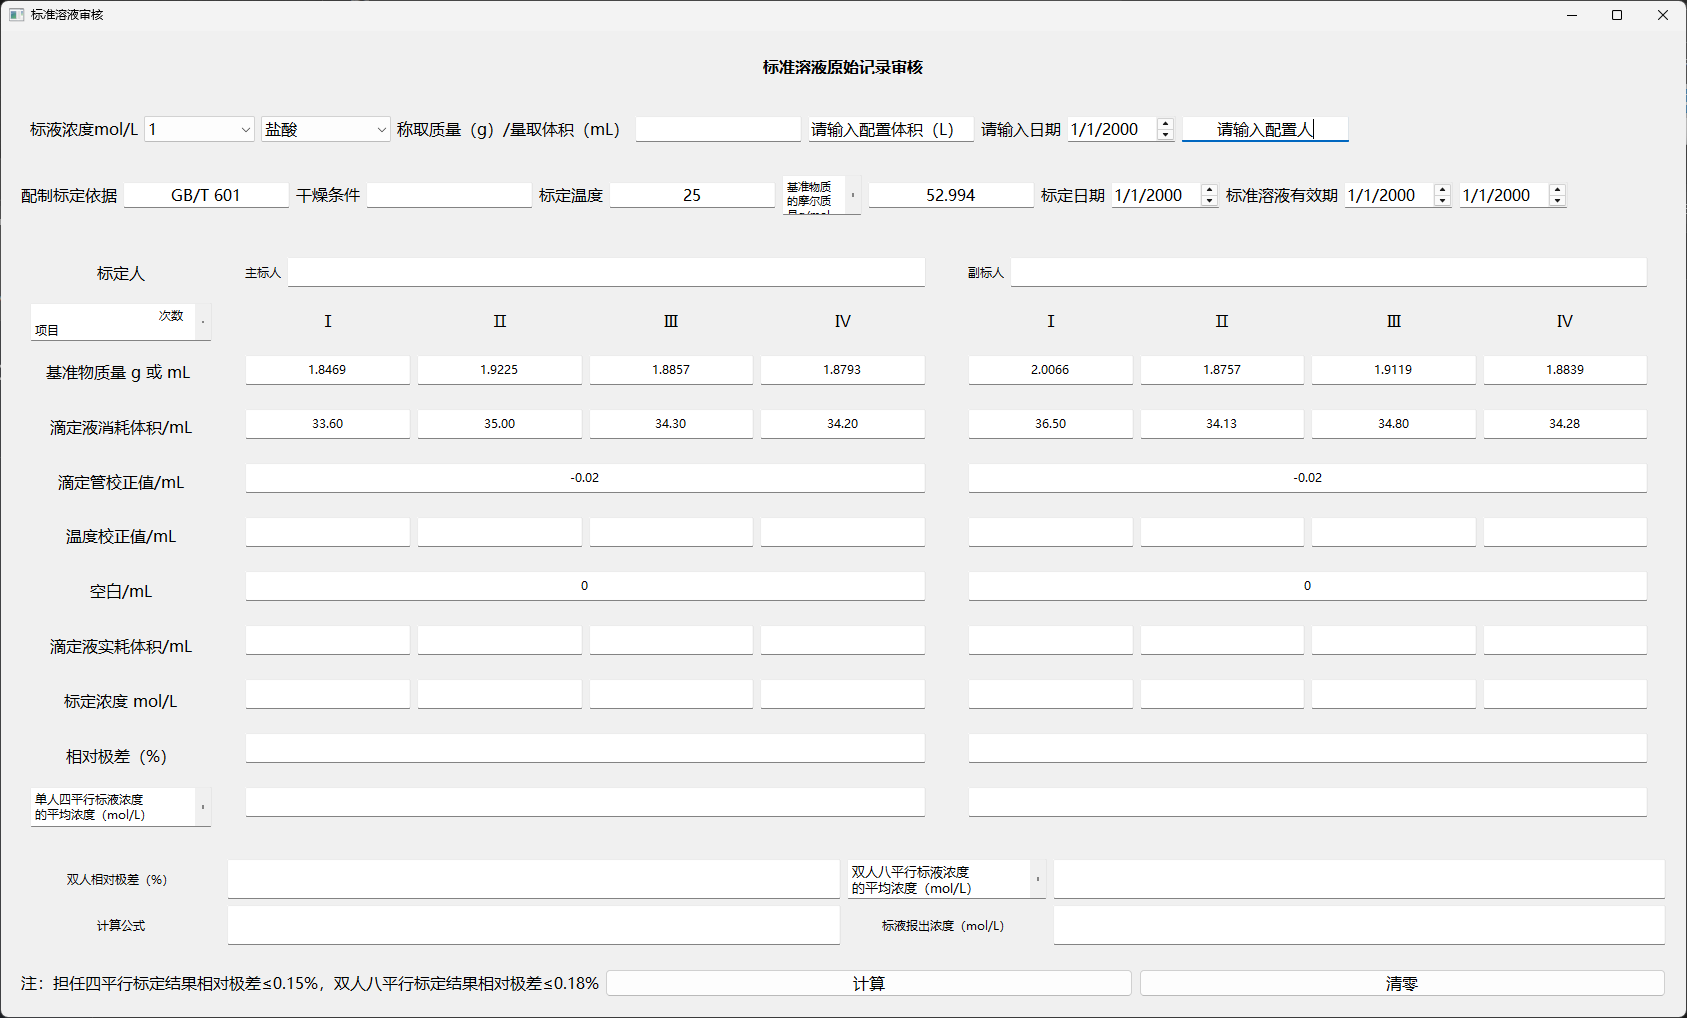
      <![CDATA[<h1 id="專案背景"><a href="#專案背景" class="headerlink" title="專案背景"></a>專案背景</h1><p>化學分析工作經常需要配製與標定標準滴定溶液。標定完成後，還要進一步計算濃度、套用校正值、比較平行樣結果並完成審核。全部靠人工計算與覆核，不只花時間，資料一多也更容易出現計算或審核疏漏。</p><ul><li><p>這套系統是在工作之餘慢慢做出來的，從 4 月開始，到 11 月完成第一個正式版本，前後花了 6 個多月，也是我第一個真正投入使用的 GUI 桌面程式。</p></li><li><p>開發過程中自學 Python 與 PyQt6，從介面、計算邏輯、測試到部署都自己完成；另外使用 QFluentWidgets 改善日常操作的體驗。</p></li><li><p>實際投入使用後，每人每週可以少花一個多小時在資料審核上。也算實現了某個晚上冒出的念頭——花半年做一個工具，之後每週替自己「偷懶」一小時。😆</p></li><li><p>最近剛離職，終於有時間把專案整理完整，乾脆一起開源分享。</p></li></ul><p><strong><a href="https://www.weigshare.com/standard">網頁預覽</a> ⬅</strong> 點這裡</p><h1 id="標準溶液計算審核系統"><a href="#標準溶液計算審核系統" class="headerlink" title="標準溶液計算審核系統"></a>標準溶液計算審核系統</h1><div align="left" style="display:flex;gap:10px;flex-wrap:wrap;justify-content:left;">  <img src="https://img.shields.io/badge/Python-3.12-blue" alt="Python">  <img src="https://img.shields.io/badge/PyQt6-GUI-green" alt="PyQt6">  <img src="https://img.shields.io/badge/SQLite-Database-blue" alt="SQLite">  <img src="https://img.shields.io/badge/GPL--3.0-red" alt="GPL3"></div><p>一款用於實驗室標準溶液標定、計算與審核的軟體。</p><p>支援溫度校正、滴定管校正、單人四平行、雙人八平行及相對極差自動計算，提高實驗室標準溶液管理效率。</p><img src="https://img.weigshare.com/img/002.StandardSolution_Review_System_Demo_GIF.gif" ><p>輸入實驗數據後，即可自動完成計算與審核。開始使用 <a href="https://github.com/weigefenxiang/StandardSolutionReviewSystem/releases">exe</a>。</p><hr><h2 id="功能特點"><a href="#功能特點" class="headerlink" title="功能特點"></a>功能特點</h2><p>✅ 溫度校正計算<br>✅ 滴定管校正值修正<br>✅ 標液濃度自動計算</p><p>✅ 單人四平行計算<br>✅ 雙人八平行計算<br>✅ 相對極差計算<br>✅ 標液報出濃度計算</p><hr><h2 id="支援的標準溶液"><a href="#支援的標準溶液" class="headerlink" title="支援的標準溶液"></a>支援的標準溶液</h2><ul><li><p>鹽酸、氫氧化鈉、硫酸、高錳酸鉀、硝酸銀、硫代硫酸鈉、乙二胺四乙酸（EDTA）、氯化鋅、氫氧化鉀-乙醇、碳酸鈉等</p></li><li><p>HCl、NaOH、H₂SO₄、KMnO₄、AgNO₃、Na₂S₂O₃、EDTA、ZnCl₂、KOH-Ethanol、Na₂CO₃、Custom Molar Mass (g&#x2F;mol)</p></li><li><p><strong>自訂</strong></p></li></ul><hr><h2 id="軟體介面"><a href="#軟體介面" class="headerlink" title="軟體介面"></a>軟體介面</h2><h3 id="主介面"><a href="#主介面" class="headerlink" title="主介面"></a>主介面</h3><img src="https://img.weigshare.com/img/002.StandardSolution_Review_System_Demo.png" ><h4 id="舊介面"><a href="#舊介面" class="headerlink" title="舊介面"></a>舊介面</h4><p>經過多次迭代：</p><img src=https://img.weigshare.com/img/002.002.StandardSolution_Review_System_Demo_old.png ><table><thead><tr><th><strong>支援輸入</strong></th><th><strong>自動產生</strong></th></tr></thead><tbody><tr><td>基準物質質量</td><td>實際滴定體積</td></tr><tr><td>滴定液消耗體積</td><td>單人四平行濃度</td></tr><tr><td>滴定管校正值</td><td>雙人八平行濃度</td></tr><tr><td>溫度校正值</td><td>相對極差</td></tr><tr><td>空白試驗體積</td><td>報出濃度</td></tr></tbody></table><hr><h2 id="執行方式"><a href="#執行方式" class="headerlink" title="執行方式"></a>執行方式</h2><h3 id="發布版"><a href="#發布版" class="headerlink" title="發布版"></a>發布版</h3><p>下載並執行 <a href="https://github.com/weigefenxiang/StandardSolutionReviewSystem/releases">exe</a>：</p><pre class="line-numbers language-text" data-language="text"><code class="language-text">StandardSolution_ReviewSystem.exe<span aria-hidden="true" class="line-numbers-rows"><span></span></span></code></pre><h2 id="從原始碼執行"><a href="#從原始碼執行" class="headerlink" title="從原始碼執行"></a>從原始碼執行</h2><details>    <summary>點擊展開</summary><h3 id="開發環境"><a href="#開發環境" class="headerlink" title="開發環境"></a>開發環境</h3><ul><li>Windows 11</li><li>Python 3.12</li><li>PyQt6</li><li>QFluentWidgets</li><li>SQLite</li><li>Nuitka（用於打包）</li></ul><h3 id="安裝依賴"><a href="#安裝依賴" class="headerlink" title="安裝依賴"></a>安裝依賴</h3><pre class="line-numbers language-bash" data-language="bash"><code class="language-bash">pip <span class="token function">install</span> <span class="token parameter variable">-r</span> requirements.txt<span aria-hidden="true" class="line-numbers-rows"><span></span></span></code></pre><h3 id="執行程式"><a href="#執行程式" class="headerlink" title="執行程式"></a>執行程式</h3><pre class="line-numbers language-bash" data-language="bash"><code class="language-bash">python Flu_Main.py<span aria-hidden="true" class="line-numbers-rows"><span></span></span></code></pre><h2 id="開源授權"><a href="#開源授權" class="headerlink" title="開源授權"></a>開源授權</h2><p>本專案採用 GPL-3.0 License 開源。</p><p>使用、修改和散佈本專案時，請遵守 GPL-3.0 授權條款。</p><h2 id="第三方開源元件"><a href="#第三方開源元件" class="headerlink" title="第三方開源元件"></a>第三方開源元件</h2><p>本專案使用以下開源專案：</p><ul><li>Python、PyQt6、QFluentWidgets、SQLite、Nuitka</li></ul><p>感謝所有開源專案開發者的貢獻。</p></details>]]>
    </content>
    <id>https://www.weigshare.com/posts/StandardSolution-Review-Soft/</id>
    <link href="https://www.weigshare.com/posts/StandardSolution-Review-Soft/"/>
    <published>2026-07-02T01:19:11.000Z</published>
    <summary>以 Python、PyQt6、QFluentWidgets 與 SQLite 開發的 Windows 實驗室工具，用於標準溶液計算與審核，支援溫度校正、滴定管校正、平行樣統計與相對極差自動計算。</summary>
    <title>標準溶液計算與審核系統（Standard Solution Review System）</title>
    <updated>2026-10-21T08:39:31.056Z</updated>
  </entry>
</feed>