<?xml version="1.0" encoding="utf-8"?>
<feed xmlns="http://www.w3.org/2005/Atom">
  <author>
    <name>Wei.G</name>
  </author>
  <generator uri="https://hexo.io/">Hexo</generator>
  <id>https://www.weigshare.com/</id>
  <link href="https://www.weigshare.com/" rel="alternate"/>
  <link href="https://www.weigshare.com/atom.xml" rel="self"/>
  <rights>All rights reserved 2026, Wei.G</rights>
  <subtitle>Cloud · AI · Python · DevOps</subtitle>
  <title>Weige Share Blog</title>
  <updated>2026-08-30T13:25:49.067Z</updated>
  <entry>
    <author>
      <name>Wei.G</name>
    </author>
    <content>
      <![CDATA[<p>Welcome to <a href="https://hexo.io/">Hexo</a>! This is your very first post. Check <a href="https://hexo.io/docs/">documentation</a> for more info. If you get any problems when using Hexo, you can find the answer in <a href="https://hexo.io/docs/troubleshooting.html">troubleshooting</a> or you can ask me on <a href="https://github.com/hexojs/hexo/issues">GitHub</a>.</p><h2 id="Quick-Start"><a href="#Quick-Start" class="headerlink" title="Quick Start"></a>Quick Start</h2><h3 id="Create-a-new-post"><a href="#Create-a-new-post" class="headerlink" title="Create a new post"></a>Create a new post</h3><pre class="line-numbers language-bash" data-language="bash"><code class="language-bash">$ hexo new <span class="token string">"My New Post"</span><span aria-hidden="true" class="line-numbers-rows"><span></span></span></code></pre><p>More info: <a href="https://hexo.io/docs/writing.html">Writing</a></p><h3 id="Run-server"><a href="#Run-server" class="headerlink" title="Run server"></a>Run server</h3><pre class="line-numbers language-bash" data-language="bash"><code class="language-bash">$ hexo server<span aria-hidden="true" class="line-numbers-rows"><span></span></span></code></pre><p>More info: <a href="https://hexo.io/docs/server.html">Server</a></p><h3 id="Generate-static-files"><a href="#Generate-static-files" class="headerlink" title="Generate static files"></a>Generate static files</h3><pre class="line-numbers language-bash" data-language="bash"><code class="language-bash">$ hexo generate<span aria-hidden="true" class="line-numbers-rows"><span></span></span></code></pre><p>More info: <a href="https://hexo.io/docs/generating.html">Generating</a></p><h3 id="Deploy-to-remote-sites"><a href="#Deploy-to-remote-sites" class="headerlink" title="Deploy to remote sites"></a>Deploy to remote sites</h3><pre class="line-numbers language-bash" data-language="bash"><code class="language-bash">$ hexo deploy<span aria-hidden="true" class="line-numbers-rows"><span></span></span></code></pre><p>More info: <a href="https://hexo.io/docs/one-command-deployment.html">Deployment</a></p>]]>
    </content>
    <id>https://www.weigshare.com/posts/hello-world/</id>
    <link href="https://www.weigshare.com/posts/hello-world/"/>
    <published>2026-08-30T13:25:49.067Z</published>
    <summary>
      <![CDATA[<p>Welcome to <a href="https://hexo.io/">Hexo</a>! This is your very first post. Check <a href="https://hexo.io/docs/">documentation</a> for]]>
    </summary>
    <title>Hello World</title>
    <updated>2026-08-30T13:25:49.067Z</updated>
  </entry>
  <entry>
    <author>
      <name>Wei.G</name>
    </author>
    <category term="OpenWrt" scheme="https://www.weigshare.com/categories/OpenWrt/"/>
    <category term="OpenWrt" scheme="https://www.weigshare.com/tags/OpenWrt/"/>
    <category term="ImmortalWrt" scheme="https://www.weigshare.com/tags/ImmortalWrt/"/>
    <category term="GitHub Actions" scheme="https://www.weigshare.com/tags/GitHub-Actions/"/>
    <category term="固件编译" scheme="https://www.weigshare.com/tags/%E5%9B%BA%E4%BB%B6%E7%BC%96%E8%AF%91/"/>
    <content>
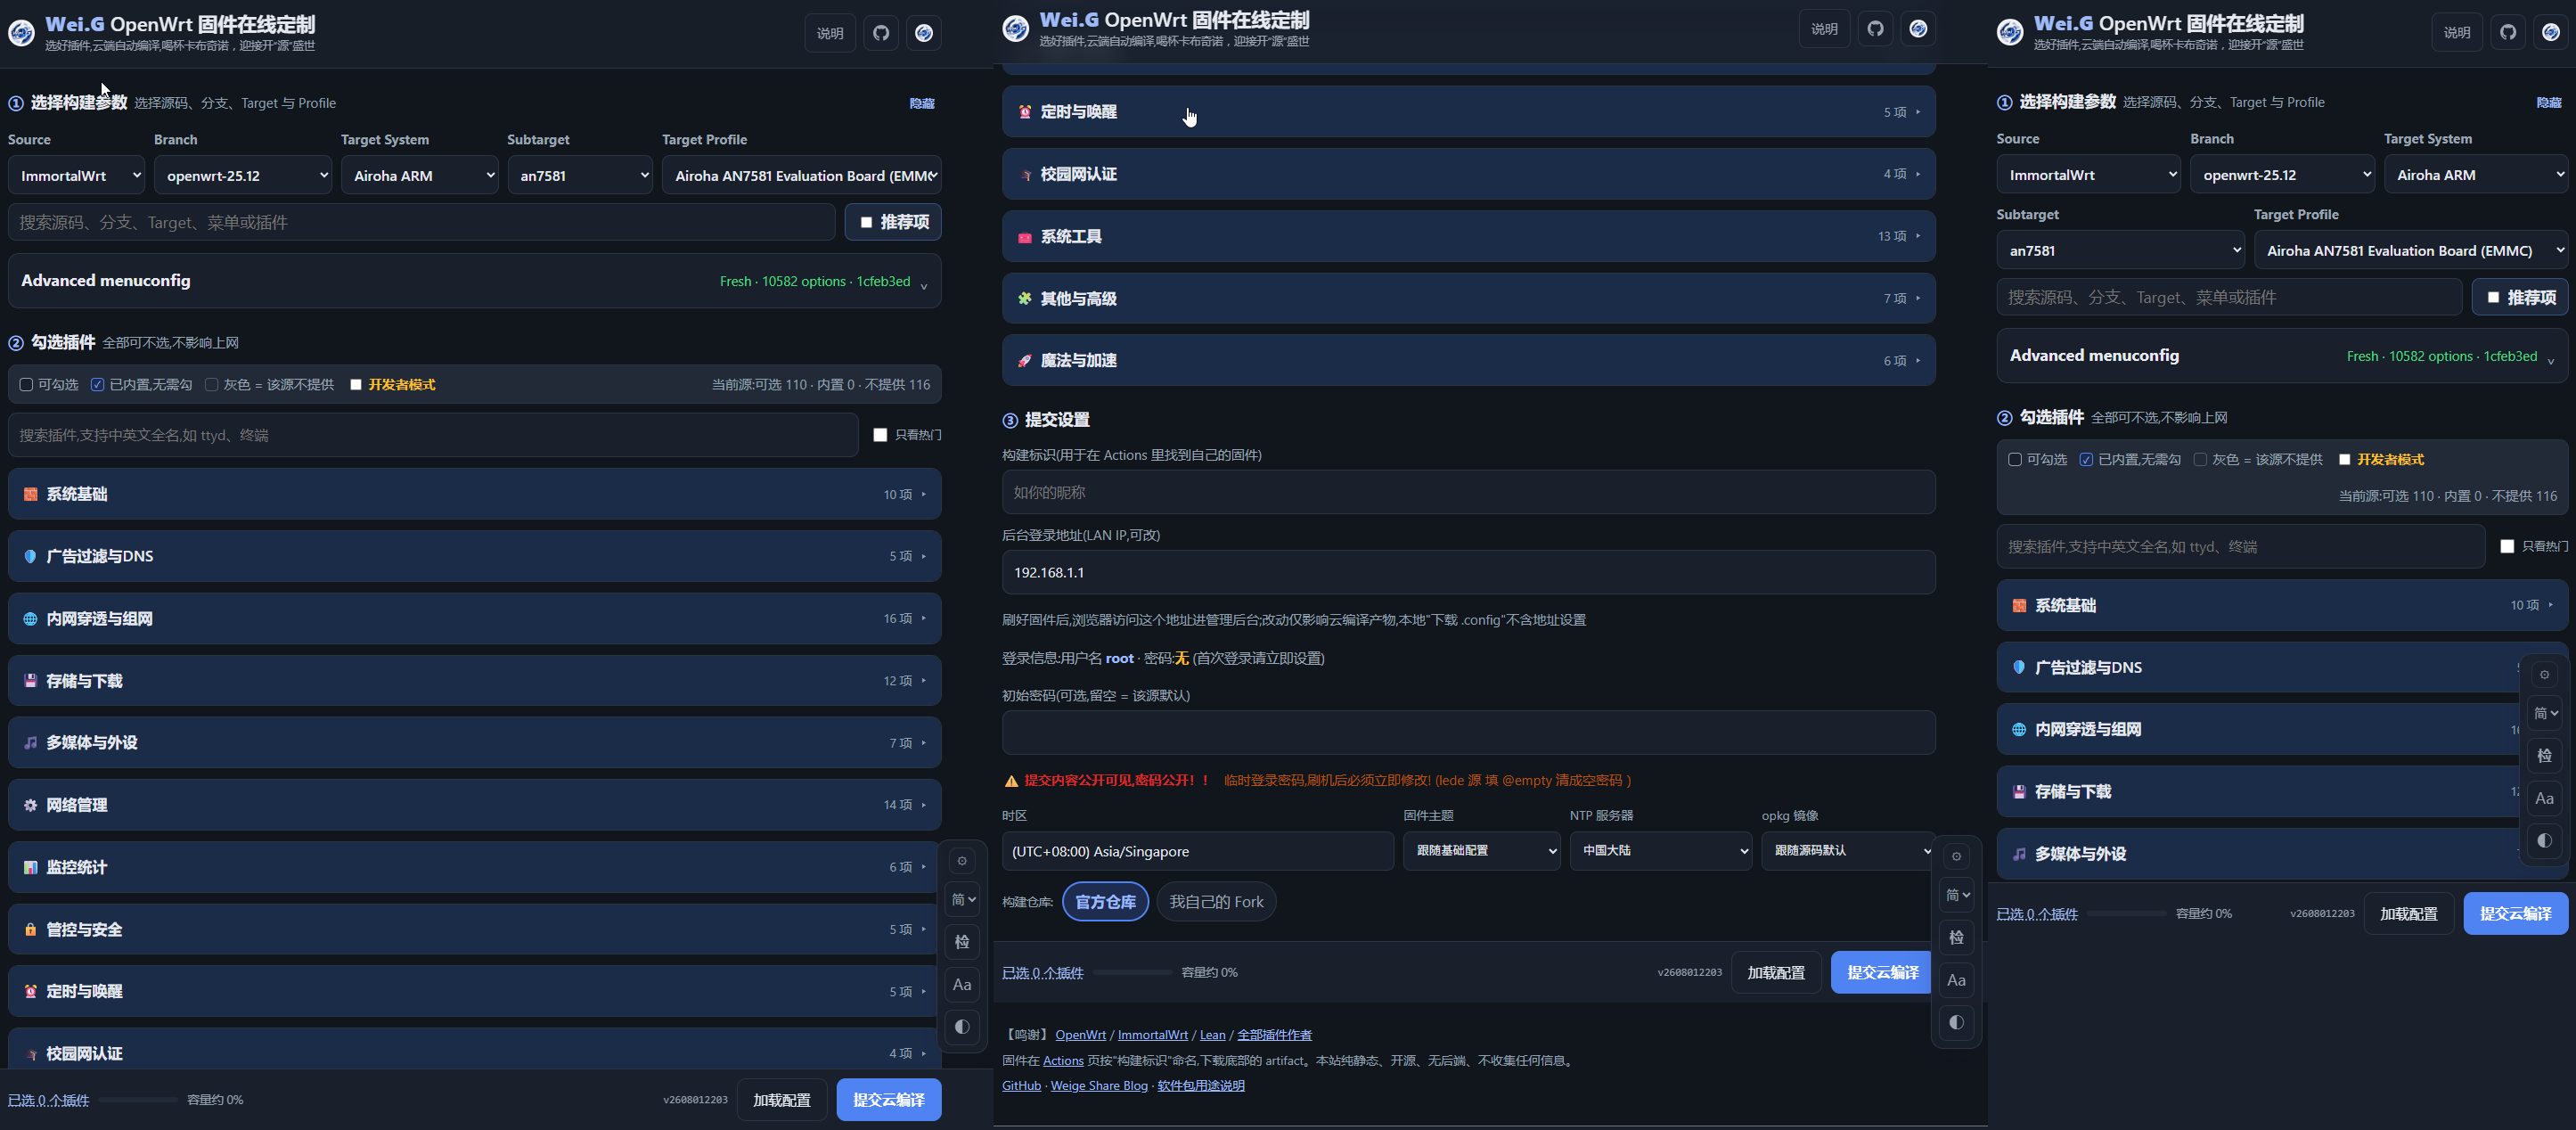
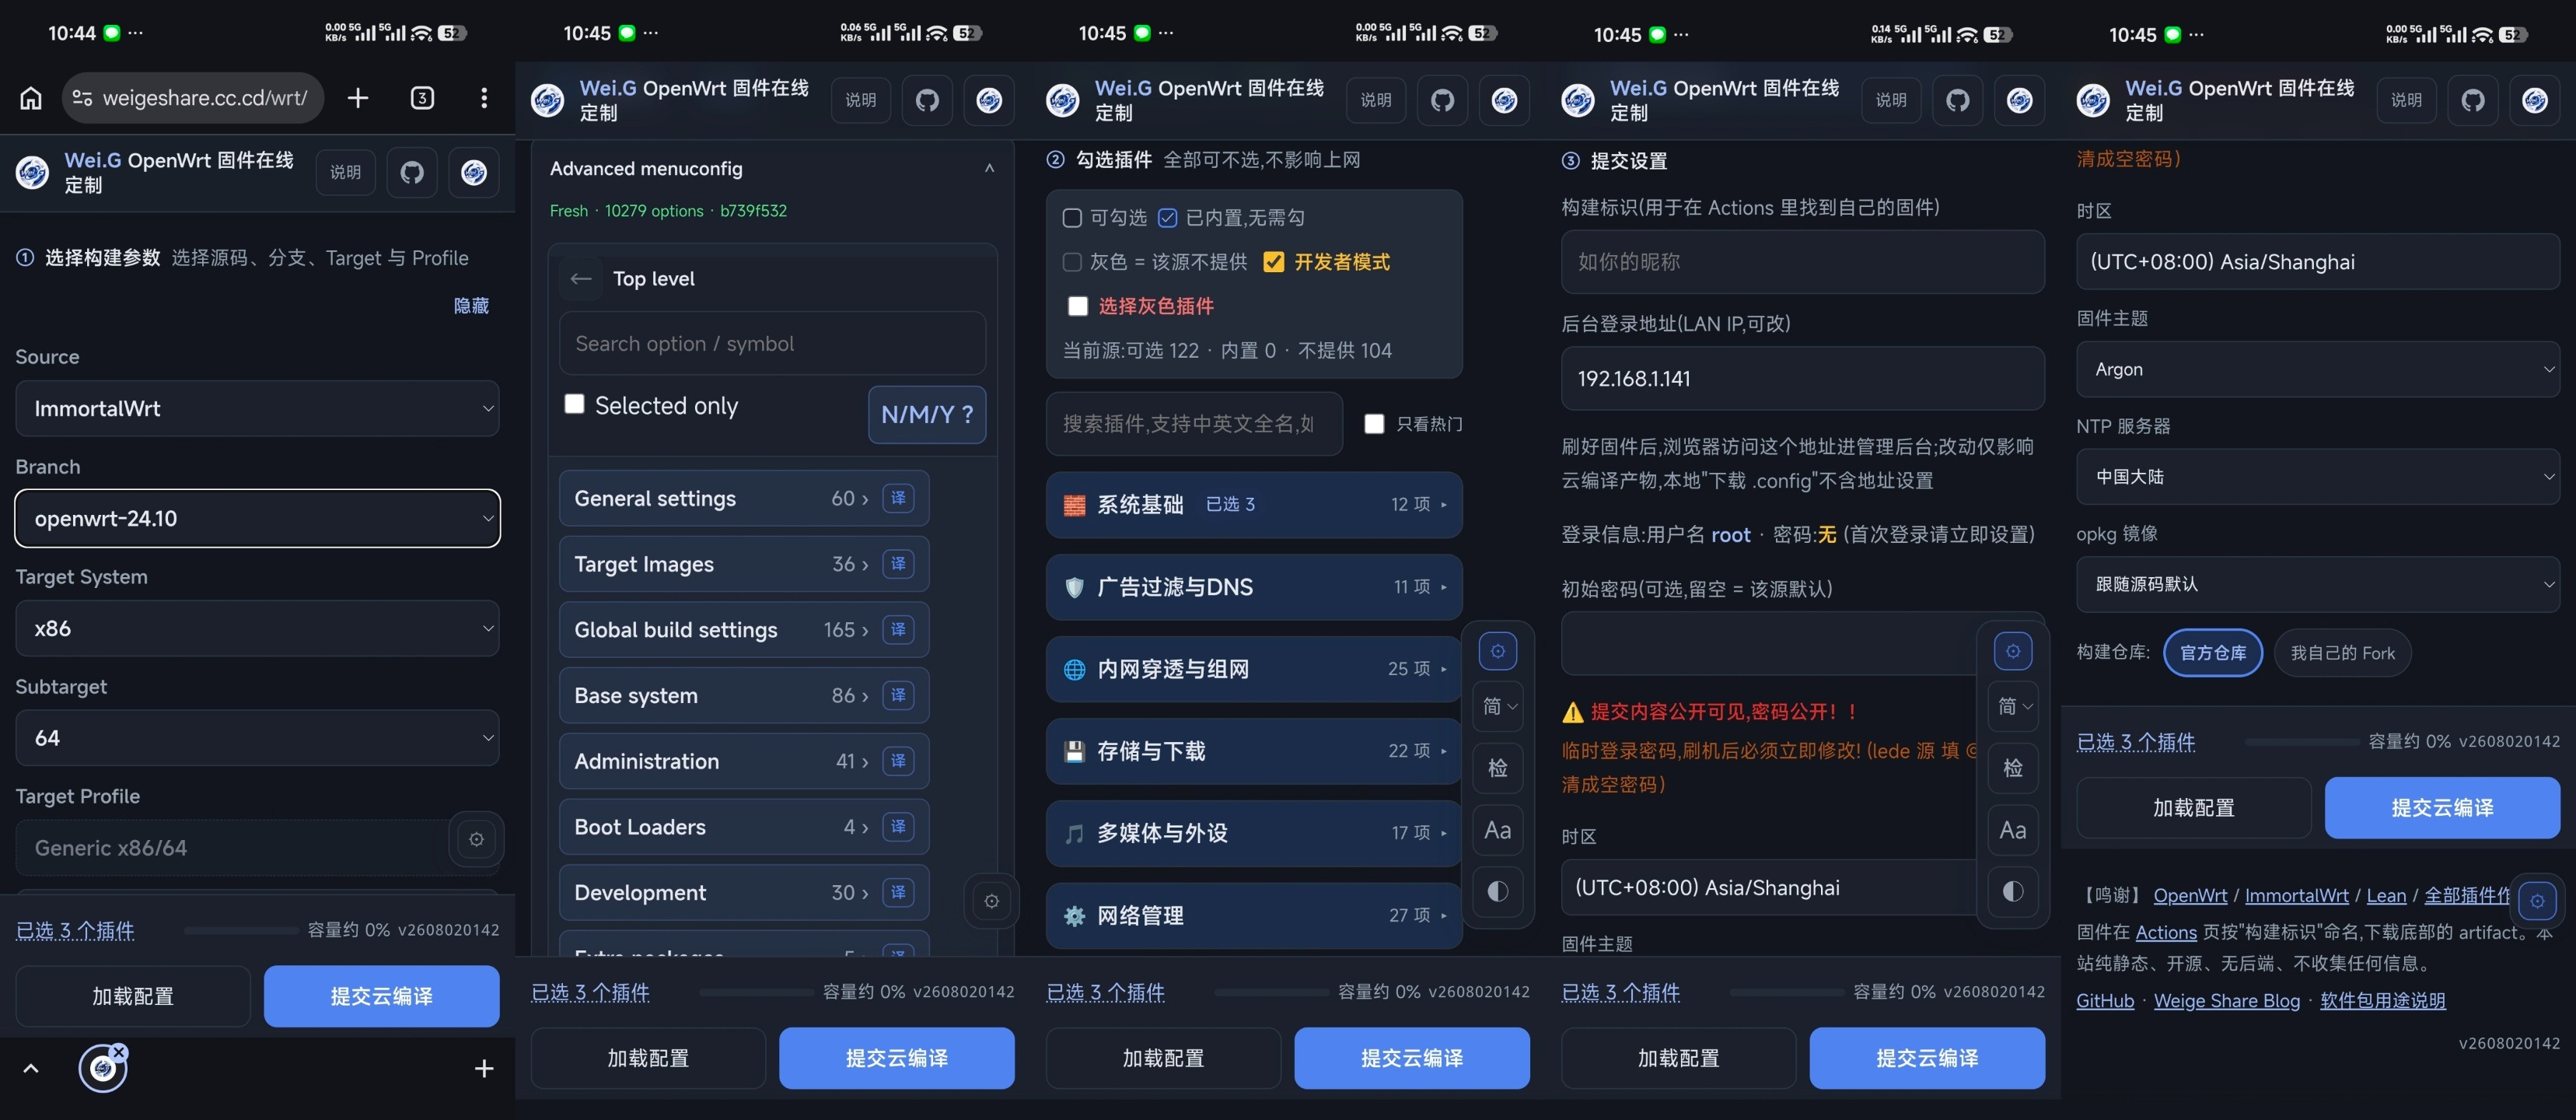
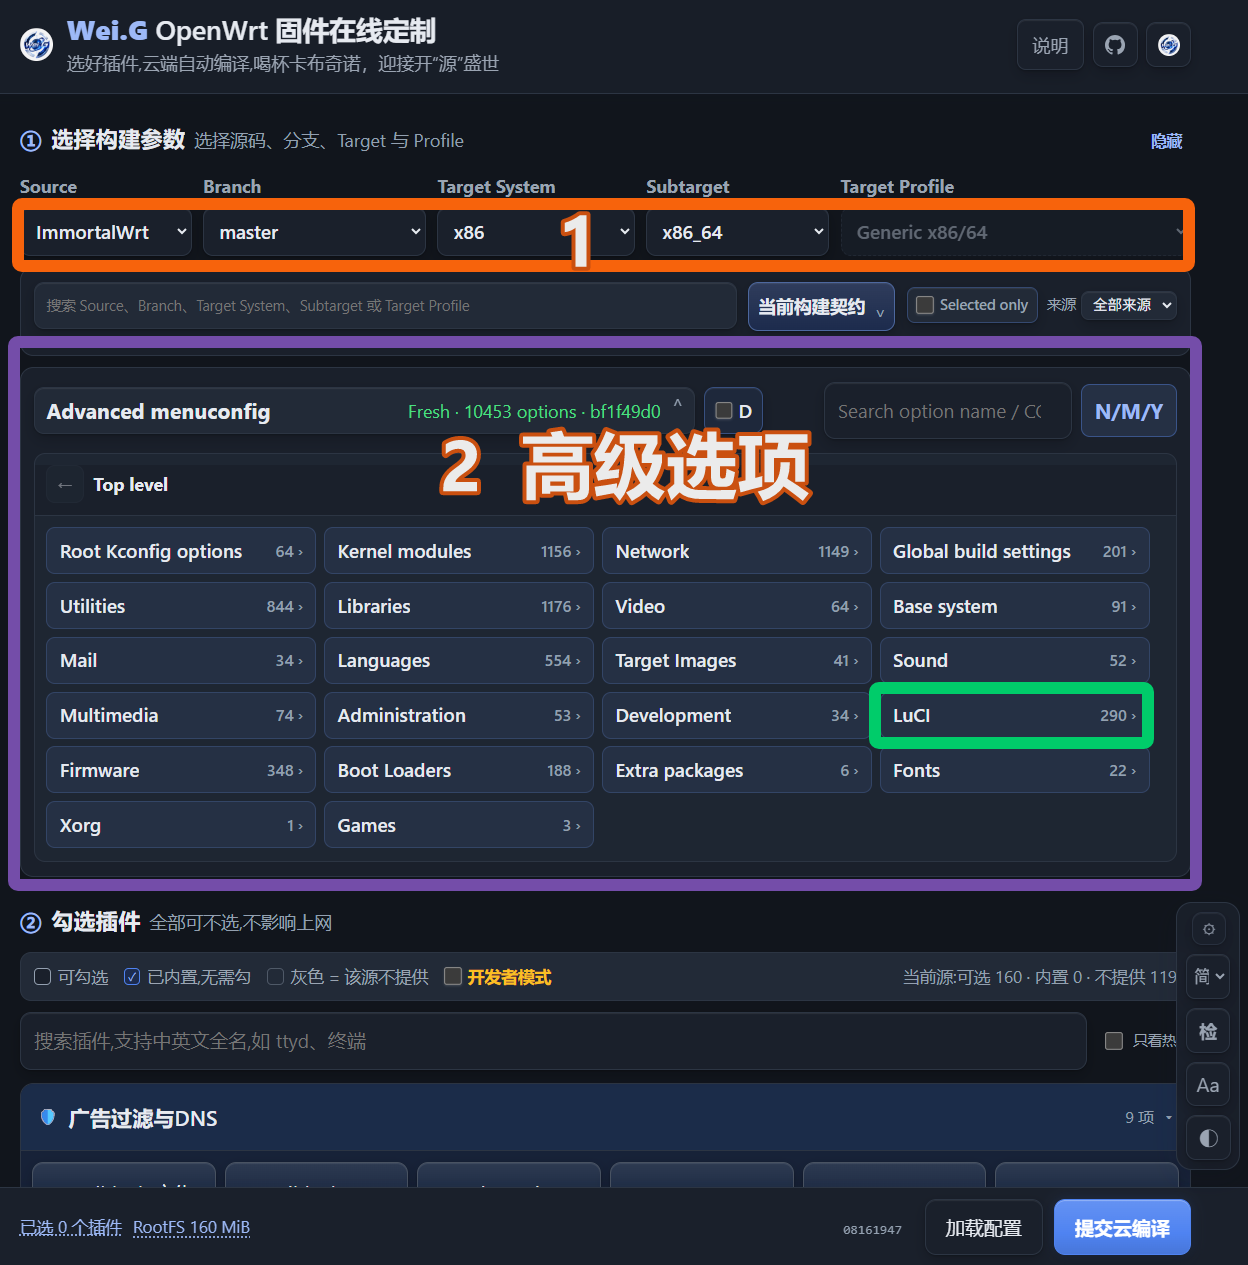
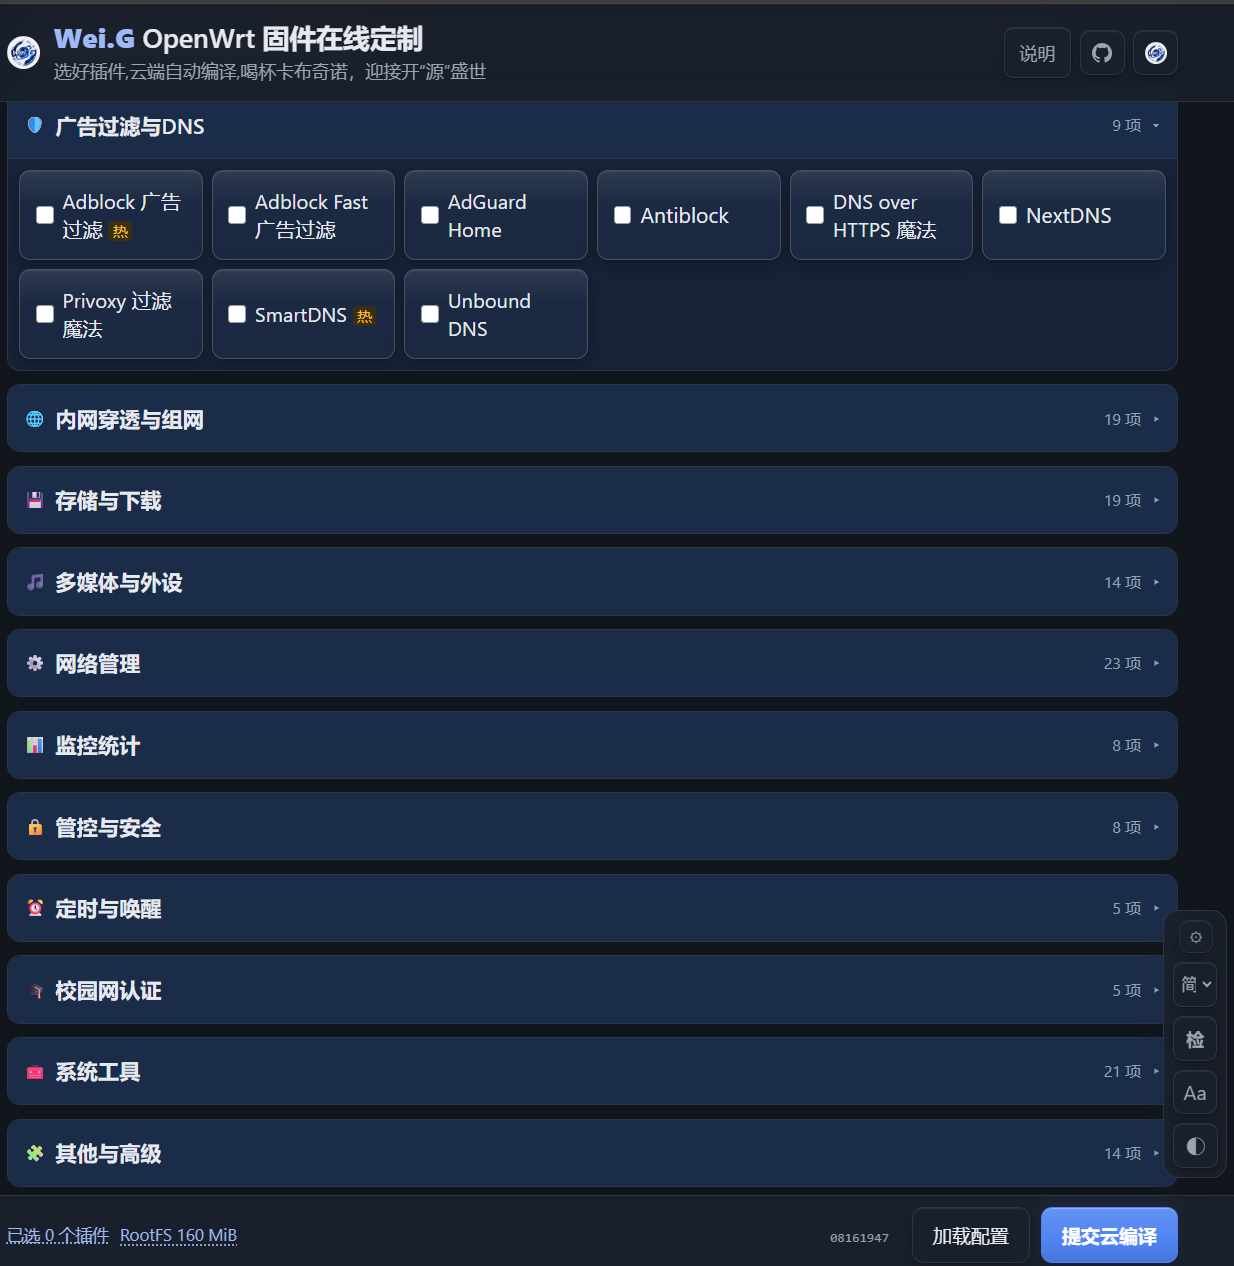
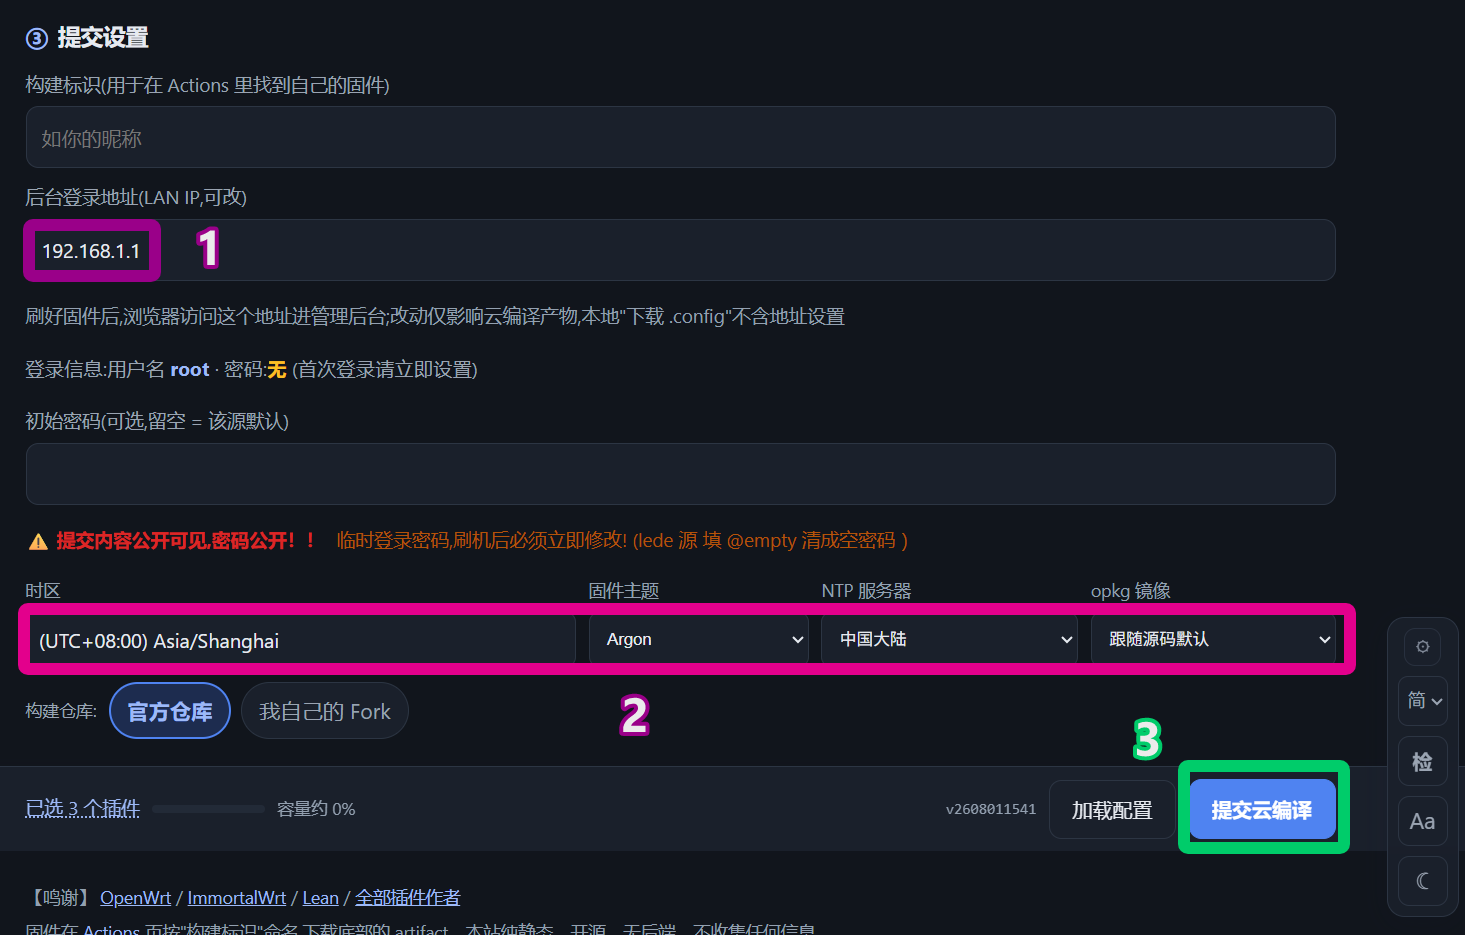
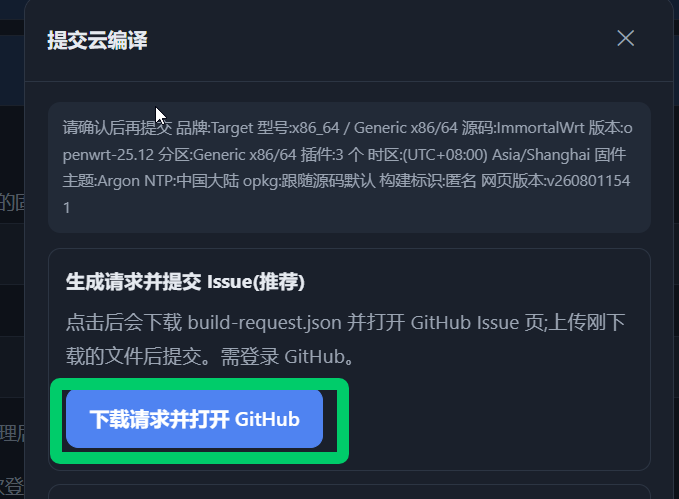
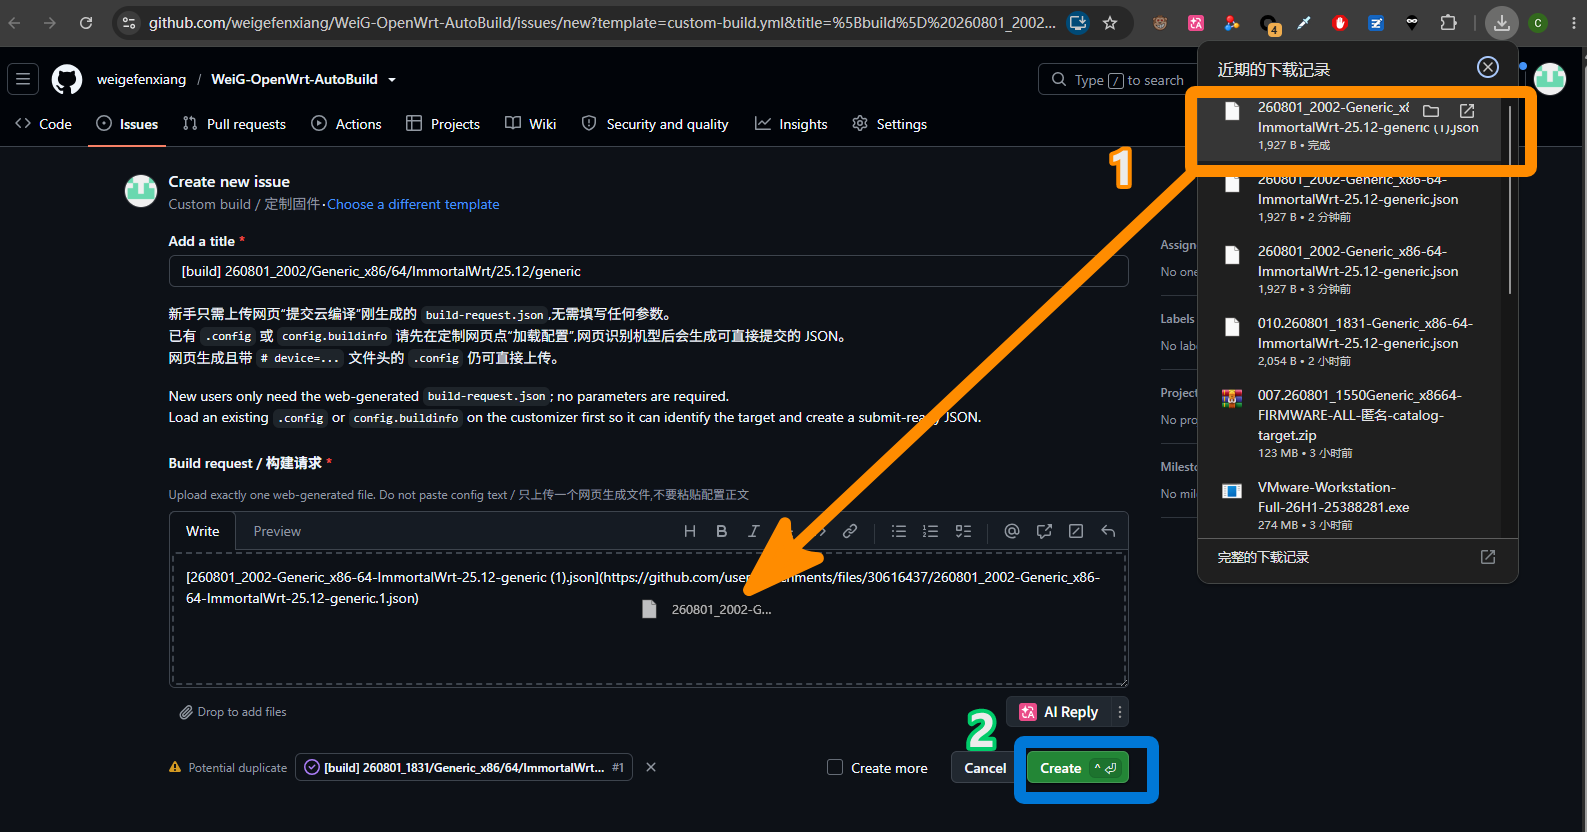
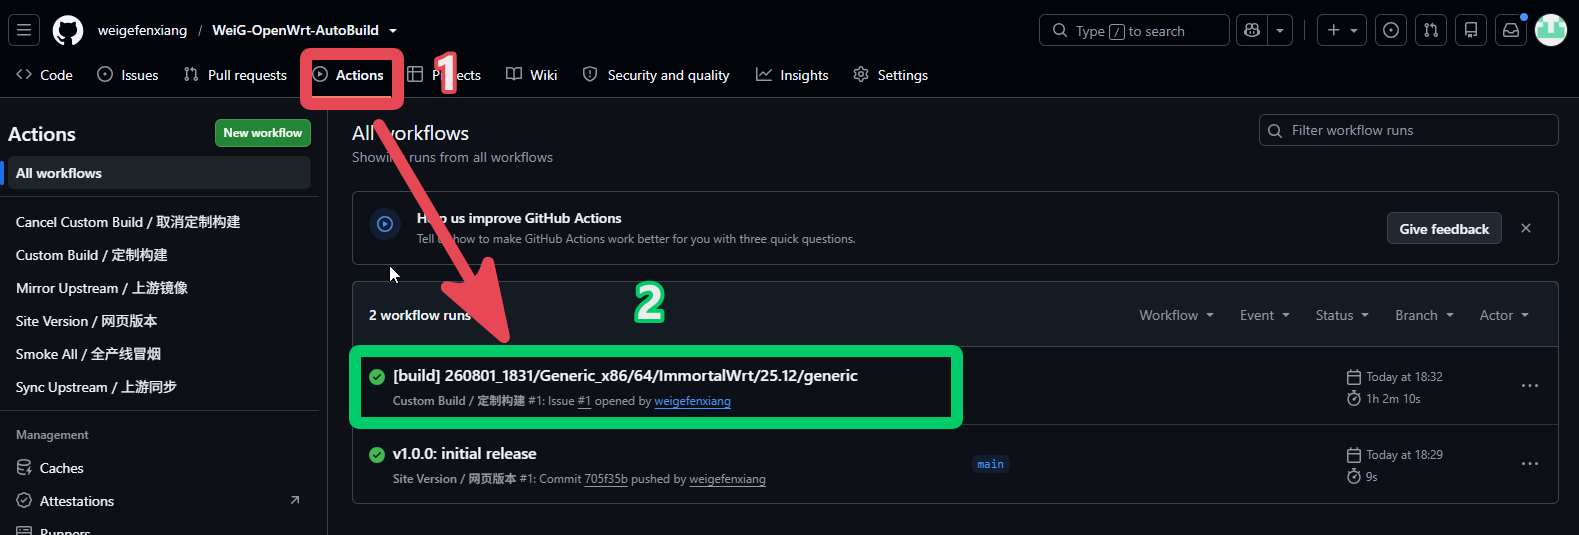
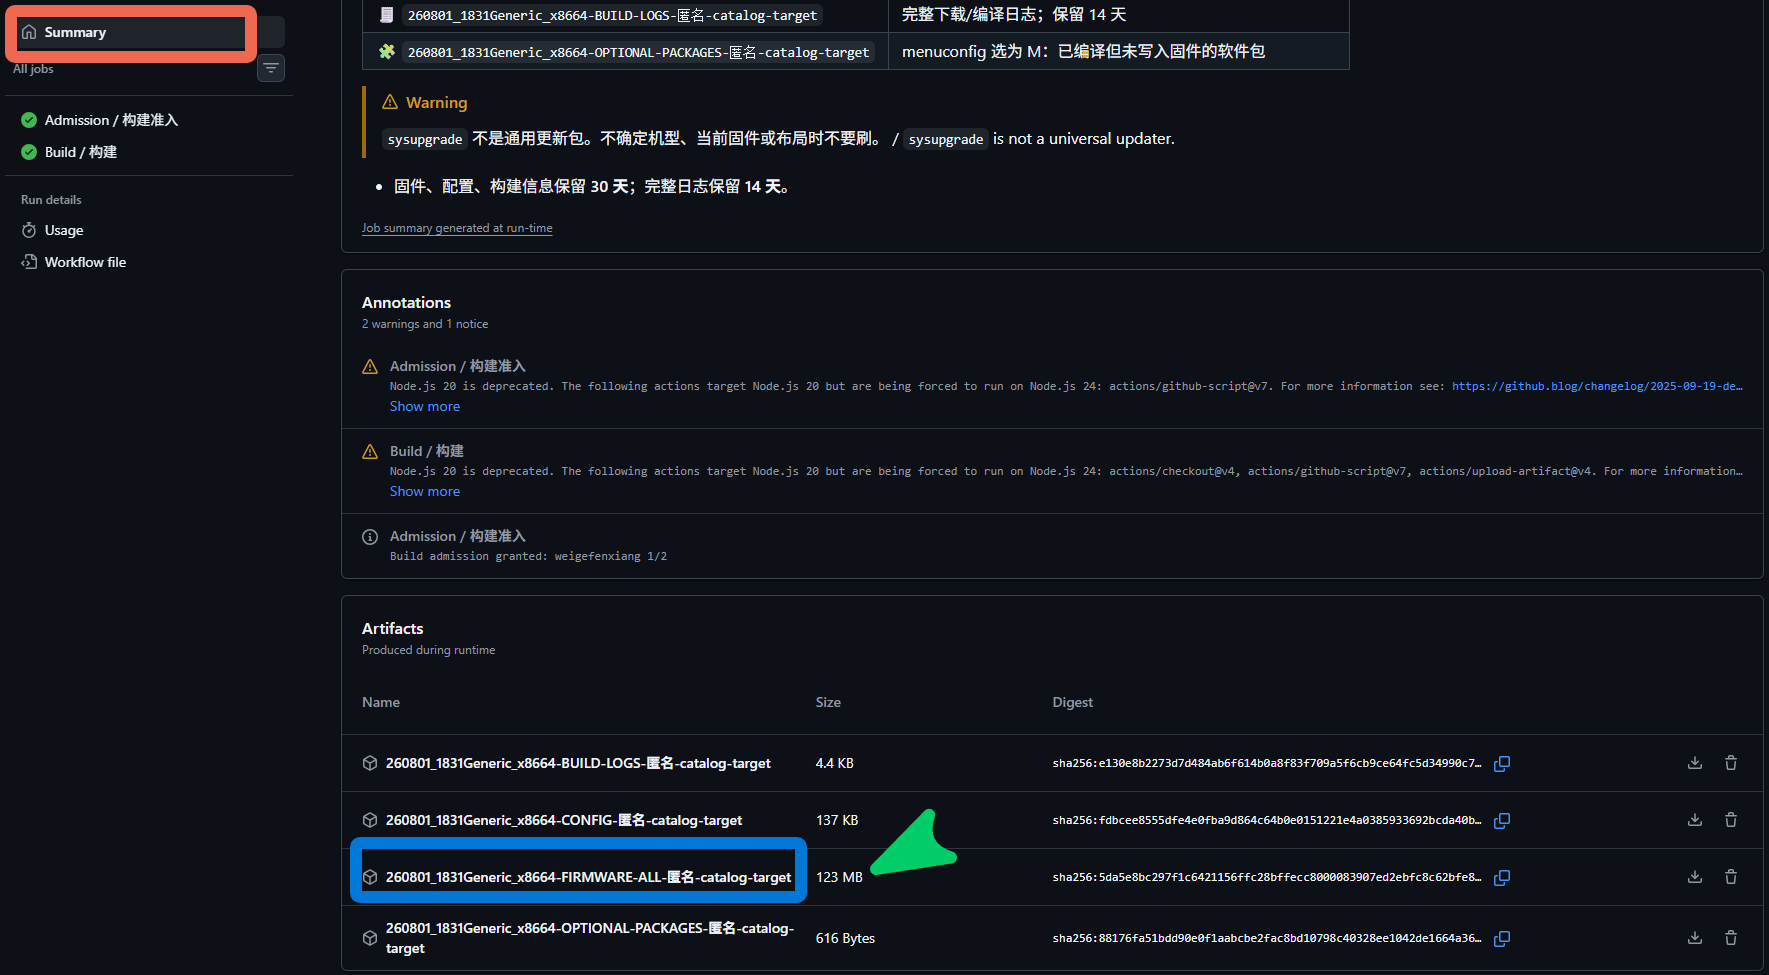
      <![CDATA[<p>想要一份适合自己的 OpenWrt 固件，不必在本地安装编译环境。打开 <a href="https://www.weigshare.com/wrt">WeiG OpenWrt 在线定制</a>，选择参数后提交到 GitHub Actions，等待云端编译即可。</p><div align="left" style="display:flex;gap:10px;flex-wrap:wrap;justify-content:left;">  <img src="https://img.shields.io/badge/JavaScript-ES2020-f7df1e?logo=javascript&logoColor=black" alt="JavaScript">  <img src="https://img.shields.io/badge/HTML-5-e34f26?logo=html5&logoColor=white" alt="HTML">  <img src="https://img.shields.io/badge/CSS-3-1572b6?logo=css3&logoColor=white" alt="CSS">  <img src="https://img.shields.io/badge/Node.js-22-339933?logo=nodedotjs&logoColor=white" alt="Node.js">  <img src="https://img.shields.io/badge/Bash-5-4eaa25?logo=gnubash&logoColor=white" alt="Bash">  <img src="https://img.shields.io/badge/YAML-1.2-cb171e?logo=yaml&logoColor=white" alt="YAML"></div><p> <span style="color:#ffc107;">⚠️ </span> <span style="color:#ff7b72;"> 刷机有风险。请先确认路由器型号、分区与刷写方式；不确定时不要刷写。</span></p><h2 id="背景"><a href="#背景" class="headerlink" title="背景"></a>背景</h2><ul><li>想自己编译固件，体会手搓固件的乐趣。</li><li>某些插件一定要编译到固件里才可使用</li><li><strong>配置环境</strong> 对于大多数人来说相当复杂及繁琐，配置及网络环境无法满足。</li><li><strong>未来:</strong> 每个人都可一键 <strong>folk</strong> ,即可拥有自己的在线编译网站（<strong>Page</strong> + <strong>Github</strong>）</li><li>支持电脑、手机端</li></ul><div style="display:flex; gap:10px;"><img src=https://img.weigshare.com/img/003.009.WeiG-OpenWrt-AutoBuild-Guide.png height="150"></div><div style="display:flex; gap:10px;"><img src=https://img.weigshare.com/img/003.010.WeiG-OpenWrt-AutoBuild-Guide.png height="150"></div><h2 id="适用"><a href="#适用" class="headerlink" title="适用"></a>适用</h2><p>当前仅适用以下机型，其它机型尚未验证，如您没有救砖工具，请勿使用，</p><ul><li><strong>源码： <a href="https://github.com/openwrt/openwrt">OpenWrt</a> · <a href="https://github.com/immortalwrt/immortalwrt">ImmortalWrt</a> · <a href="https://github.com/coolsnowwolf/lede">LEDE</a> · <a href="https://github.com/hanwckf/immortalwrt-mt798x">hanwckf</a></strong></li><li><strong>x86 &#x2F; 64</strong></li></ul><h2 id="准备"><a href="#准备" class="headerlink" title="准备"></a>准备</h2><ul><li><strong><a href="https://github.com/">Github</a></strong> 账号 (如果没有无法构建)</li><li>登录 <strong><a href="https://www.weigshare.com/wrt">WeiG_OpenWrt_在线定制</a></strong><ul><li><strong><a href="https://dev.weig-wrt.pages.dev/">Page 页</a></strong> (实验功能，体验最新功能)</li></ul></li></ul><!-- 截图 1：网页首页，展示 Source、Branch、Target 与插件区域 --><h2 id="1-选择参数"><a href="#1-选择参数" class="headerlink" title="1. 选择参数"></a>1. 选择参数</h2><ul><li><p>选择源后，在搜索框搜索相应机型或环境。也可加载config</p></li><li><p><strong>Source → Branch → Target System → Subtarget → Target Profile</strong>。</p><ul><li>例 X86&#x2F;64：  <strong>ImmortalWrt → openwrt-24.10 → x86 → 64</strong> → Generic x86&#x2F;64</li></ul></li><li><p><strong>Advanced menuconfig</strong> → 勾选插件</p></li></ul><p>然后按需；<strong>时区</strong>、<strong>固件主题</strong>、<strong>NTP 服务器</strong>和<strong>软件源镜像</strong> 一并设置。</p><div style="display:flex; gap:10px;"><img src=https://img.weigshare.com/img/003.002.WeiG-OpenWrt-AutoBuild-Guide.png height="150"><img src=https://img.weigshare.com/img/003.003.WeiG-OpenWrt-AutoBuild-Guide.png height="150"><img src=https://img.weigshare.com/img/003.004.WeiG-OpenWrt-AutoBuild-Guide.png height="150"></div><h3 id="已有配置"><a href="#已有配置" class="headerlink" title="已有配置"></a>已有配置</h3><p>已有 <code>.config</code>、<code>config.buildinfo</code> 或以前下载的请求文件，可点底部“加载配置”，在确认框核对源码、分支、Target Profile、插件和固件设置。</p><h2 id="2-提交构建"><a href="#2-提交构建" class="headerlink" title="2. 提交构建"></a>2. 提交构建</h2><p>点击右下角 <strong>提交云编译</strong>，</p><p>选择 <strong>下载请求并打开 GitHub</strong>：浏览器会下载一个 JSON 文件，并自动打开 GitHub 的新 Issue 页面。</p><p>将文件移动到 Issue 的对话框，直接点击 <strong>Create</strong>。</p><p>机器人会在 Issue 中回复本次构建的 Actions 链接。</p><div style="display:flex; gap:10px;"><img src=https://img.weigshare.com/img/003.005.WeiG-OpenWrt-AutoBuild-Guide.png height="150"><img src=https://img.weigshare.com/img/003.006.WeiG-OpenWrt-AutoBuild-Guide.png height="150"></div><h2 id="3-下载固件"><a href="#3-下载固件" class="headerlink" title="3. 下载固件"></a>3. 下载固件</h2><p>编译通常需要2~3小时。完成后进入 Actions 页面，在底部 <strong>Artifacts</strong> 下载：</p><ul><li><code>FIRMWARE-ALL-…</code>：全部固件与校验资料；首次刷机通常找 <code>factory</code> 等文件。</li><li><code>CONFIG-…</code>：本次提交配置、最终配置和差异，建议留存。</li><li><code>BUILD-LOGS-…</code>：完整构建日志；用于排查原因。</li></ul><div style="display:flex; gap:10px;"><img src=https://img.weigshare.com/img/003.007.WeiG-OpenWrt-AutoBuild-Guide.png height="150"><img src=https://img.weigshare.com/img/003.008.WeiG-OpenWrt-AutoBuild-Guide.png height="150"></div><h2 id="常见问题"><a href="#常见问题" class="headerlink" title="常见问题"></a>常见问题</h2><ul><li><strong>构建失败怎么办？</strong> 下载 <code>BUILD-LOGS-…</code>，查看最后出现的 <code>Error</code>；也可在 Issue 反馈。</li><li><strong>如何取消？</strong> 在自己的构建 Issue 回复 <code>/cancel</code>。</li><li><strong>同时构建数量</strong> 一个账号只允许同时2个构建任务，否则得排队。</li><li><strong>为什么没有下载按钮？</strong> GitHub 的 Artifacts 下载通常需要先登录账号。</li><li><strong>公共仓库排队较久？</strong> 未来做到 <a href="https://github.com/weigefenxiang/WeiG-OpenWrt-AutoBuild">Fork 本项目</a>，按页面提示提交到自己的仓库运行。就不会受到排队限制。</li></ul><p>项目地址：<a href="https://github.com/weigefenxiang/WeiG-OpenWrt-AutoBuild">WeiG-OpenWrt-AutoBuild</a>。</p><h2 id="鸣谢"><a href="#鸣谢" class="headerlink" title="鸣谢"></a>鸣谢</h2><ul><li><p><strong>源码：</strong> <a href="https://github.com/openwrt/openwrt">OpenWrt</a> · <a href="https://github.com/immortalwrt/immortalwrt">ImmortalWrt</a> · <a href="https://github.com/coolsnowwolf/lede">LEDE</a> · <a href="https://github.com/hanwckf/immortalwrt-mt798x">hanwckf</a> </p></li><li><p><strong>参考：</strong> <a href="https://github.com/P3TERX/Actions-OpenWrt">P3TERX</a></p></li><li><p><strong>LuCI 插件的全部作者</strong></p></li><li><p><strong>每一位</strong>参与的小伙伴</p></li></ul>]]>
    </content>
    <id>https://www.weigshare.com/posts/WeiG-OpenWrt-AutoBuild-Guide/</id>
    <link href="https://www.weigshare.com/posts/WeiG-OpenWrt-AutoBuild-Guide/"/>
    <published>2026-08-01T12:11:00.000Z</published>
    <summary>不需安装编译环境，用 WeiG OpenWrt 在线定制器让每个人体会手搓固件的乐趣。</summary>
    <title>从零到一云编译自己的 OpenWrt 固件</title>
    <updated>2026-08-30T13:25:49.067Z</updated>
  </entry>
  <entry>
    <author>
      <name>Wei.G</name>
    </author>
    <category term="网站搭建" scheme="https://www.weigshare.com/categories/%E7%BD%91%E7%AB%99%E6%90%AD%E5%BB%BA/"/>
    <category term="Hexo" scheme="https://www.weigshare.com/tags/Hexo/"/>
    <category term="Cloudflare" scheme="https://www.weigshare.com/tags/Cloudflare/"/>
    <category term="PicList" scheme="https://www.weigshare.com/tags/PicList/"/>
    <category term="R2" scheme="https://www.weigshare.com/tags/R2/"/>
    <category term="图床" scheme="https://www.weigshare.com/tags/%E5%9B%BE%E5%BA%8A/"/>
    <content>
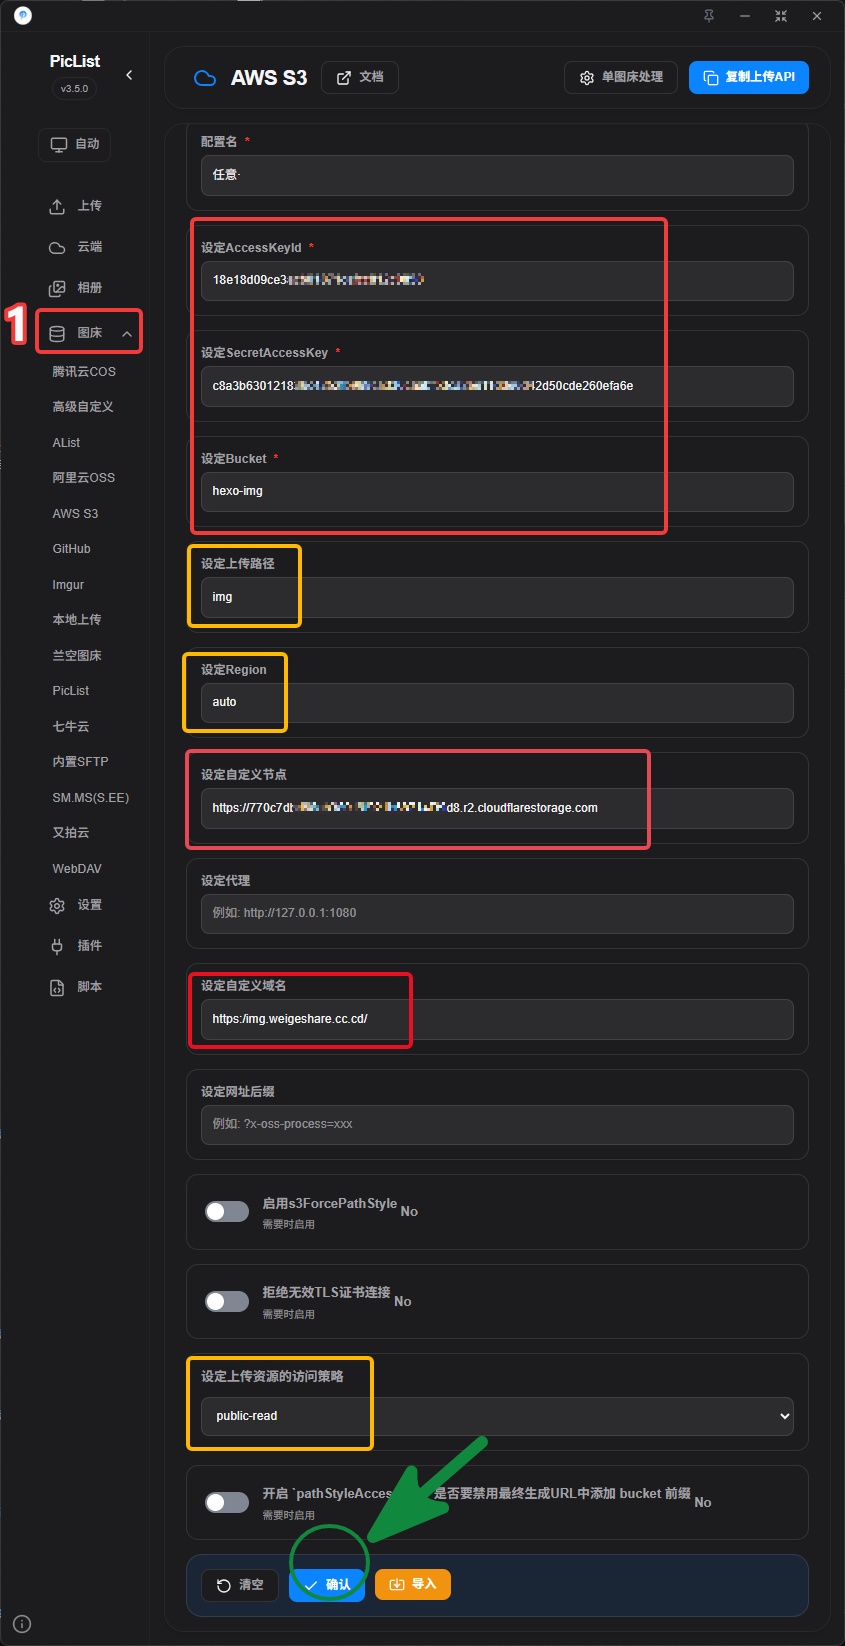
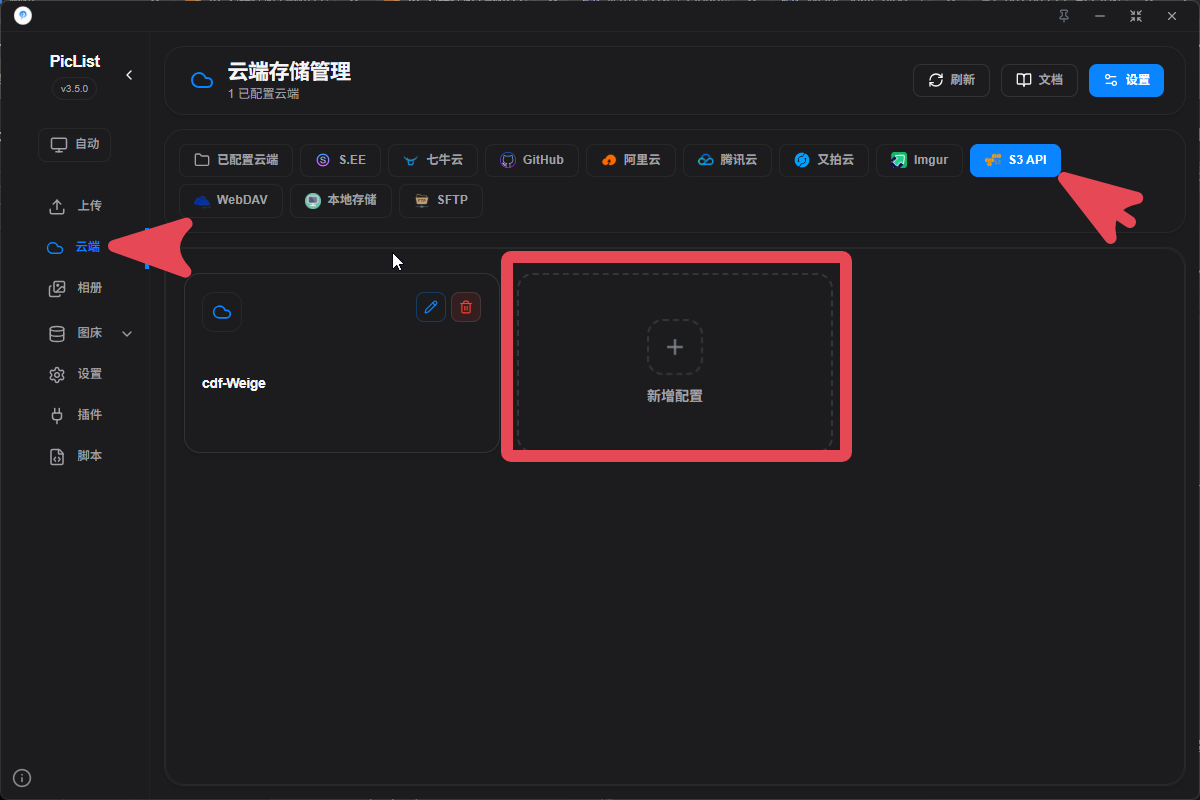
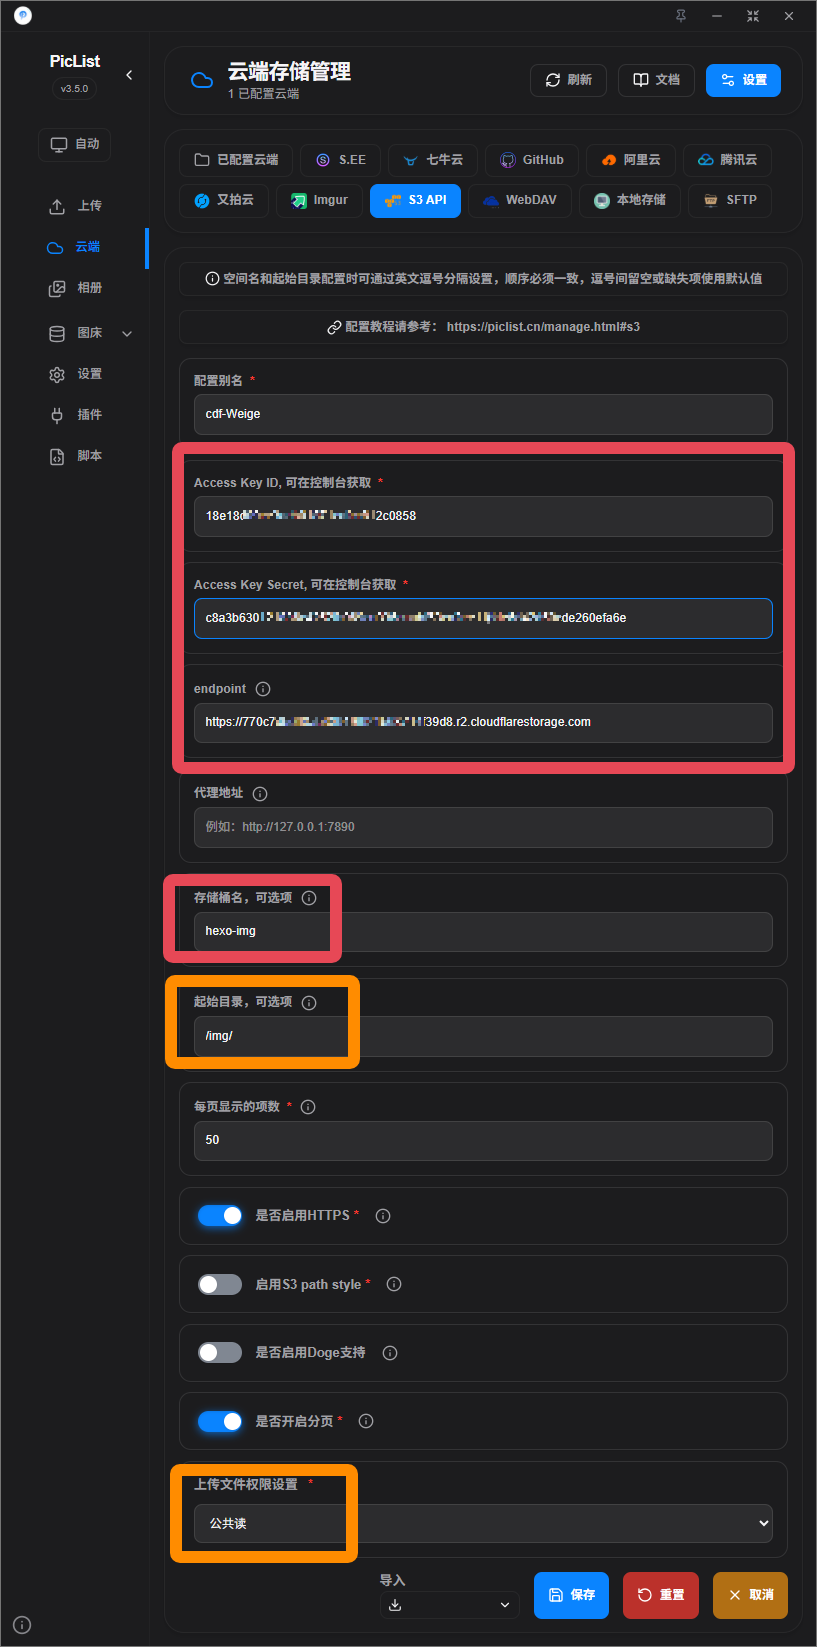
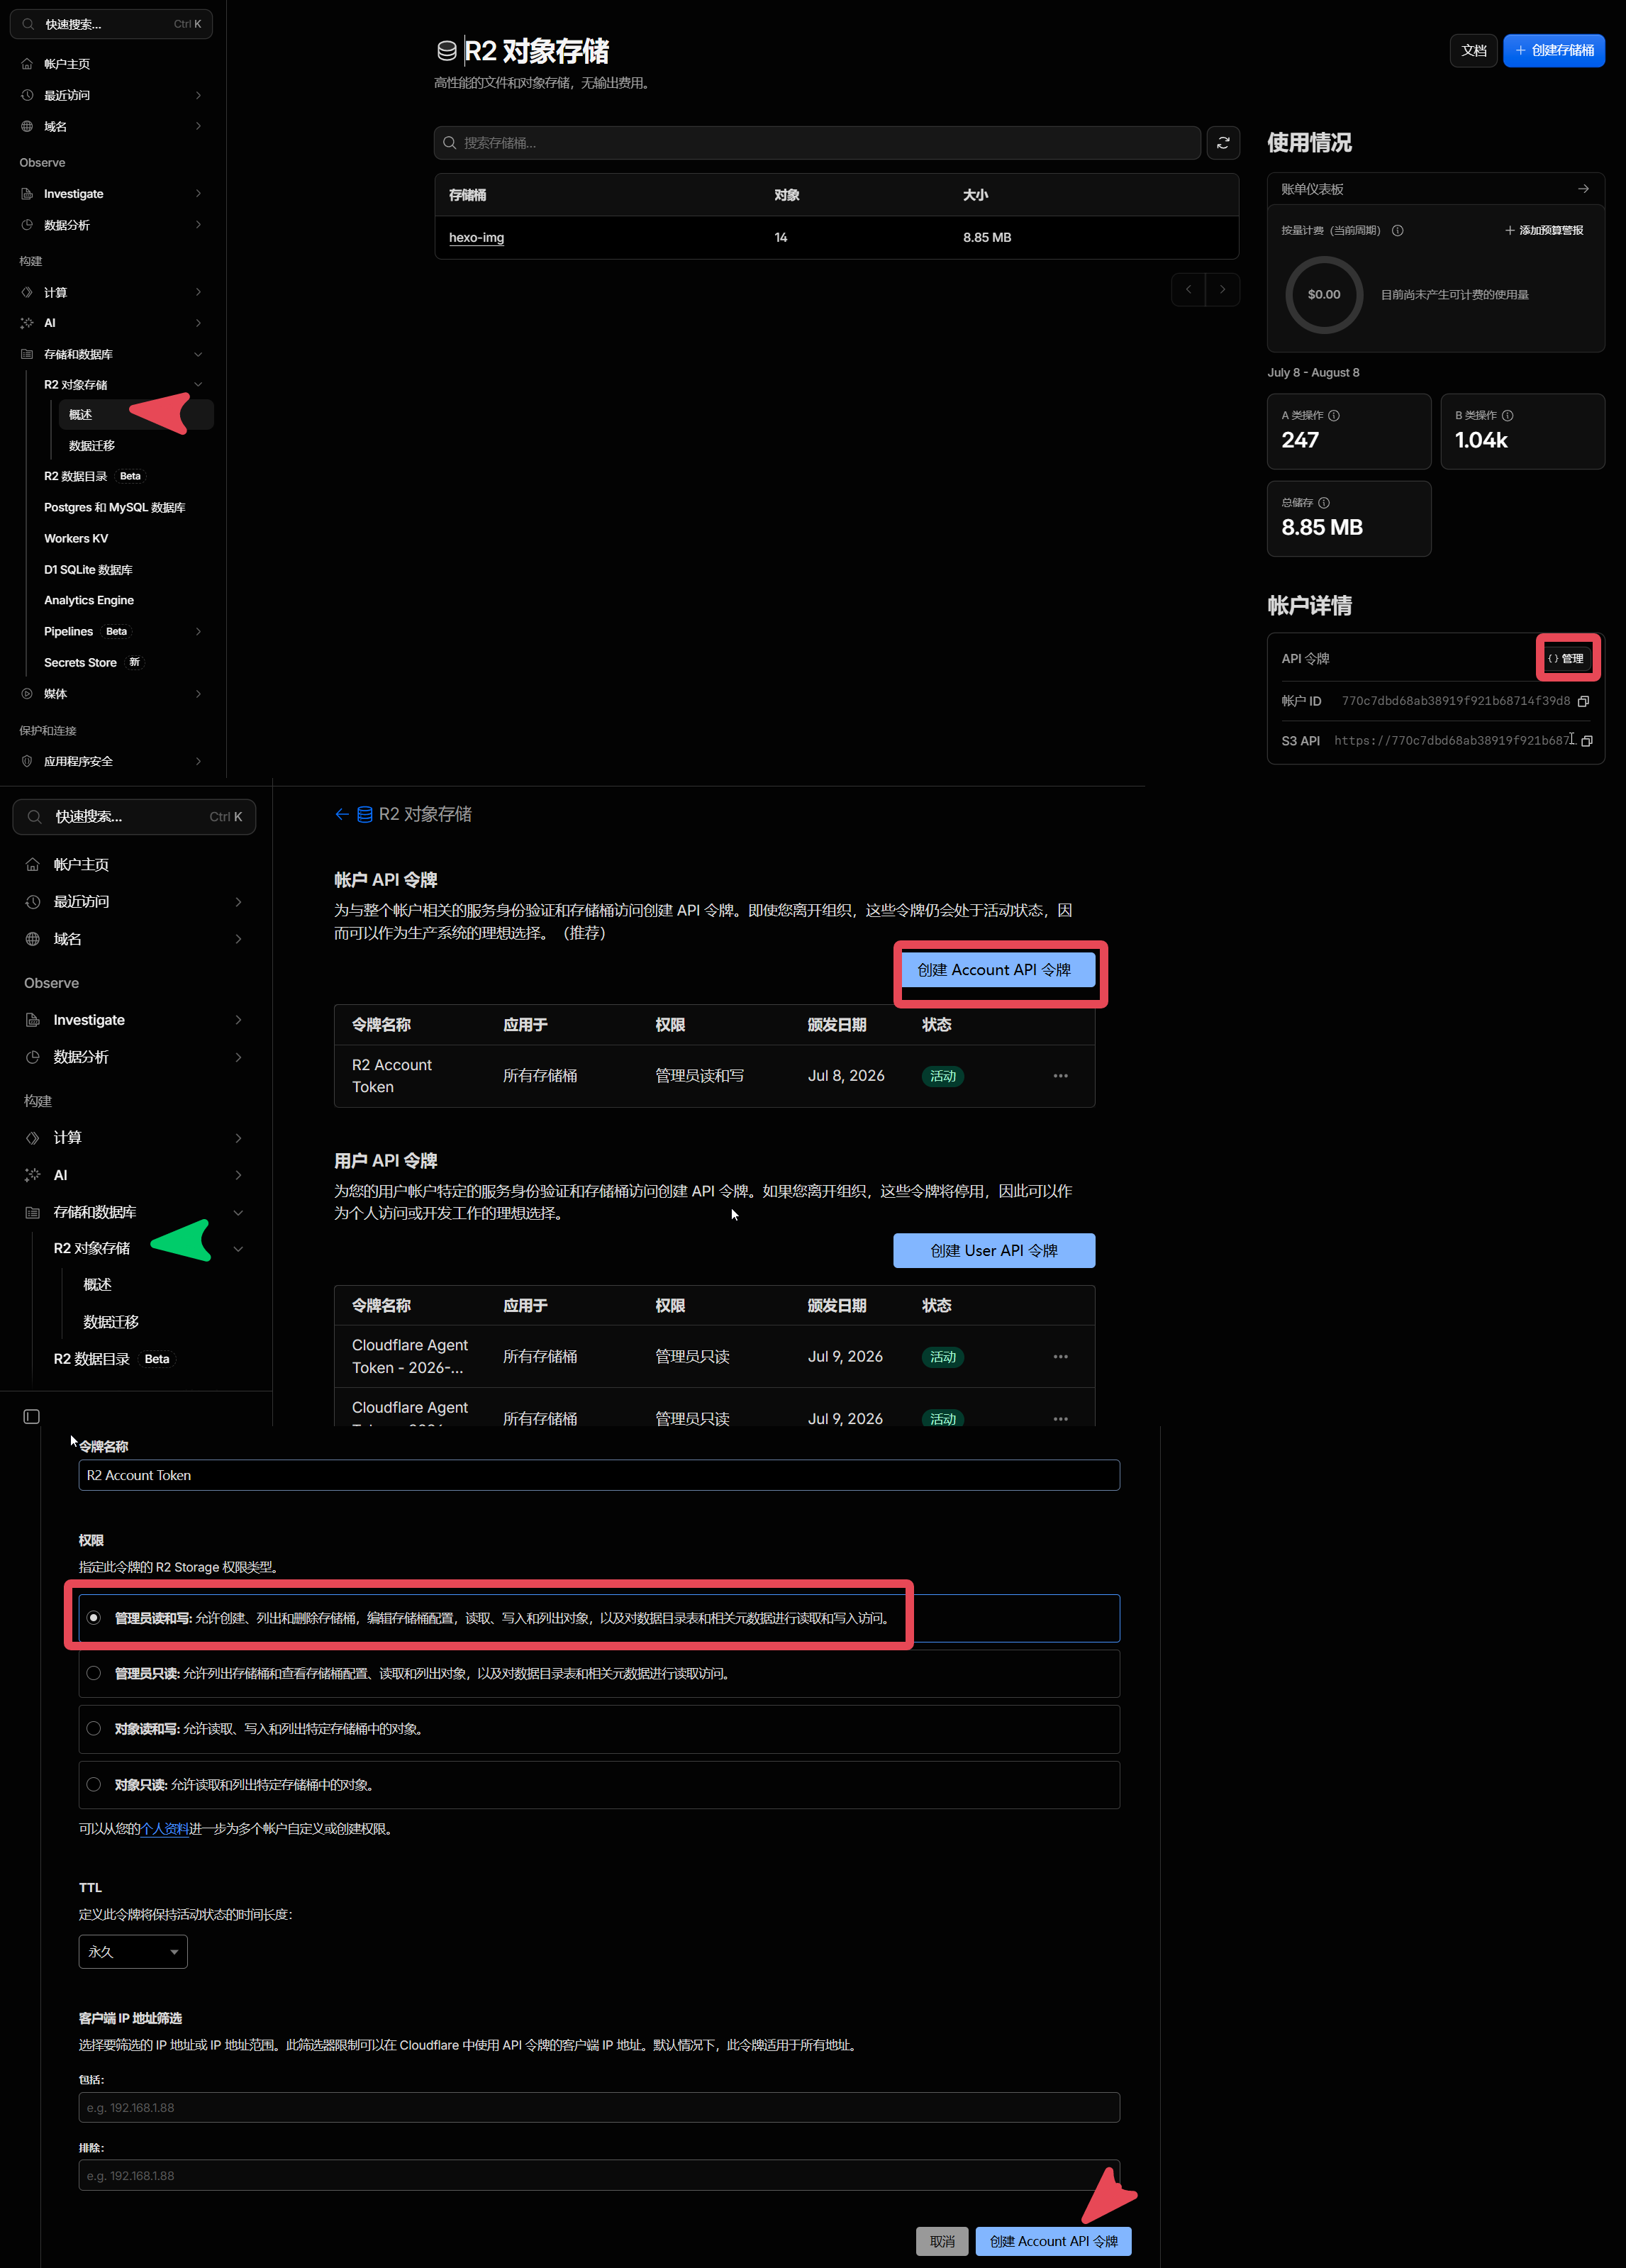
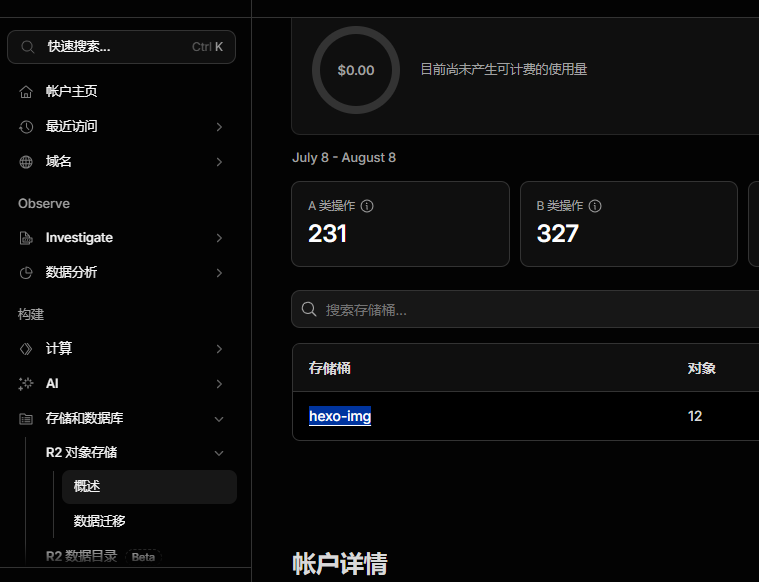
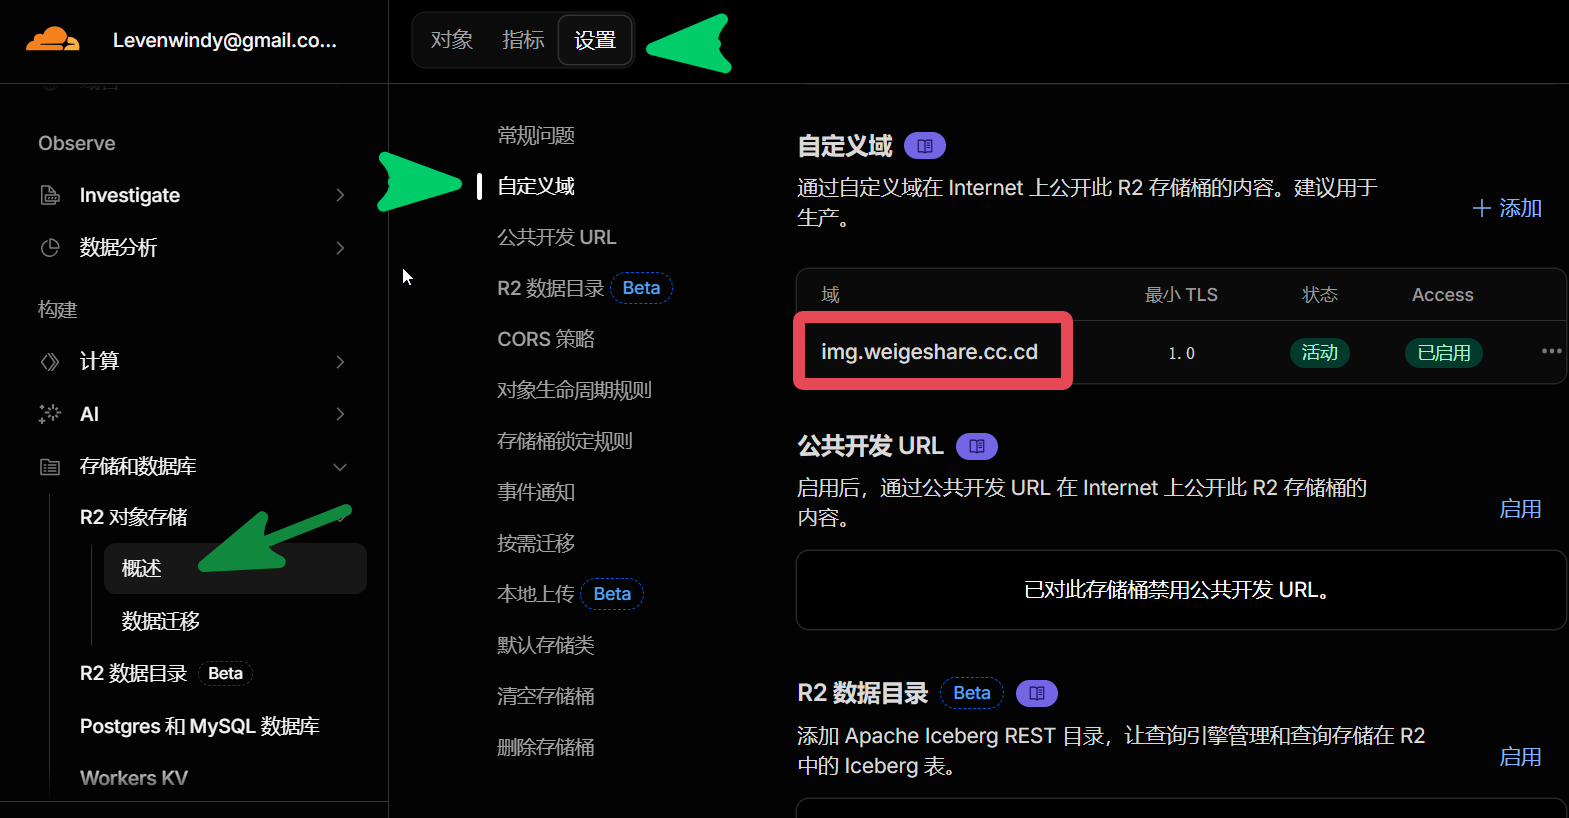
      <![CDATA[<h1 id="前言"><a href="#前言" class="headerlink" title="前言"></a>前言</h1><p>PicList 目前对 Cloudflare R2 的支持已经比较完善，但在配置过程中仍存在一些小问题： </p><ul><li>配置项较多，新手容易填错</li><li>缺少连接测试功能</li><li>配置是否正确只能通过实际上传验证</li></ul><p>本文将介绍如何使用 PicList 连接 Cloudflare R2，实现免费、高速、支持 CDN 的图床方案。<br>Cloudflare R2 图床的搭建可参照</p><ul><li><a href="https://www.fecify.com/doc/cn-1.0/fecify-shop-helper-cloudflare-r2.html">Cloudflare R2 教程</a></li></ul><p>PicList 版本当前为26年7月v3.5.0</p><hr><p>最近将博客图片迁移到了 <strong>Cloudflare R2</strong>，配合 <strong>PicList</strong> 使用，效果非常不错：</p><p>✅ 免费额度充足  ✅ 全球 CDN 加速  ✅ 支持自定义域名  ✅ 不占用 VPS 空间  ✅ 与 Hexo 完美搭配</p><hr><h1 id="配置-PicList"><a href="#配置-PicList" class="headerlink" title="配置 PicList"></a>配置 PicList</h1><ul><li>图床：用于图片上传6</li><li>云端：用于 PicList 访问CF的图床</li></ul><h2 id="图床配置"><a href="#图床配置" class="headerlink" title="图床配置"></a>图床配置</h2><p>在左边导航窗口【<strong>图床</strong>】-【<strong>AWS S3</strong>】-【<strong>新增配置</strong>】：</p><img src="https://img.weigshare.com/img/001.002_PicList_orign.png" width="120"/><h3 id="必填项"><a href="#必填项" class="headerlink" title="必填项"></a>必填项</h3><pre><code>● 配置名：任意● 设定 AccessKeyId：18e1************************c0858● 设定 secretAccessKey：c8a3********************************************************fa6e● 设定自定义节点：https://770*************************39d8.r2.cloudflarestorage.com</code></pre><p>以上均可在此获取 <a href="https://img.weigshare.com/img/001.005_CF_API_token.png">API图示</a>。</p><ul><li>权限： <strong>管理员读和写</strong> （否则 <strong>PicLlist</strong> 云端访问失败）</li><li>只展示一次，记得保存，否则得重新弄。</li></ul><p>● 设定 Bucket（存储桶）： （我的是<strong>hexo-img</strong> ）<a href="https://img.weigshare.com/img/001.003_CDF_bucket.png">图示</a></p><hr><h3 id="非必需项"><a href="#非必需项" class="headerlink" title="非必需项"></a>非必需项</h3><p>■ 设定上传路径：**&#x2F;**（根目录）</p><p>我想放在目录 <strong>img</strong> 下： <strong>&#x2F;img&#x2F;</strong> <a href="https://img.weigshare.com/img/001.004_Directory.png">图示</a></p><p> ●设定自定义域名：  <a href="https://img.weigshare.com/">https://img.weigshare.com/</a>     （绑定了域名才能设置，上传后就可拿到对应域名的链接 ）<a href="https://img.weigshare.com/img/001.004_Directory.png">图示</a></p> <pre class="line-numbers language-bash" data-language="bash"><code class="language-bash">https://img.weigeshare.com/img/x.png<span aria-hidden="true" class="line-numbers-rows"><span></span></span></code></pre><p>☐ 不设置的话，拿到以下这种链接，可能打不开</p><pre class="line-numbers language-text" data-language="text"><code class="language-text">https://770*************************39d8.r2.cloudflarestorage.com/img/0.%E5%B1%8F%E5%B9%95%E6%88%AA%E5%9B%BE%202026-07-08%20181820.png<span aria-hidden="true" class="line-numbers-rows"><span></span></span></code></pre><p>☐ 设定 Region：<strong>auto</strong> （ 或 us-east-1）</p><ul><li>设定上传资源的访问策略：<span style="color:#ff69b4;font-weight:bold;">public-read</span> （官方建议）</li></ul><hr><h2 id="云端配置"><a href="#云端配置" class="headerlink" title="云端配置"></a>云端配置</h2><p>在左边导航窗口【<strong>云端</strong>】-【<strong>S3 API</strong>】-【<strong>新增配置</strong>】-【<strong>保存</strong>】：</p><p><img src="https://img.weigshare.com/img/001.005_piclist_cloud_configuration1.png" height="280"/> <img src="https://img.weigshare.com/img/001.005_piclist_cloud_configuration2.png" height="280"/></p><h3 id="必填项-1"><a href="#必填项-1" class="headerlink" title="必填项"></a>必填项</h3><pre><code>● 配置别：任意● Access Key Id：18e1************************c0858● Access Key Secret：c8a3********************************************************fa6e● endpoint 自定义节点：https://770*************************39d8.r2.cloudflarestorage.com</code></pre><p>API令牌在此获取 <a href="https://img.weigshare.com/img/001.005_CF_API_token.png">API</a>。</p><ul><li>权限： <strong>管理员读和写</strong> （否则 <strong>PicLlist</strong> 云端访问失败）</li></ul><p>● 存储桶名（Bucket）： <strong>hexo-img</strong>  <a href="https://img.weigshare.com/img/001.003_CDF_bucket.png">图示</a></p><p>■ 起始目录：**&#x2F;**</p><ul><li>我想储存在 <strong>&#x2F;img&#x2F;</strong> 目录下：<a href="https://img.weigshare.com/img/001.004_Directory.png">图示</a></li></ul><h3 id="非必需项-1"><a href="#非必需项-1" class="headerlink" title="非必需项"></a>非必需项</h3><p>■ 上传文件权限设置：public-read（公共读，官方建议 ）</p><hr><h1 id="常见问题"><a href="#常见问题" class="headerlink" title="常见问题"></a>常见问题</h1><h2 id="上传成功但图片打不开"><a href="#上传成功但图片打不开" class="headerlink" title="上传成功但图片打不开"></a>上传成功但图片打不开</h2><p>检查：</p><ul><li>Bucket 是否允许公共访问</li><li>自定义域名是否已绑定</li><li>DNS 解析是否生效</li></ul><h2 id="提示-AccessDenied"><a href="#提示-AccessDenied" class="headerlink" title="提示 AccessDenied"></a>提示 AccessDenied</h2><p>检查：</p><ul><li>Access Key ID 是否正确</li><li>Secret Access Key 是否正确</li><li>API Token 是否拥有读写权限</li></ul><h2 id="提示-SignatureDoesNotMatch"><a href="#提示-SignatureDoesNotMatch" class="headerlink" title="提示 SignatureDoesNotMatch"></a>提示 SignatureDoesNotMatch</h2><p>检查：</p><ul><li>Endpoint 是否填写正确</li></ul><h1 id="总结"><a href="#总结" class="headerlink" title="总结"></a>总结</h1><p>目前我的博客方案：</p><pre class="line-numbers language-text" data-language="text"><code class="language-text">Hexo + Butterfly + Github + Cloudflare R2 + Cloudflare CDN<span aria-hidden="true" class="line-numbers-rows"><span></span></span></code></pre><p>优点：</p><p>✅ 免费  ✅ 稳定  ✅ 高速  ✅ 自定义域名  ✅ 全球 CDN 加速  ✅ VPS 零压力</p><p>如果你正在寻找一个长期稳定的博客图床方案，PicList + Cloudflare R2 非常值得尝试。</p>]]>
    </content>
    <id>https://www.weigshare.com/posts/PicList-Cloudflare-R2-Guide/</id>
    <link href="https://www.weigshare.com/posts/PicList-Cloudflare-R2-Guide/"/>
    <published>2026-07-08T13:10:08.000Z</published>
    <summary>使用 PicList 配合 Cloudflare R2 搭建免费、高速、全球 CDN 加速的图床。</summary>
    <title>使用 PicList + Cloudflare R2 搭建免费高速图床</title>
    <updated>2026-08-30T13:25:49.067Z</updated>
  </entry>
  <entry>
    <author>
      <name>Wei.G</name>
    </author>
    <category term="Python" scheme="https://www.weigshare.com/categories/Python/"/>
    <category term="Python" scheme="https://www.weigshare.com/tags/Python/"/>
    <category term="PyQt6" scheme="https://www.weigshare.com/tags/PyQt6/"/>
    <category term="实验室" scheme="https://www.weigshare.com/tags/%E5%AE%9E%E9%AA%8C%E5%AE%A4/"/>
    <category term="化学分析" scheme="https://www.weigshare.com/tags/%E5%8C%96%E5%AD%A6%E5%88%86%E6%9E%90/"/>
    <category term="国标" scheme="https://www.weigshare.com/tags/%E5%9B%BD%E6%A0%87/"/>
    <category term="标准滴定液" scheme="https://www.weigshare.com/tags/%E6%A0%87%E5%87%86%E6%BB%B4%E5%AE%9A%E6%B6%B2/"/>
    <category term="标准溶液" scheme="https://www.weigshare.com/tags/%E6%A0%87%E5%87%86%E6%BA%B6%E6%B6%B2/"/>
    <content>
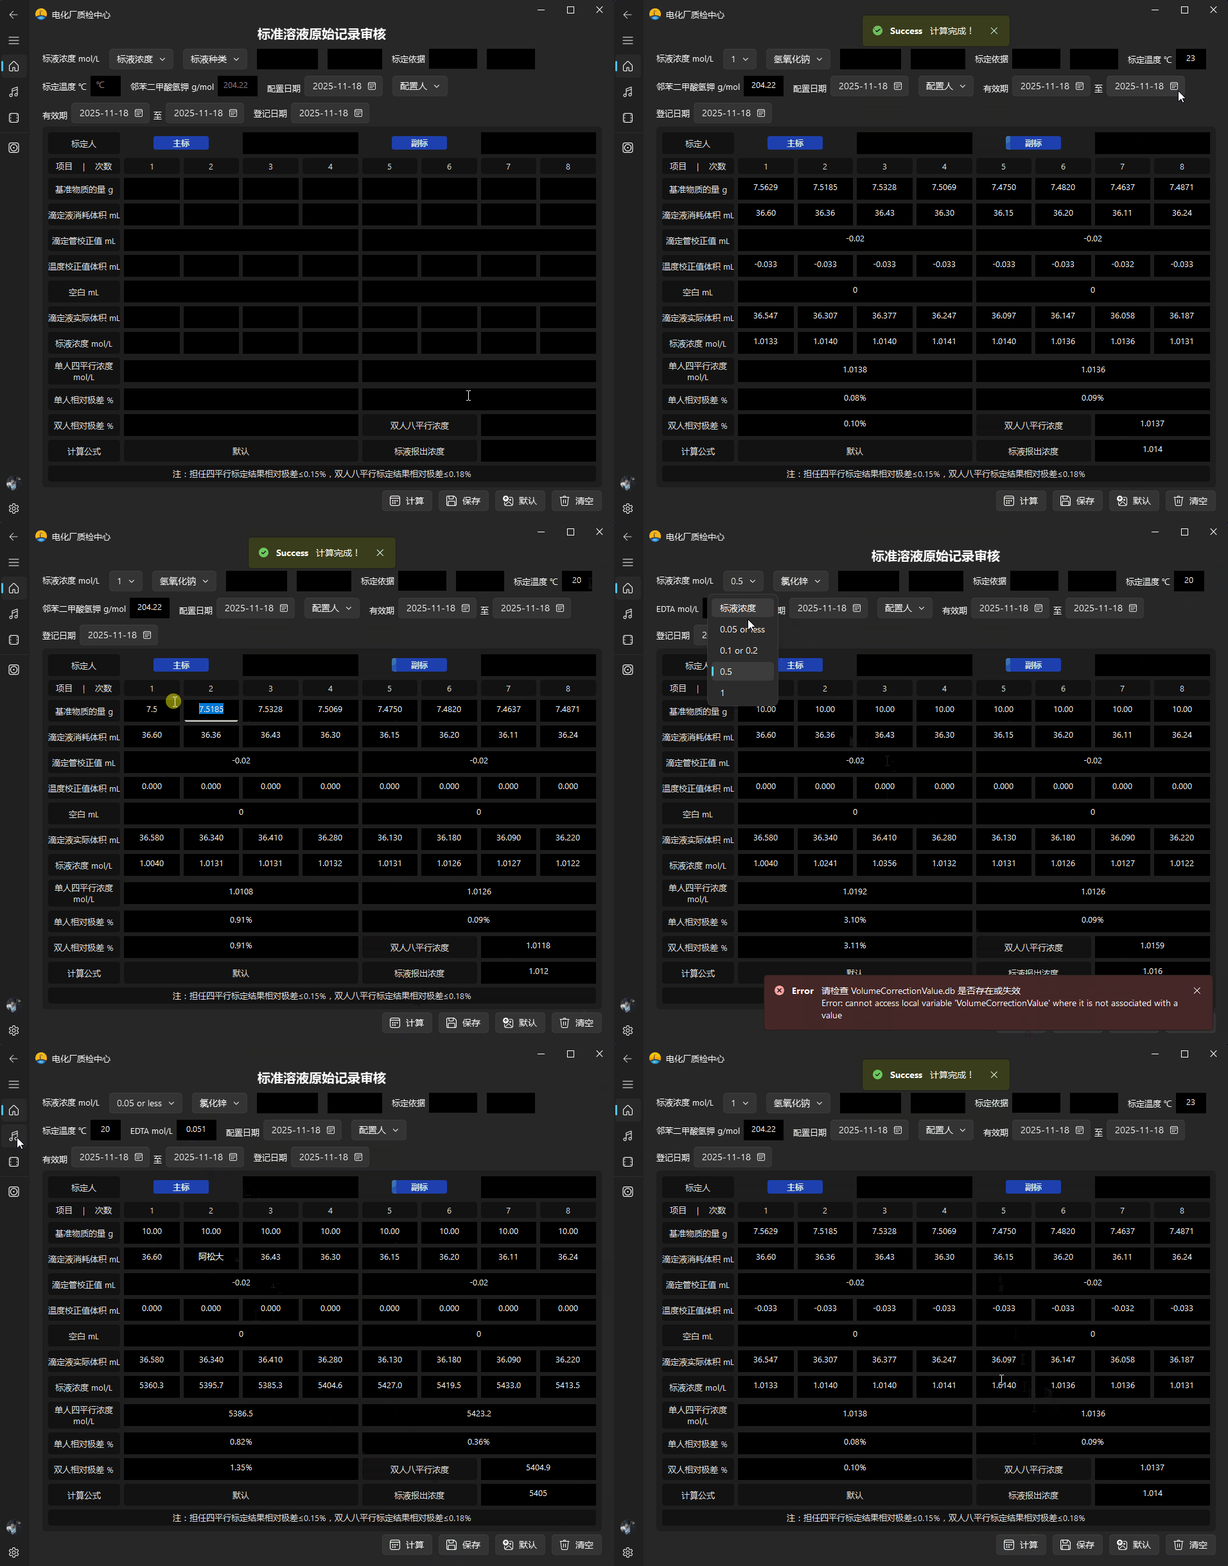
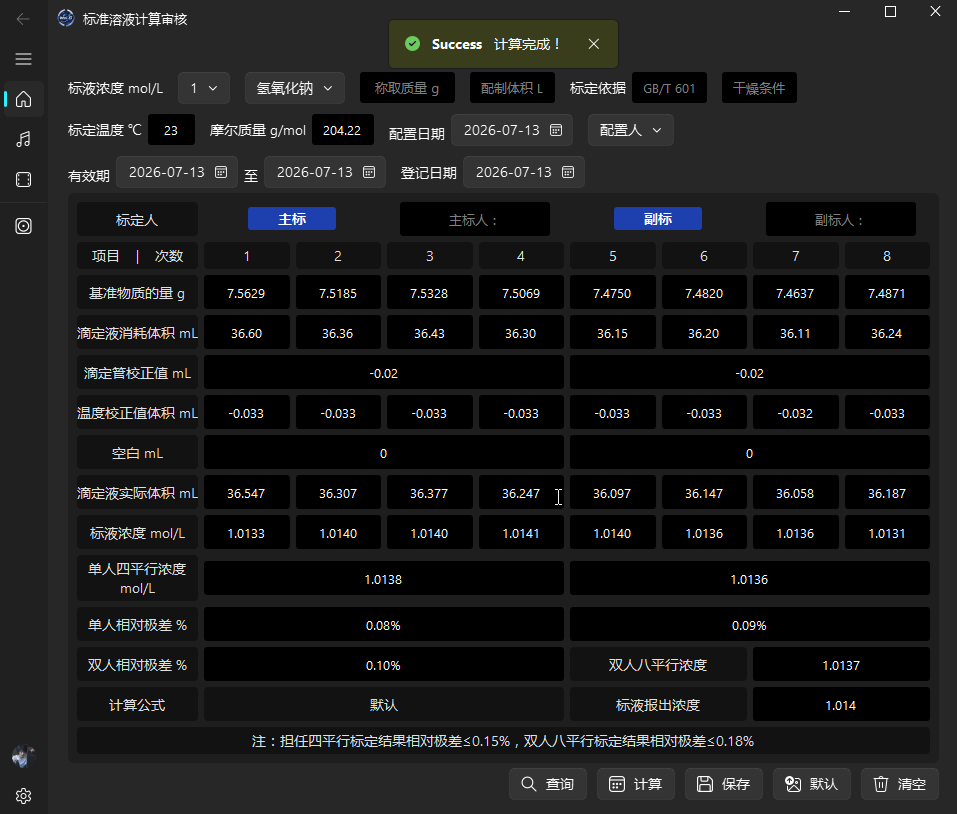
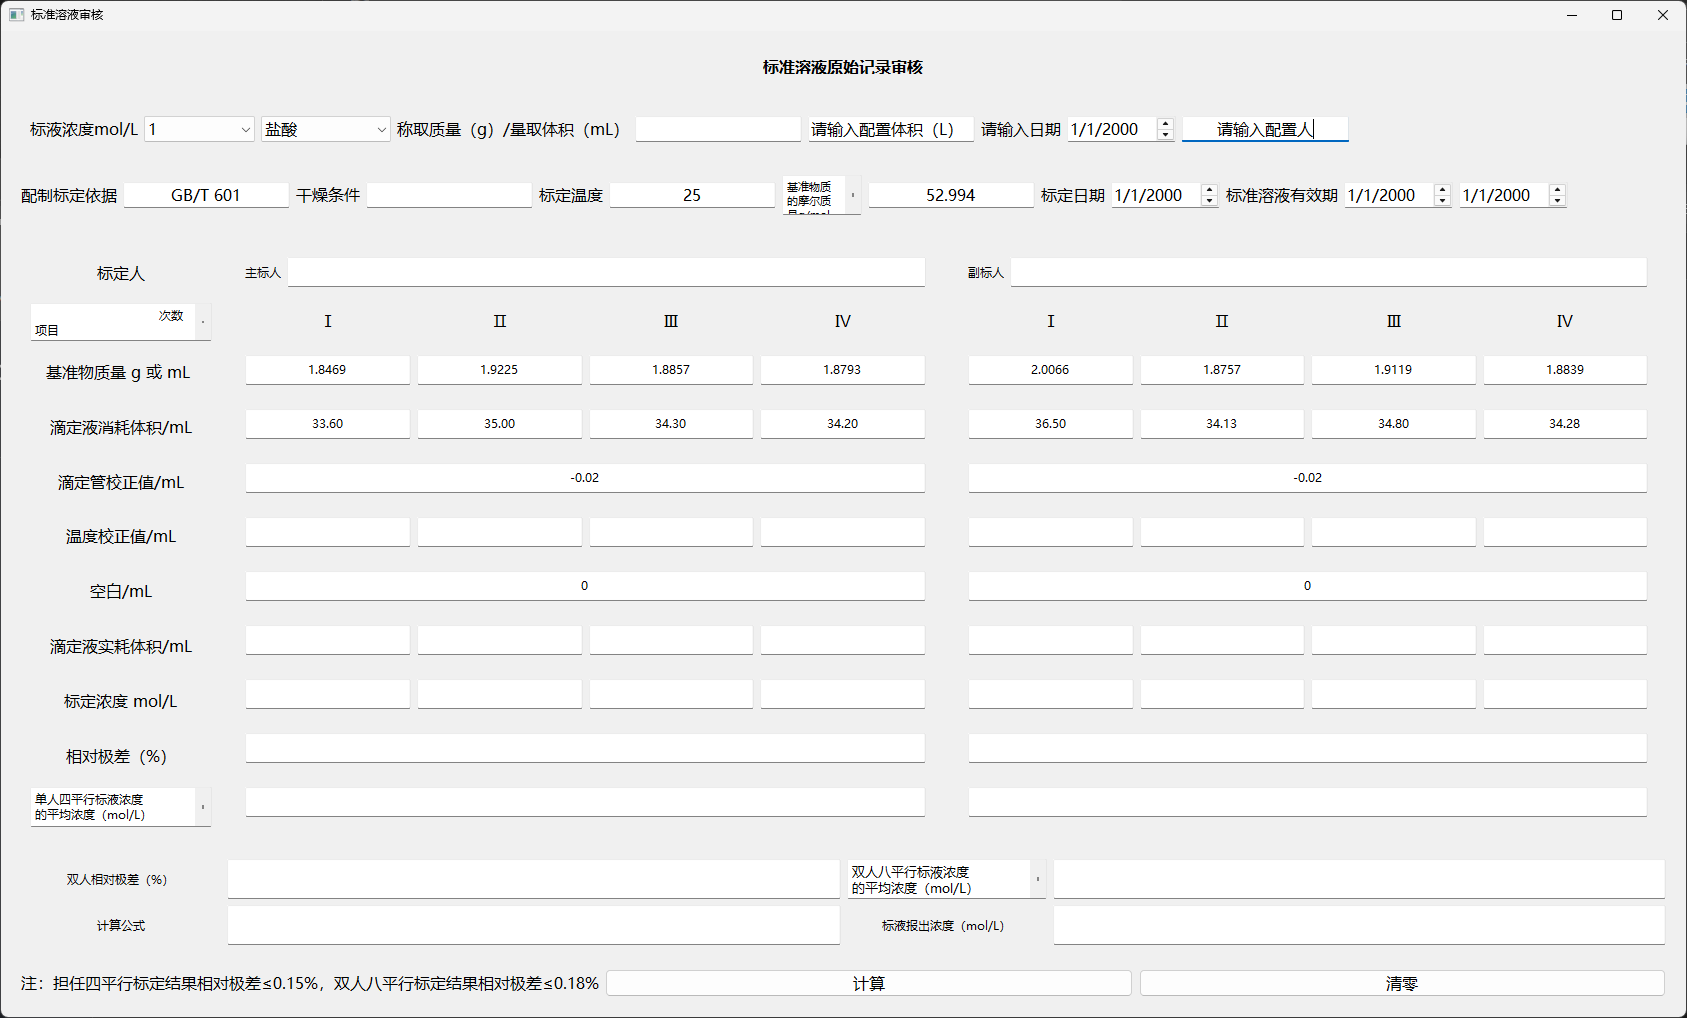
      <![CDATA[<h1 id="项目背景"><a href="#项目背景" class="headerlink" title="项目背景"></a>项目背景</h1><p>化学分析工作中需要大量配制和标定标准滴定溶液。标定完成后，需根据实验数据进行浓度计算、校正值换算及审核确认。人工计算和复核方式不仅效率较低，还容易因数据量大而产生计算或审核误差，增加质量管理风险。</p><ul><li><p>利用工作之余时间开发本系统，从 4 月立项到 11 月完成首个正式版本，历时 6 个多月，也是个人开发的第一个可视化桌面程序；</p></li><li><p>自主学习 Python 编程语言及 PyQt6 GUI 开发框架，独立完成软件设计、逻辑编码、测试与部署；QFluentWidgets 框架优化界面交互体验。</p></li><li><p>实际投入使用后，每人每周可节省约 1 小时以上的数据审核时间，实现了某个夜晚的一个梦——用半年开发一个工具，换来每周“偷懒”一小时。😆</p></li><li><p>近期刚离职，闲暇之余整理完毕，索性作为开源项目分享出来。</p></li></ul><h1 id="标准溶液计算审核系统"><a href="#标准溶液计算审核系统" class="headerlink" title="标准溶液计算审核系统"></a>标准溶液计算审核系统</h1><div align="left" style="display:flex;gap:10px;flex-wrap:wrap;justify-content:left;">  <img src="https://img.shields.io/badge/Python-3.12-blue" alt="Python">  <img src="https://img.shields.io/badge/PyQt6-GUI-green" alt="PyQt6">  <img src="https://img.shields.io/badge/SQLite-Database-blue" alt="SQLite">  <img src="https://img.shields.io/badge/GPL--3.0-red" alt="GPL3"></div><p>一款用于实验室标准溶液标定、计算与审核的软件。</p><p>支持温度校正、滴定管校正、单人四平行、双人八平行及相对极差自动计算，提高实验室标准溶液管理效率。</p><img src="https://img.weigshare.com/img/002.StandardSolution_Review_System_Demo_GIF.gif" ><p>输入实验数据后，即可自动完成计算与审核。开始使用 <a href="https://github.com/weigefenxiang/StandardSolutionReviewSystem/releases">exe</a></p><hr><h2 id="功能特点"><a href="#功能特点" class="headerlink" title="功能特点"></a>功能特点</h2><p>✅ 温度校正计算<br>✅ 滴定管校正值修正<br>✅ 标液浓度自动计算</p><p>✅ 单人四平行计算<br>✅ 双人八平行计算<br>✅ 相对极差计算<br>✅ 标液报出浓度计算</p><hr><h2 id="支持的标准溶液"><a href="#支持的标准溶液" class="headerlink" title="支持的标准溶液"></a>支持的标准溶液</h2><ul><li><p>盐酸、氢氧化钠、硫酸、高锰酸钾、硝酸银、硫代硫酸钠、乙二胺四乙酸（EDTA）、氯化锌、氢氧化钾-乙醇、碳酸钠等</p></li><li><p>HCl、NaOH、H₂SO₄、KMnO₄、AgNO₃、Na₂S₂O₃、EDTA、ZnCl₂、KOH-Ethanol、Na₂CO₃、Custom Molar Mass (g&#x2F;mol)</p></li><li><p><strong>自定义</strong></p></li></ul><hr><h2 id="软件界面"><a href="#软件界面" class="headerlink" title="软件界面"></a>软件界面</h2><h3 id="主界面"><a href="#主界面" class="headerlink" title="主界面"></a>主界面</h3><img src="https://img.weigshare.com/img/002.StandardSolution_Review_System_Demo.png" ><h4 id="旧界面"><a href="#旧界面" class="headerlink" title="旧界面"></a>旧界面</h4><p>经过多次迭代</p><img src=https://img.weigshare.com/img/002.002.StandardSolution_Review_System_Demo_old.png ><table><thead><tr><th><strong>支持录入</strong></th><th><strong>自动生成</strong></th></tr></thead><tbody><tr><td>基准物质质量</td><td>实际滴定体积</td></tr><tr><td>滴定液消耗体积</td><td>单人四平行浓度</td></tr><tr><td>滴定管校正值</td><td>双人八平行浓度</td></tr><tr><td>温度校正值</td><td>相对极差</td></tr><tr><td>空白试验体积</td><td>报出浓度</td></tr></tbody></table><hr><h2 id="运行方式"><a href="#运行方式" class="headerlink" title="运行方式"></a>运行方式</h2><h3 id="网页版"><a href="#网页版" class="headerlink" title="网页版"></a>网页版</h3><p>点击这里 <strong>→ <a href="https://www.weigeshare.com/standard">网页预览</a></strong></p><h3 id="发布版"><a href="#发布版" class="headerlink" title="发布版"></a>发布版</h3><p>下载 并 运行 <a href="https://github.com/weigefenxiang/StandardSolutionReviewSystem/releases">exe</a>：</p><pre class="line-numbers language-text" data-language="text"><code class="language-text">StandardSolution_ReviewSystem.exe<span aria-hidden="true" class="line-numbers-rows"><span></span></span></code></pre><h2 id="源码运行"><a href="#源码运行" class="headerlink" title="源码运行"></a>源码运行</h2><details>    <summary>点击展开</summary><h3 id="开发环境"><a href="#开发环境" class="headerlink" title="开发环境"></a>开发环境</h3><ul><li>Windows 11</li><li>Python 3.12</li><li>PyQt6</li><li>QFluentWidgets</li><li>SQLite</li><li>Nuitka（用于打包）</li></ul><h3 id="安装依赖"><a href="#安装依赖" class="headerlink" title="安装依赖"></a>安装依赖</h3><pre class="line-numbers language-bash" data-language="bash"><code class="language-bash">pip <span class="token function">install</span> <span class="token parameter variable">-r</span> requirements.txt<span aria-hidden="true" class="line-numbers-rows"><span></span></span></code></pre><h3 id="运行程序"><a href="#运行程序" class="headerlink" title="运行程序"></a>运行程序</h3><pre class="line-numbers language-bash" data-language="bash"><code class="language-bash">python Flu_Main.py<span aria-hidden="true" class="line-numbers-rows"><span></span></span></code></pre><h2 id="开源协议"><a href="#开源协议" class="headerlink" title="开源协议"></a>开源协议</h2><p>本项目采用 GPL-3.0 License 开源。</p><p>使用、修改和分发本项目时，请遵守 GPL-3.0 许可证要求。</p><h2 id="第三方开源组件"><a href="#第三方开源组件" class="headerlink" title="第三方开源组件"></a>第三方开源组件</h2><p>本项目使用了以下开源项目：</p><ul><li>Python、PyQt6、QFluentWidgets、SQLite、Nuitka</li></ul><p>感谢所有开源项目开发者的贡献。</p></details>]]>
    </content>
    <id>https://www.weigshare.com/posts/StandardSolution-Review-Soft/</id>
    <link href="https://www.weigshare.com/posts/StandardSolution-Review-Soft/"/>
    <published>2026-07-02T01:19:11.000Z</published>
    <summary>基于 Python、PyQt6、QFluentWidgets 与 SQLite 开发的实验室Windows标准溶液计算审核系统，支持温度校正、滴定管校正、平行样统计及相对极差自动计算。</summary>
    <title>标准溶液计算审核系统（Standard Solution Review System）</title>
    <updated>2026-08-30T13:25:49.067Z</updated>
  </entry>
  <entry>
    <author>
      <name>Wei.G</name>
    </author>
    <category term="Hexo" scheme="https://www.weigshare.com/tags/Hexo/"/>
    <category term="Butterfly" scheme="https://www.weigshare.com/tags/Butterfly/"/>
    <category term="Cloudflare" scheme="https://www.weigshare.com/tags/Cloudflare/"/>
    <content>
      <![CDATA[<p>欢迎来到我的博客。</p><p>这是第一篇文章。</p>]]>
    </content>
    <id>https://www.weigshare.com/posts/Hello-Butterfly/</id>
    <link href="https://www.weigshare.com/posts/Hello-Butterfly/"/>
    <published>2026-07-01T03:51:11.000Z</published>
    <summary>
      <![CDATA[<p>欢迎来到我的博客。</p>
<p>这是第一篇文章。</p>]]>
    </summary>
    <title>Hello Butterfly</title>
    <updated>2026-08-30T13:25:49.067Z</updated>
  </entry>
</feed>